I live with my Giant Maso Mastiff, Sunny, in the beautiful Shenandoah Valley. I love to serve dinner out on the back deck, have a campfire with family and friends, and take my knitting, spinning or crocheting everywhere I go! Most of all, I love to bring some sunshine to another person's day and see them go on their way with a smile on their face!
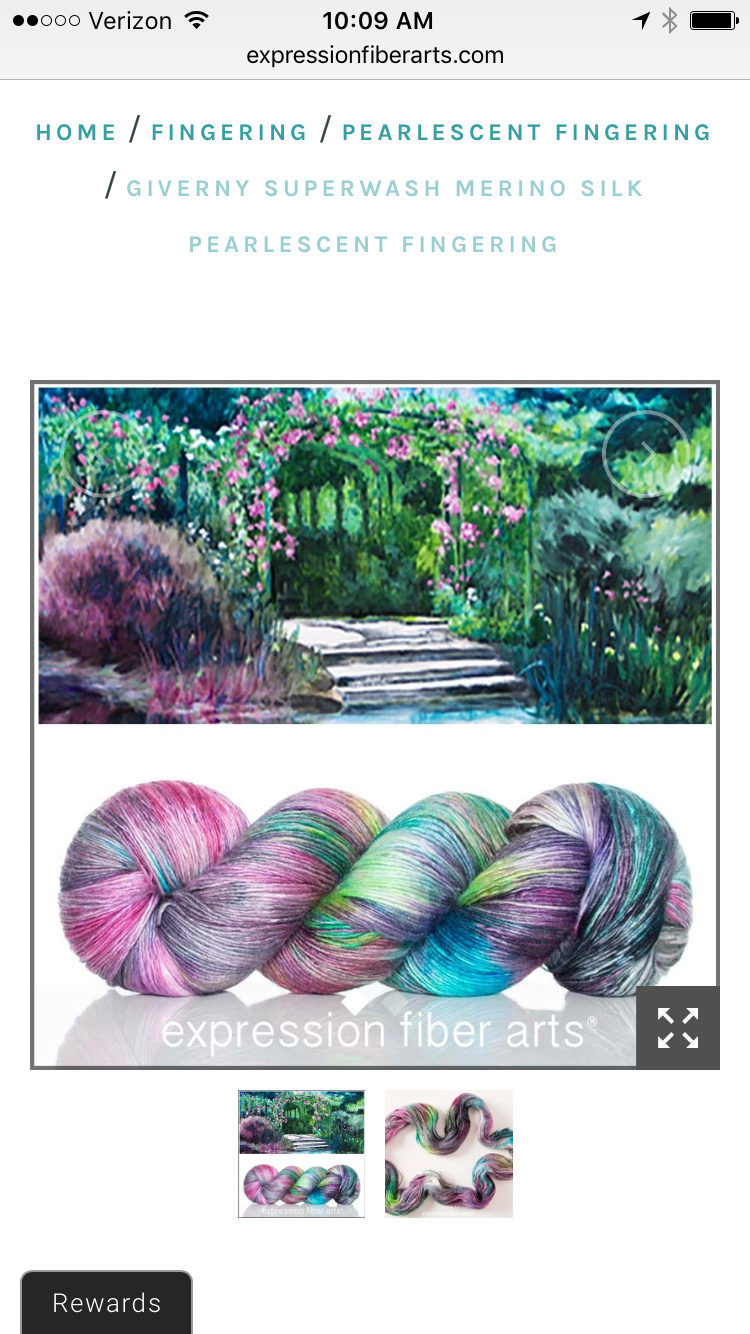
Once we’d collectively clicked “Submit” on our four skeins (one for each of us plus a lovely mint green that coordinates perfectly!)…
…it didn’t take long for the idea of designing “sister” scarves to pop into my head! (By “sister” scarves, I mean three different scarves unique to each personality and style, but clearly belonging together. 🙂 My plan is to name each scarf after the friend who inspired it. 🙂
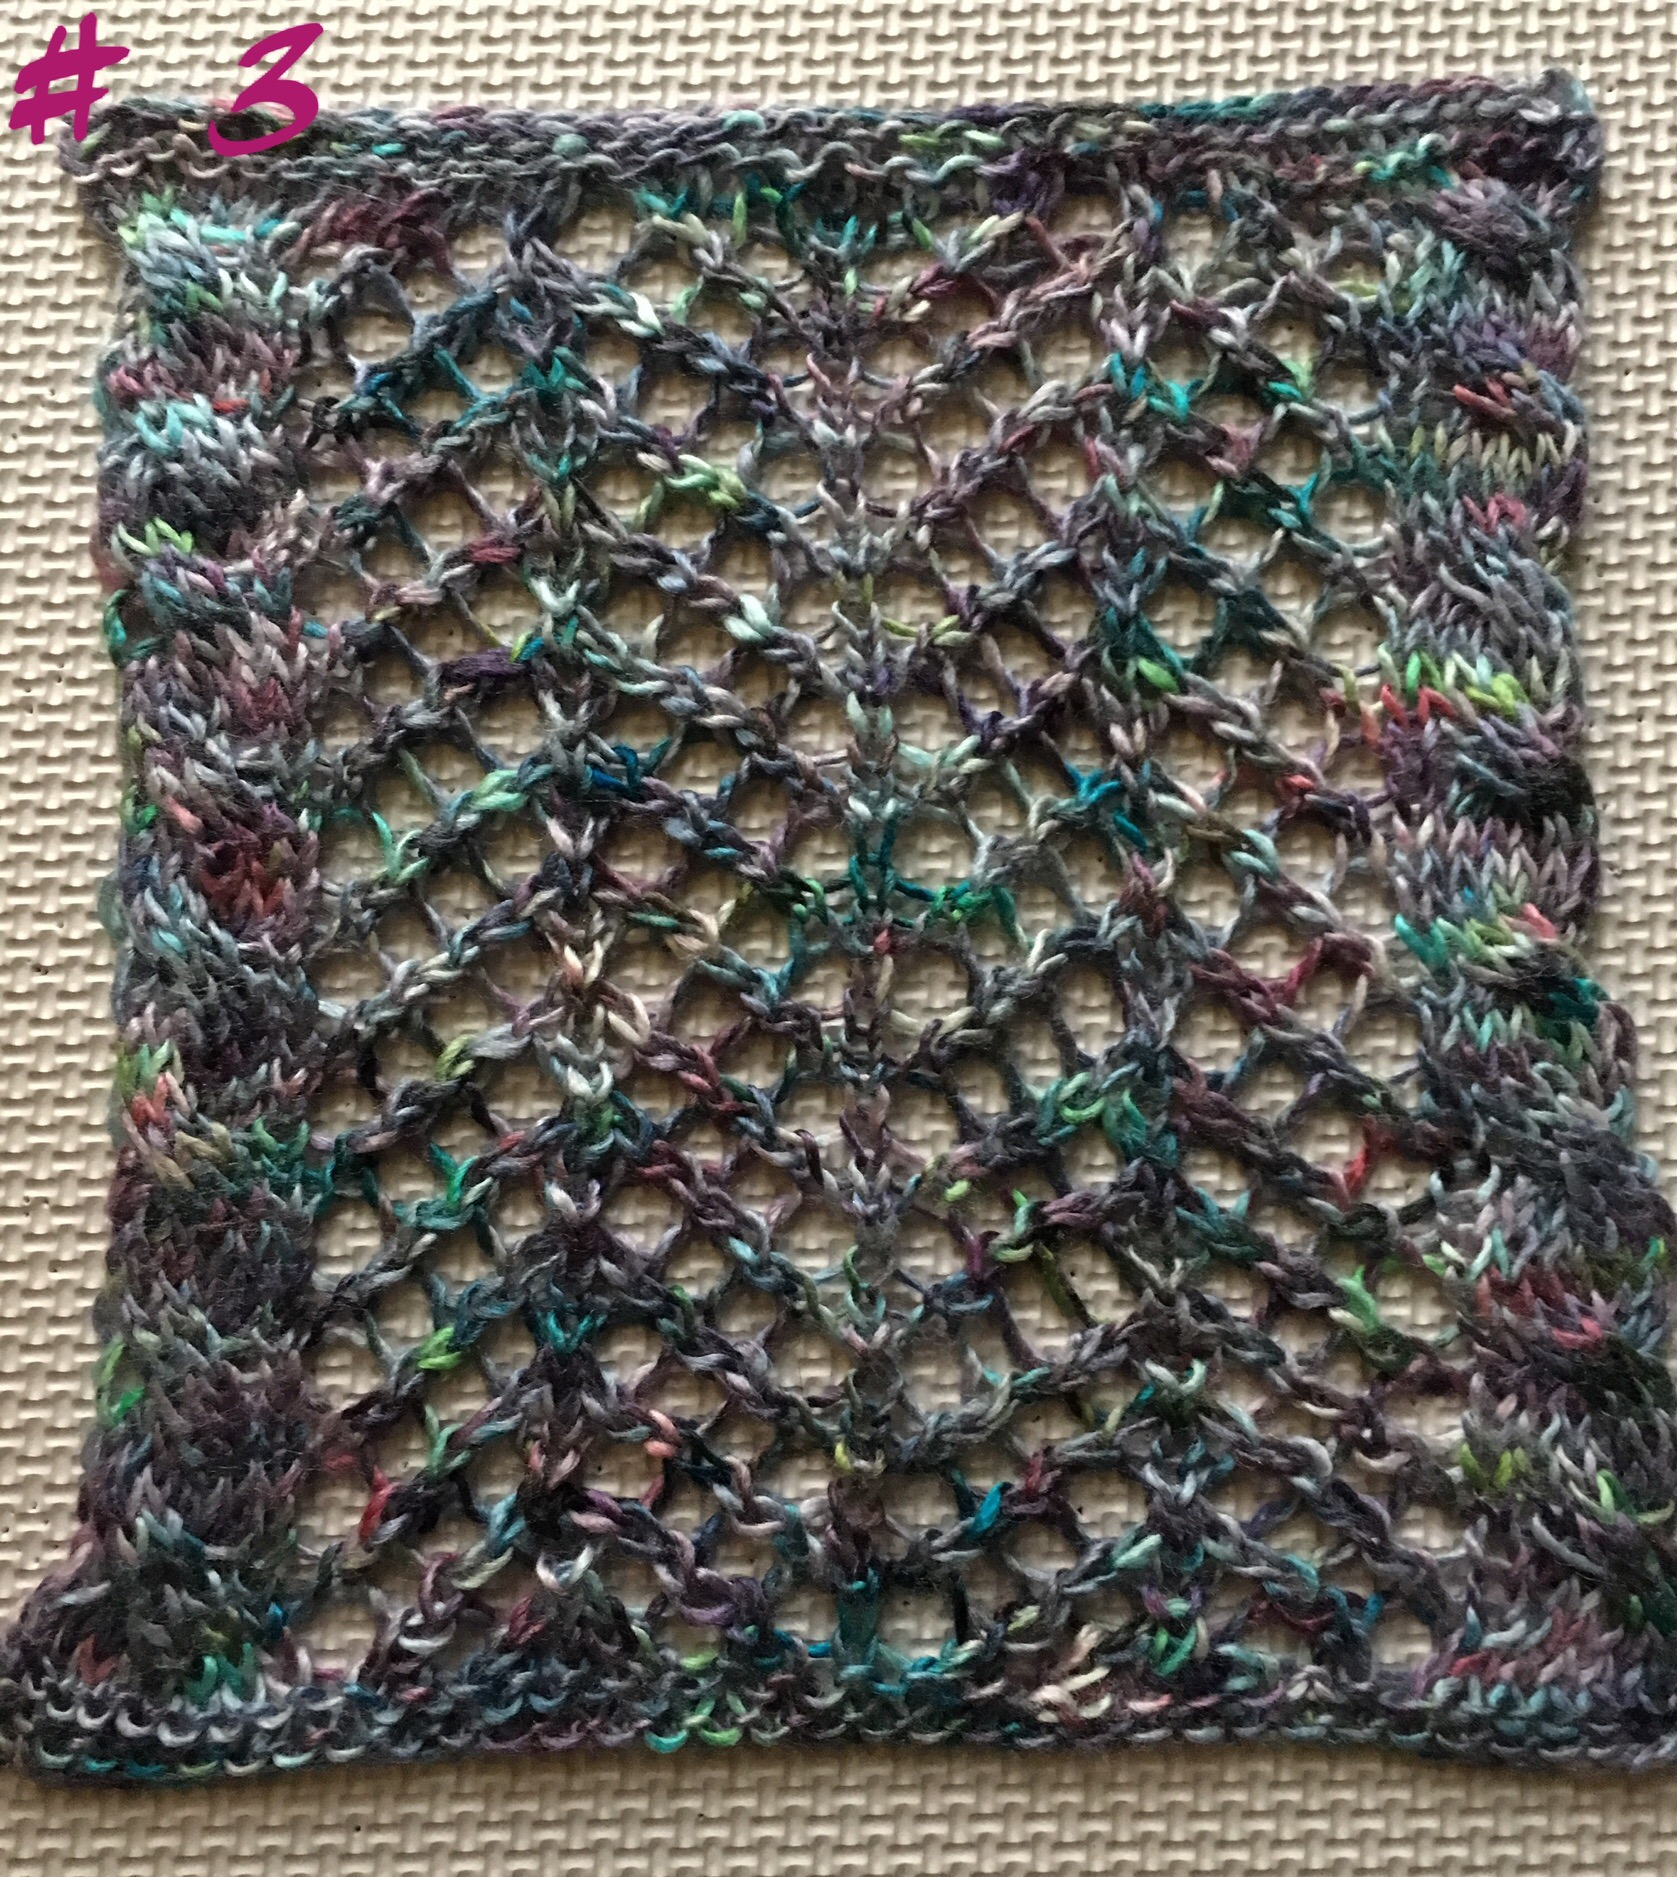
So I swatched several stitch patterns and brought them to K & K for evaluation.
Arrowhead Lace with CablesFalling LeavesNorwegian Fir Tree
The general consensus was that since they were all fun and lovely, it was nearly impossible to decide which to use!!!
If you follow me on social media, you may remember voting on this to help us decide! 😉
Once Kathryn & Kayla had chosen their stitch patterns, we discussed style…!
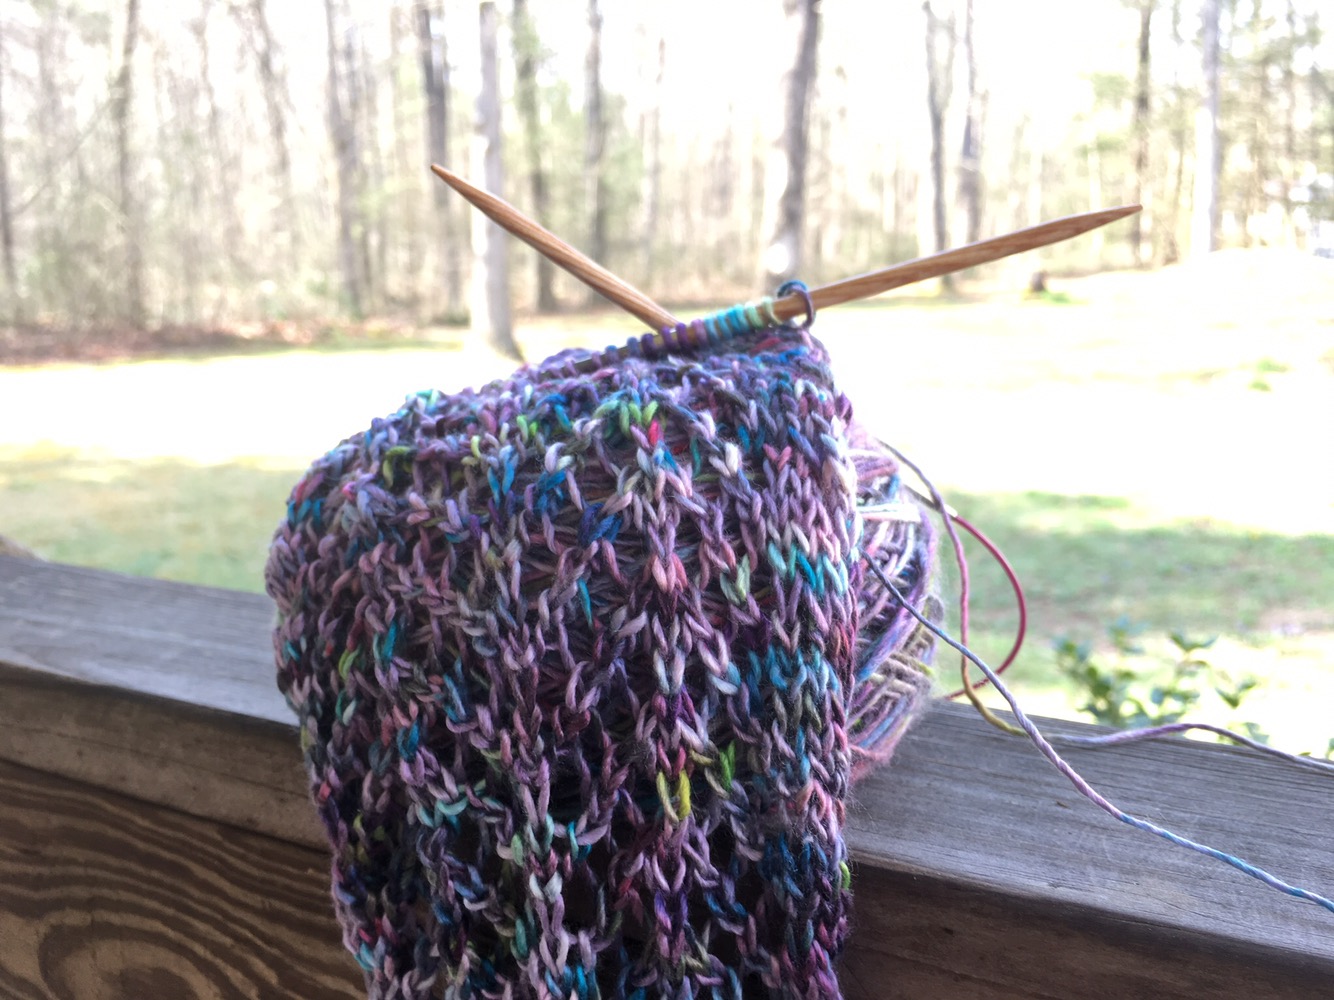
Kathryn opted for a super long & slender scarf with a very open and lacey stitch pattern called “Arrowhead Lace with Cables.” It will be very dramatic, and also very versatile, perfect for wear in almost every season!
Given that Kathryn is a talented artist and a wonderfully practical lady, I think this is a very pleasant reflection of her personality. 🙂
Kayla selected “Falling Leaves” as her stitch pattern and chose to go with an infinity style scarf.
A more solid lace compared to Arrowhead, Falling Leaves has a very elegant, flowing quality and I’ve no doubt will produce a joyful, eye-catching statement piece! (I see this scarf as representative of Kayla’s brilliance and expressive of her fullness of the joy and enthusiasm of life!)
Though so different, I think both combinations of stitch pattern and style will showcase the special yarn really well!
Arrowhead Lace with Cables is an easy-to-memorize stitch pattern,
…and because the “Kathryn” scarf is narrow the rows are short;
…so I feel like the scarf is just flying off my needles!
Slightly different story with the “Kayla” infinity scarf, however…
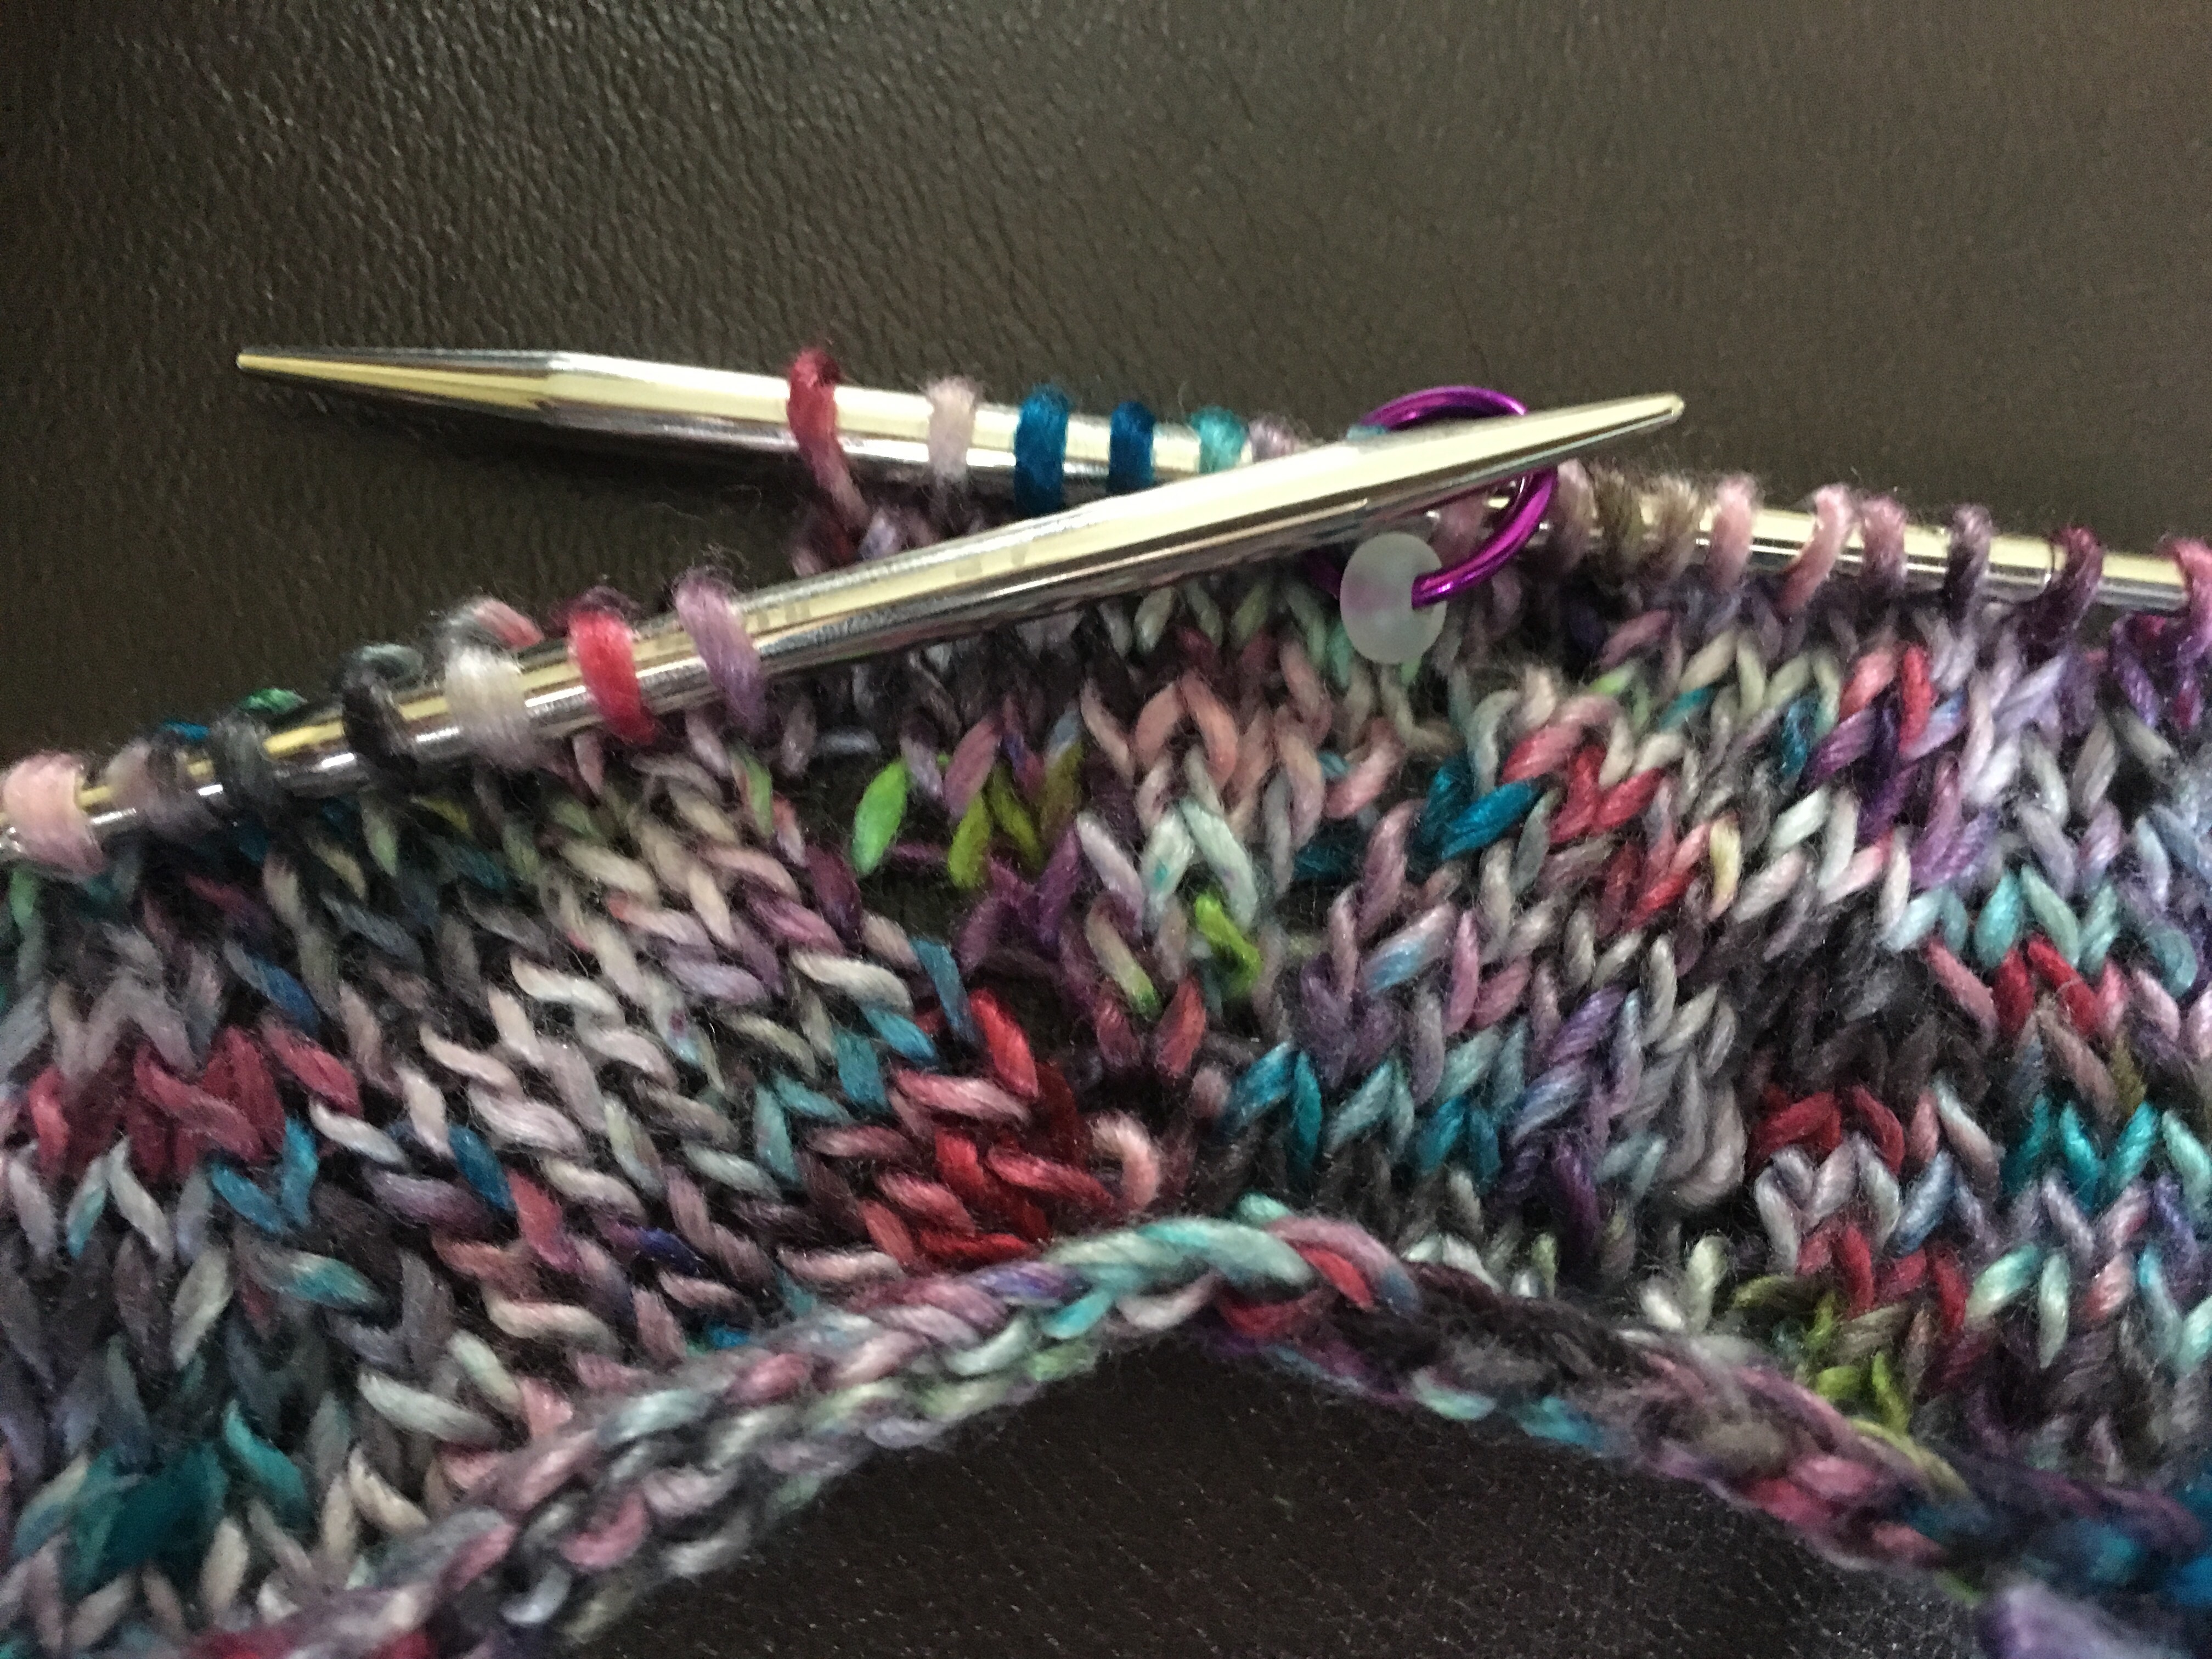
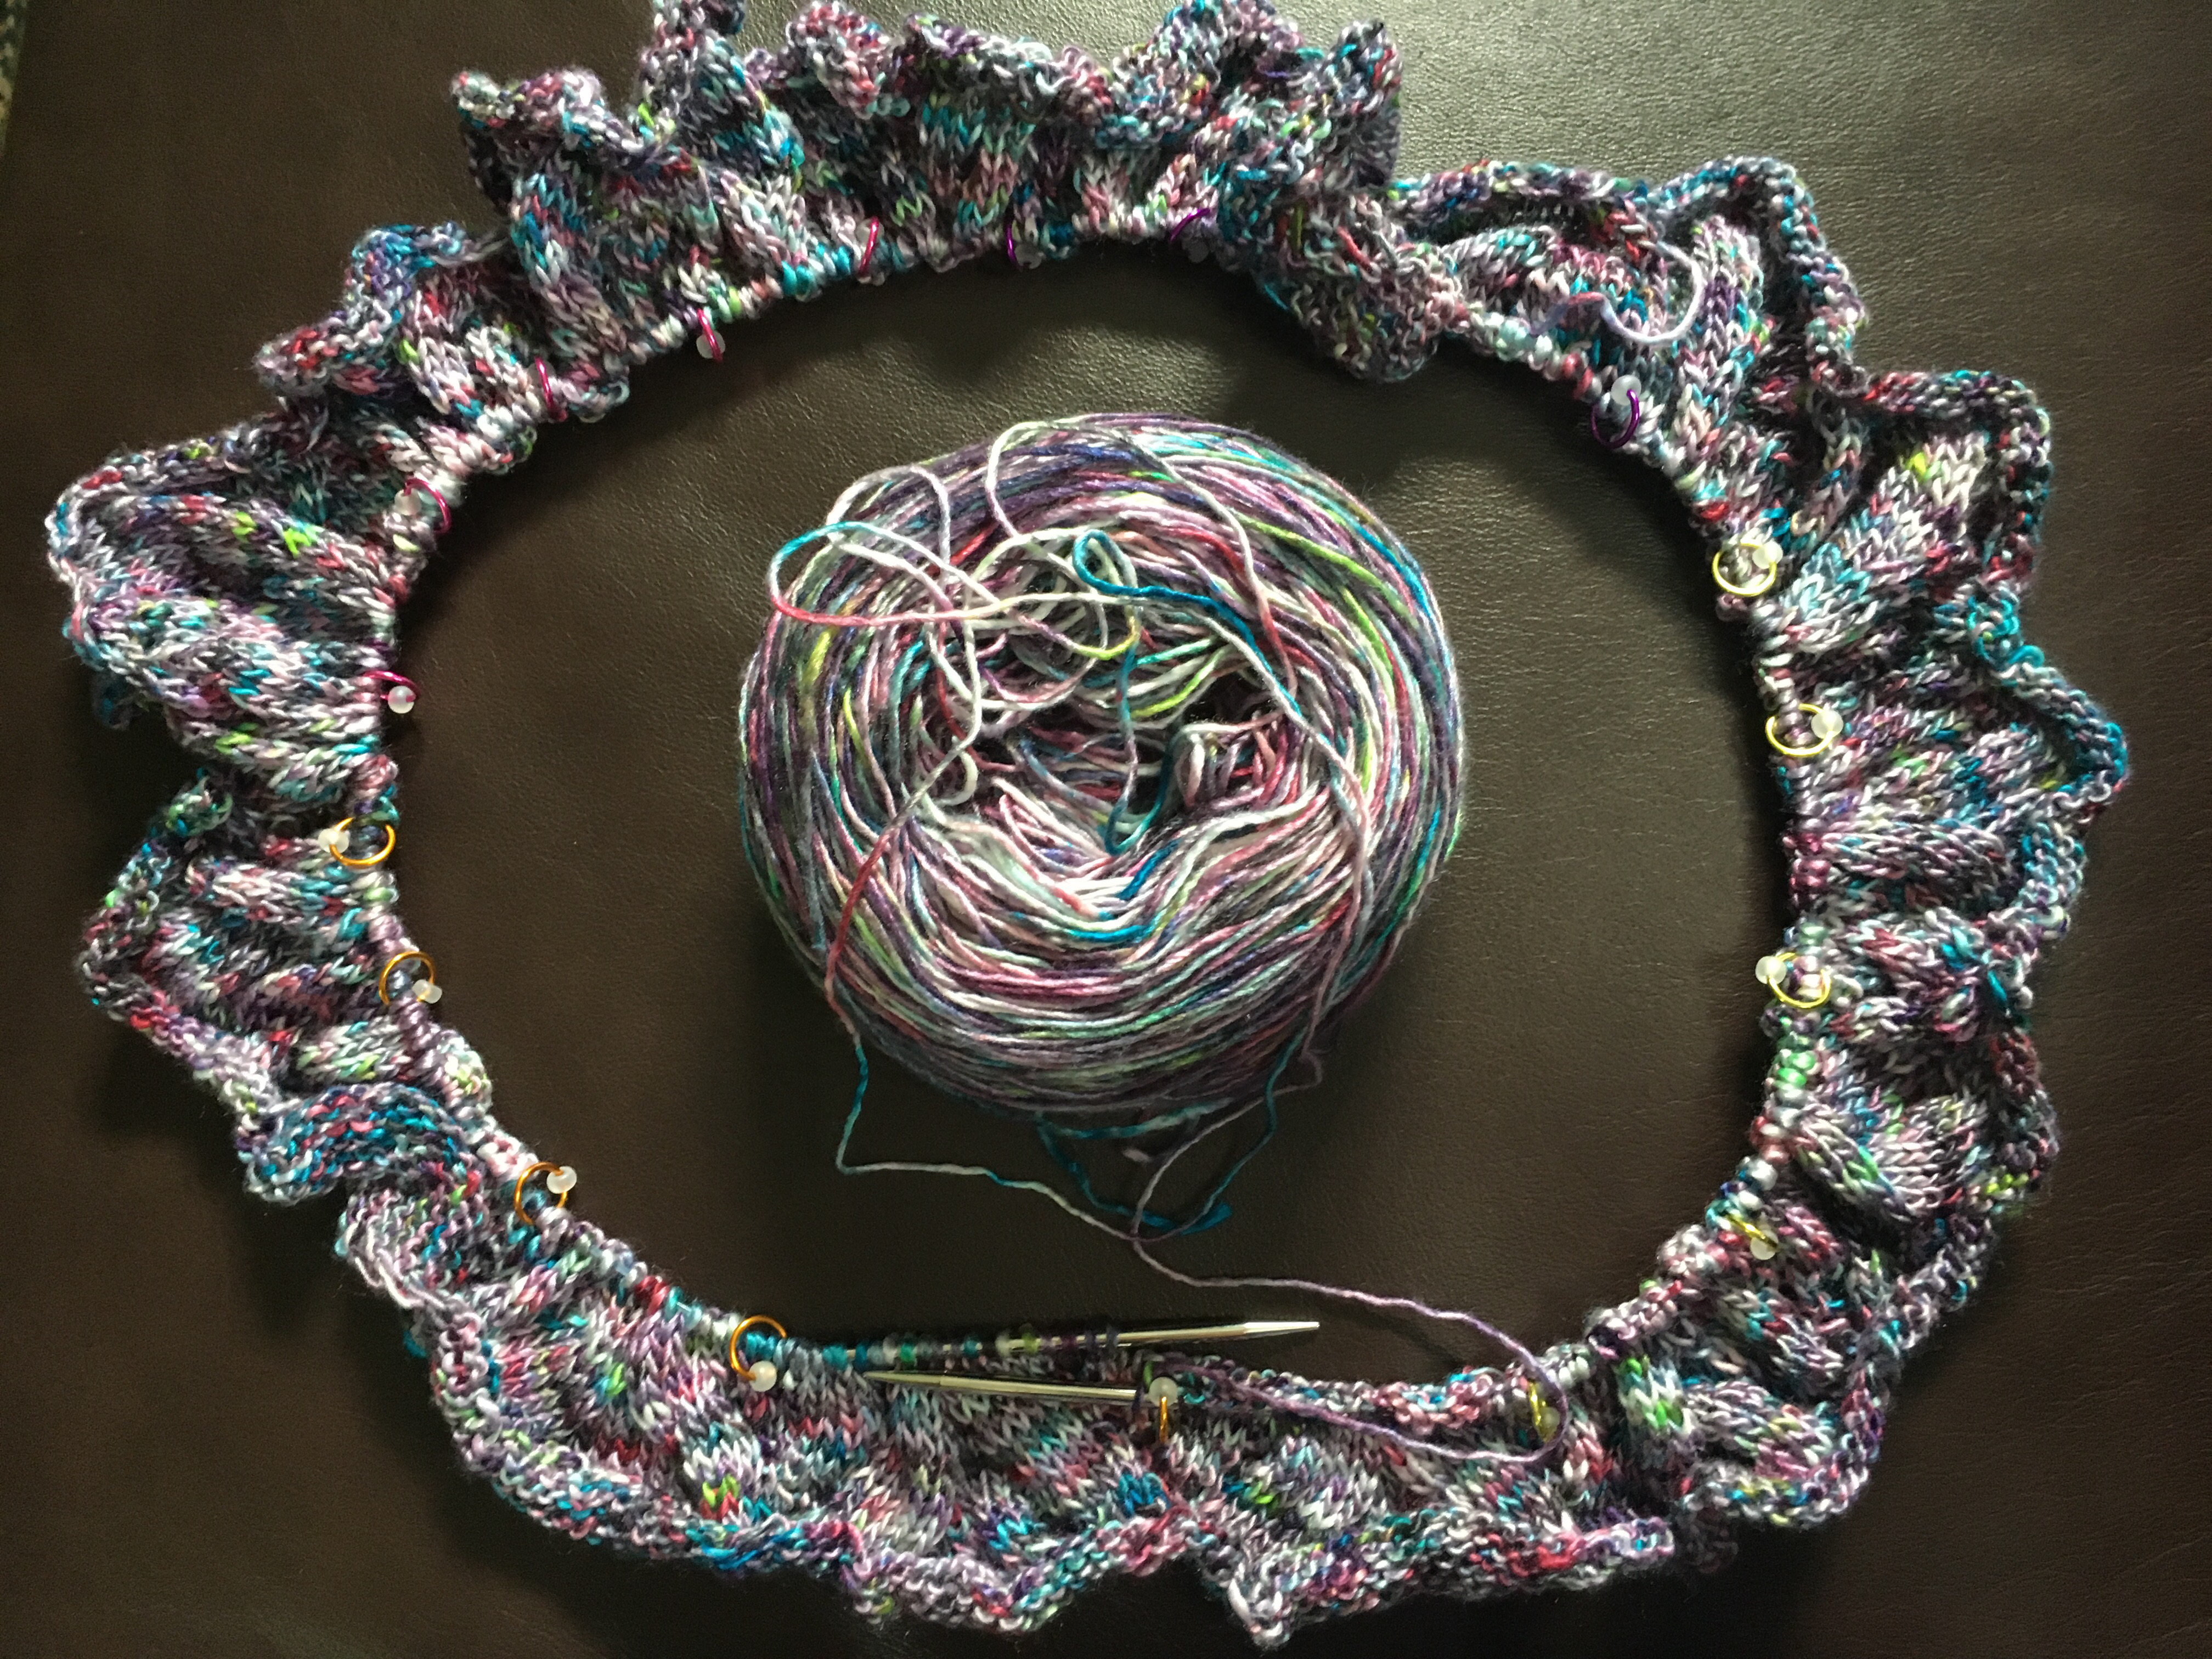
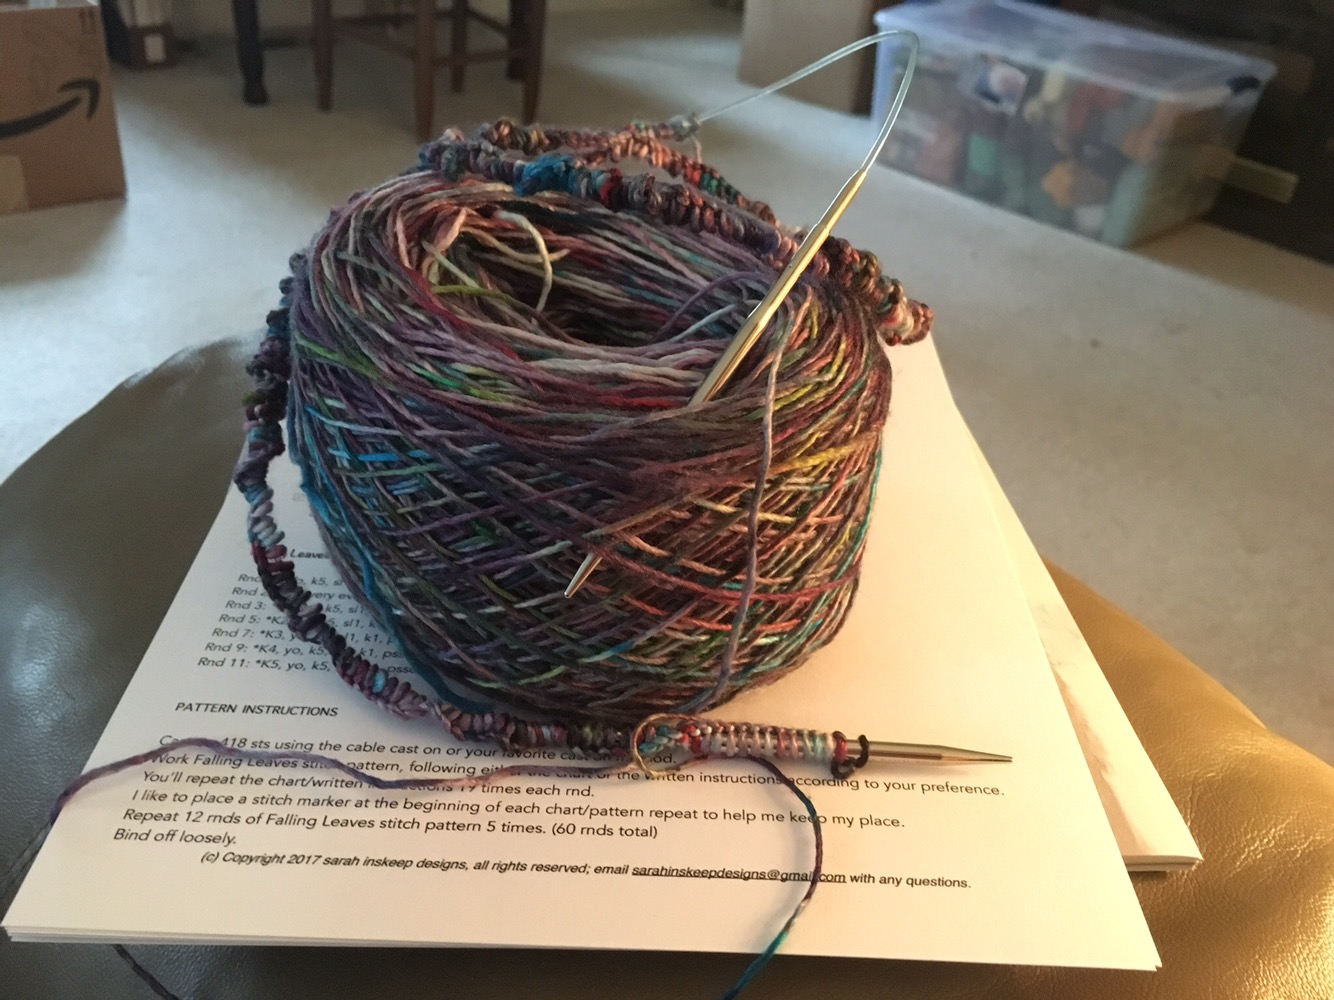
To get the “Falling Leaves” to lay the way we imagined them, “Kayla” is knit in the round. In order to create enough volume to drape the scarf twice about the neck, I’m working 19 22-stitch repeats. That means a big long cast-on. A really big, 418 stitch cast-on! Which I have already done twice and will now be doing a third time!
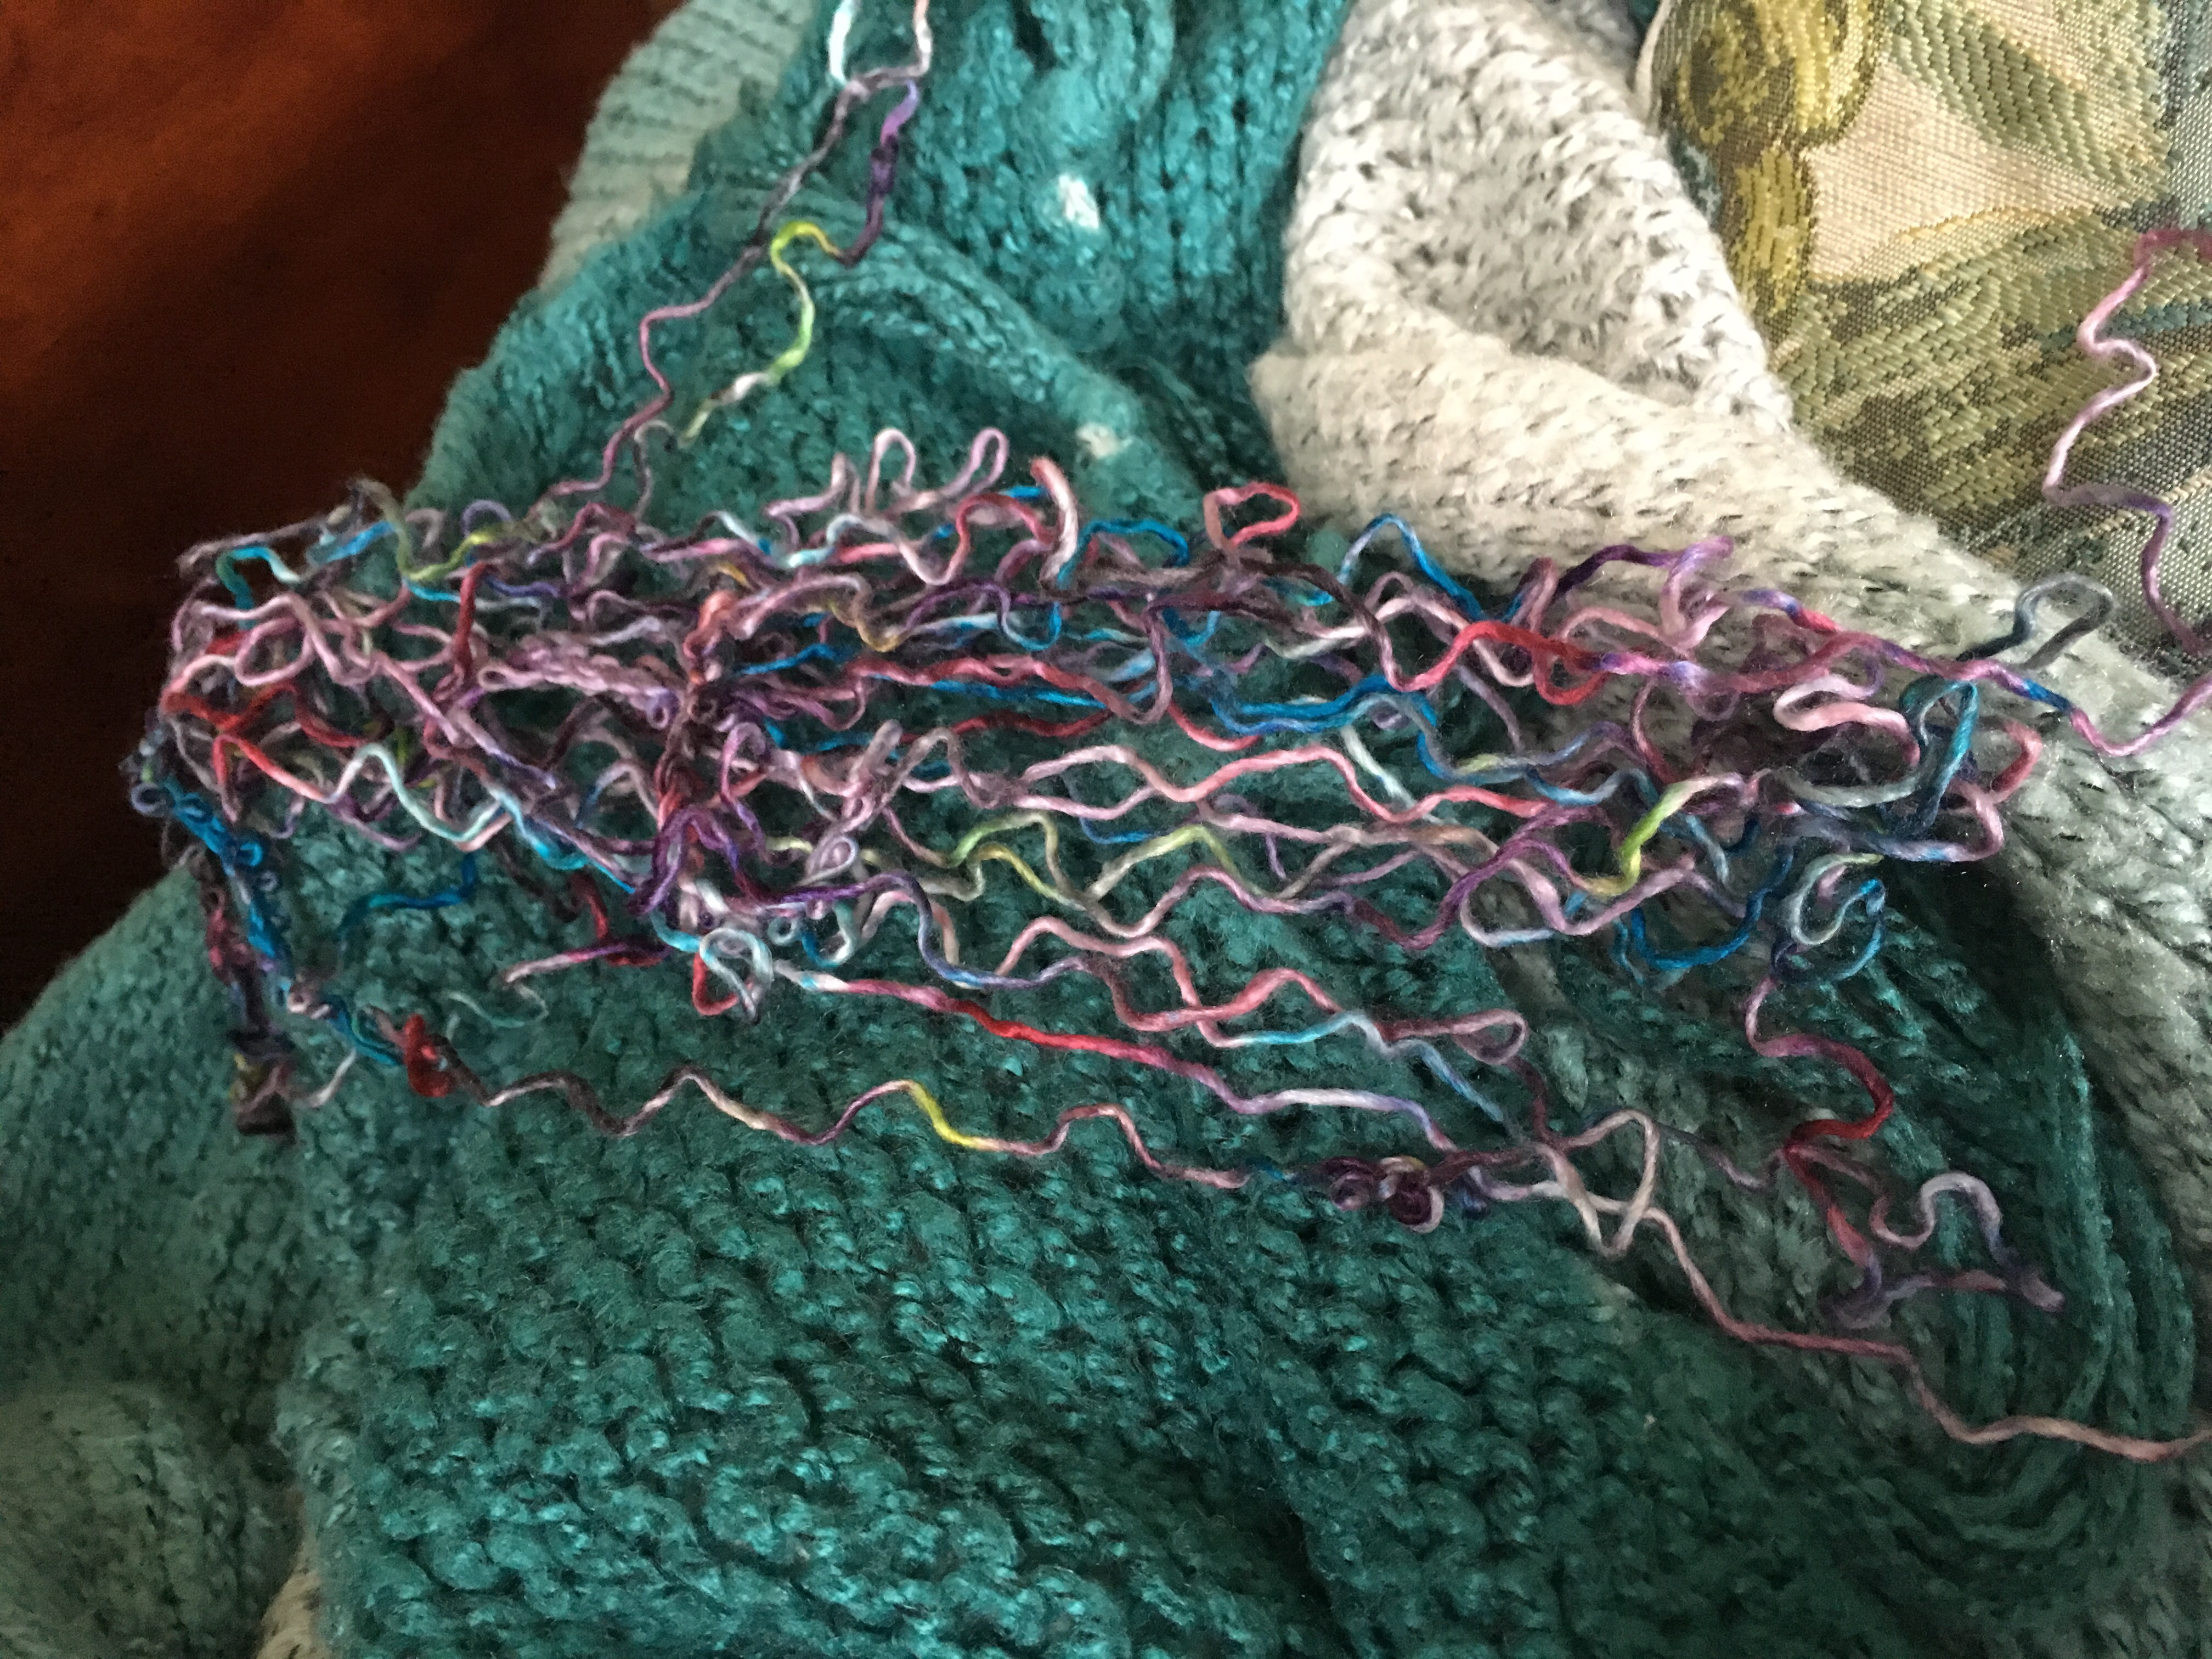
The difficulty with such a large numbers of cast-on stitches, is joining to work in the round. Specifically, it’s super hard to avoid getting a twist in your cast-on! Even when you’ve checked and re-checked and you think you’ve got it, you may later discover a pesky twist lurking! Which is what happened to me today….!
After working 1.5 pattern repeats (that’s 18 rounds, or 7,524 stitches)…
I noticed this:
A twist! Aaauuuggghhh! Do you see it?
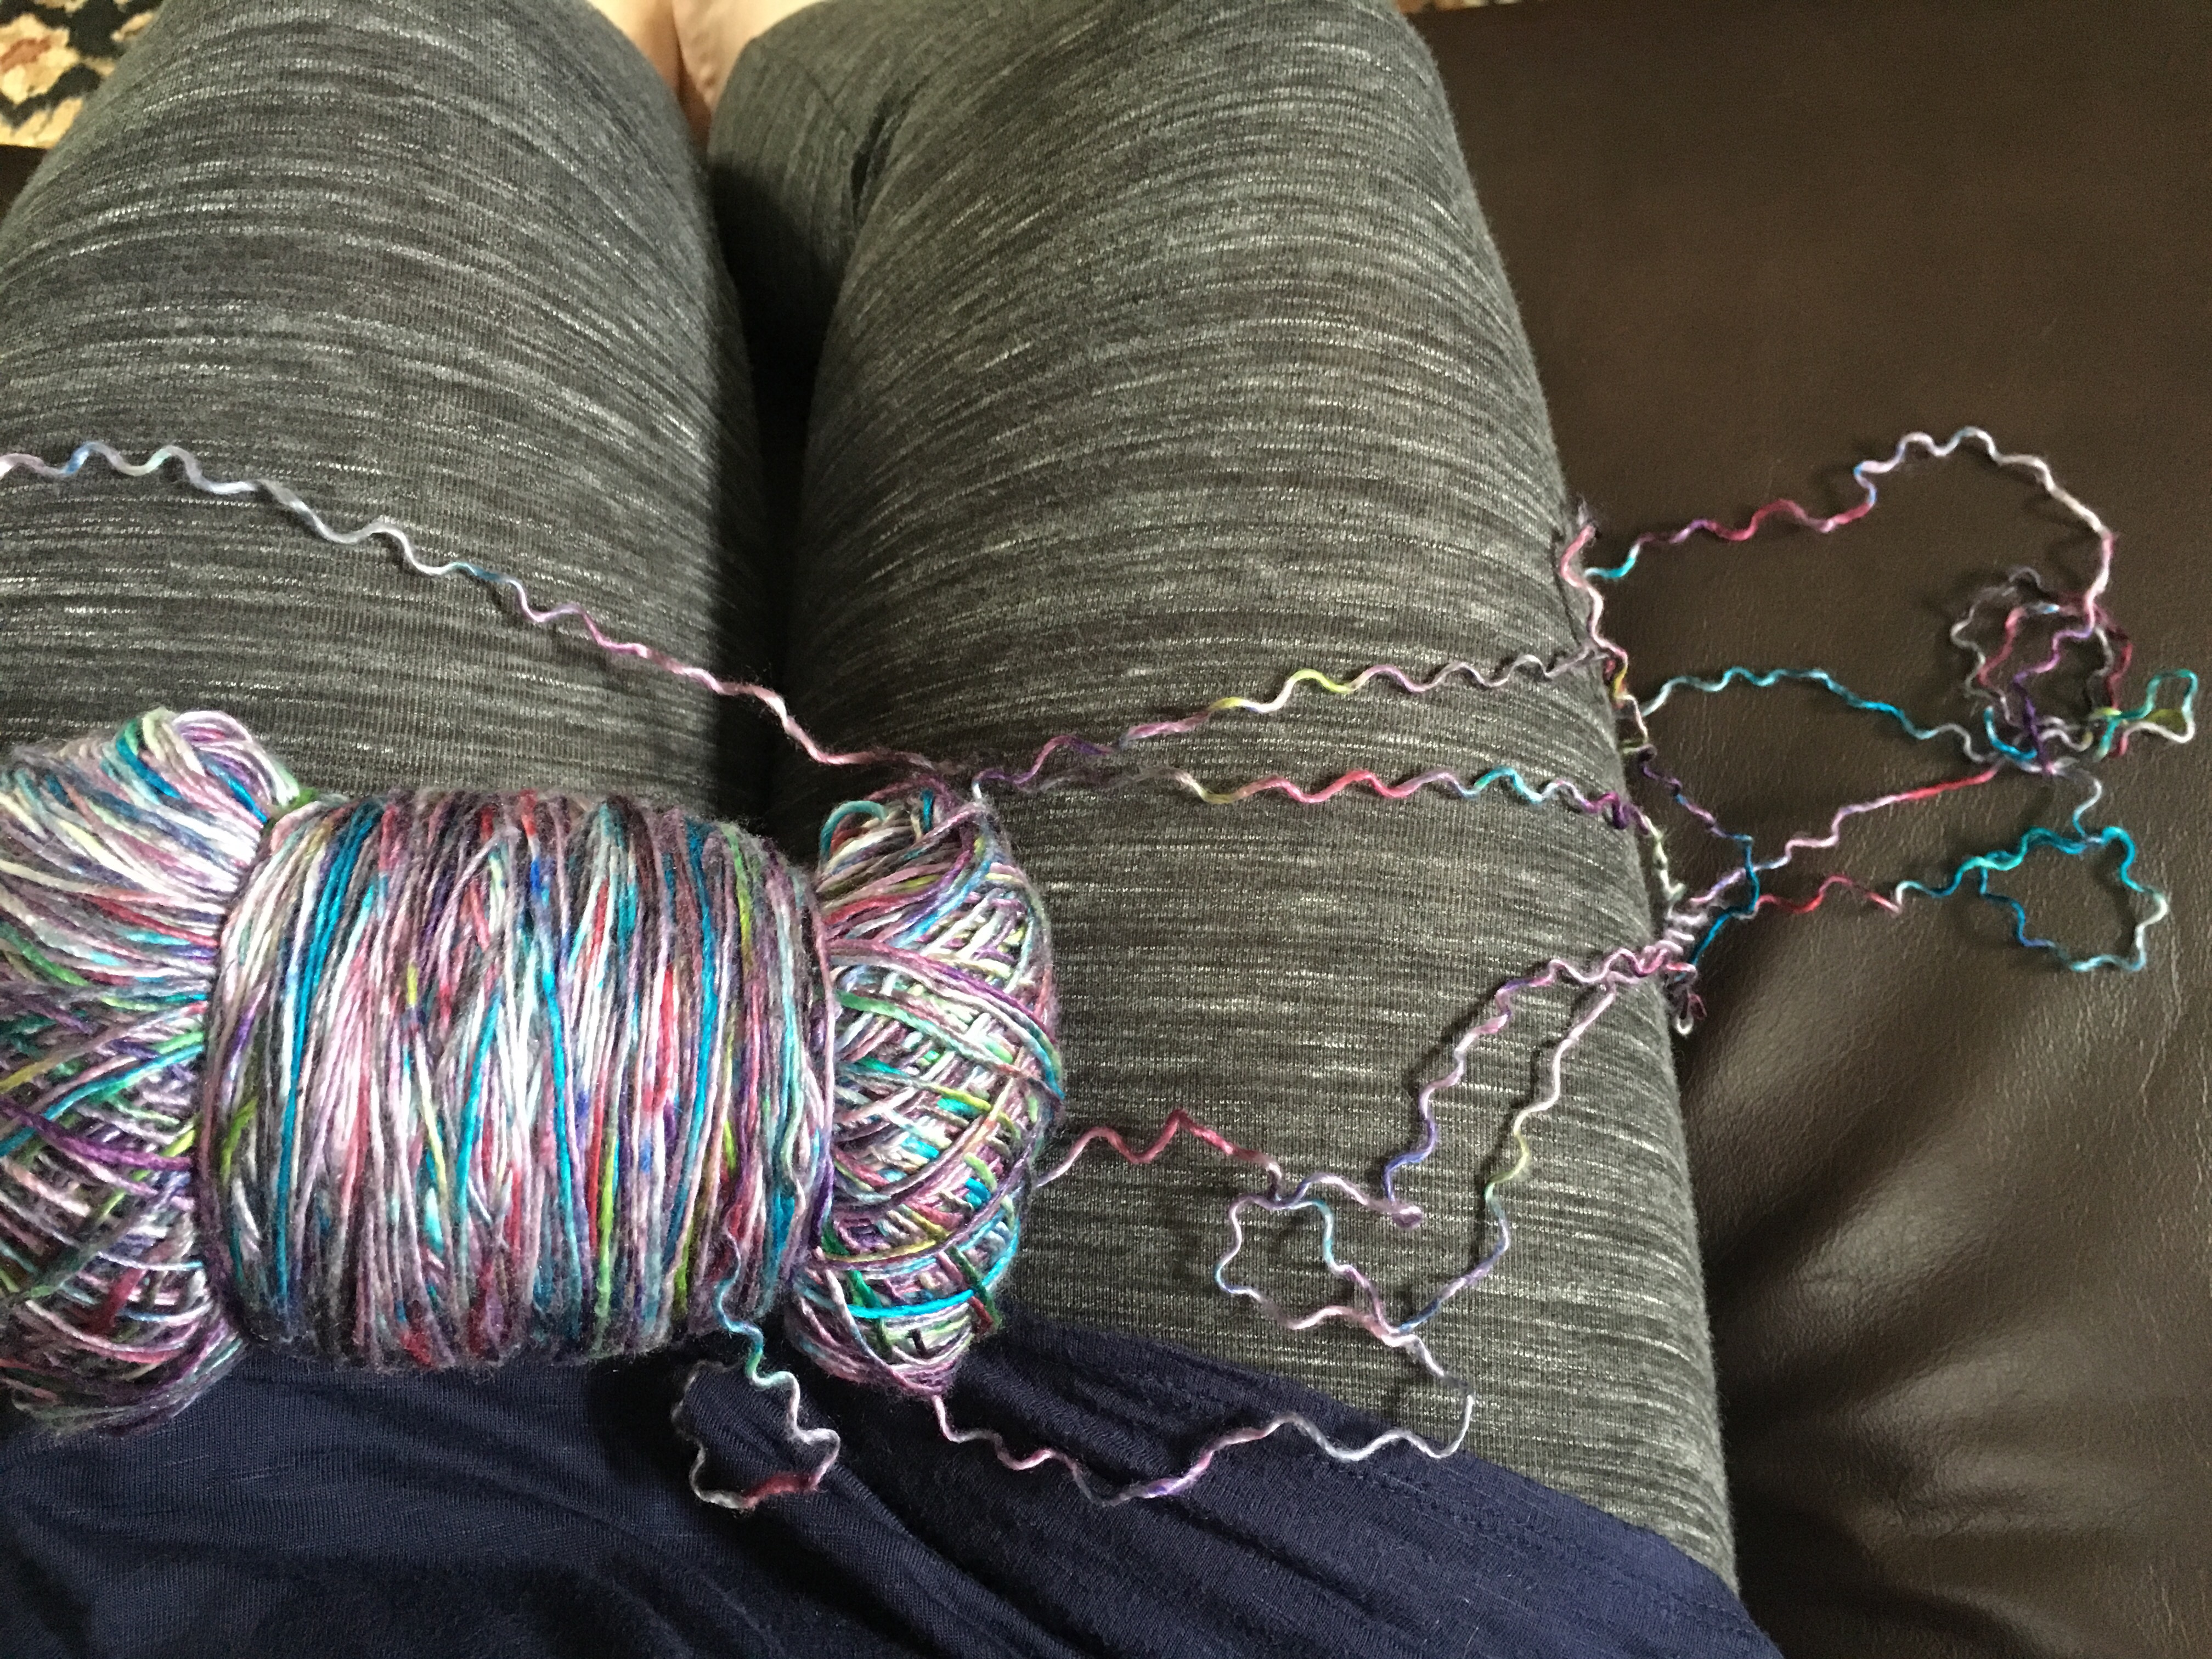
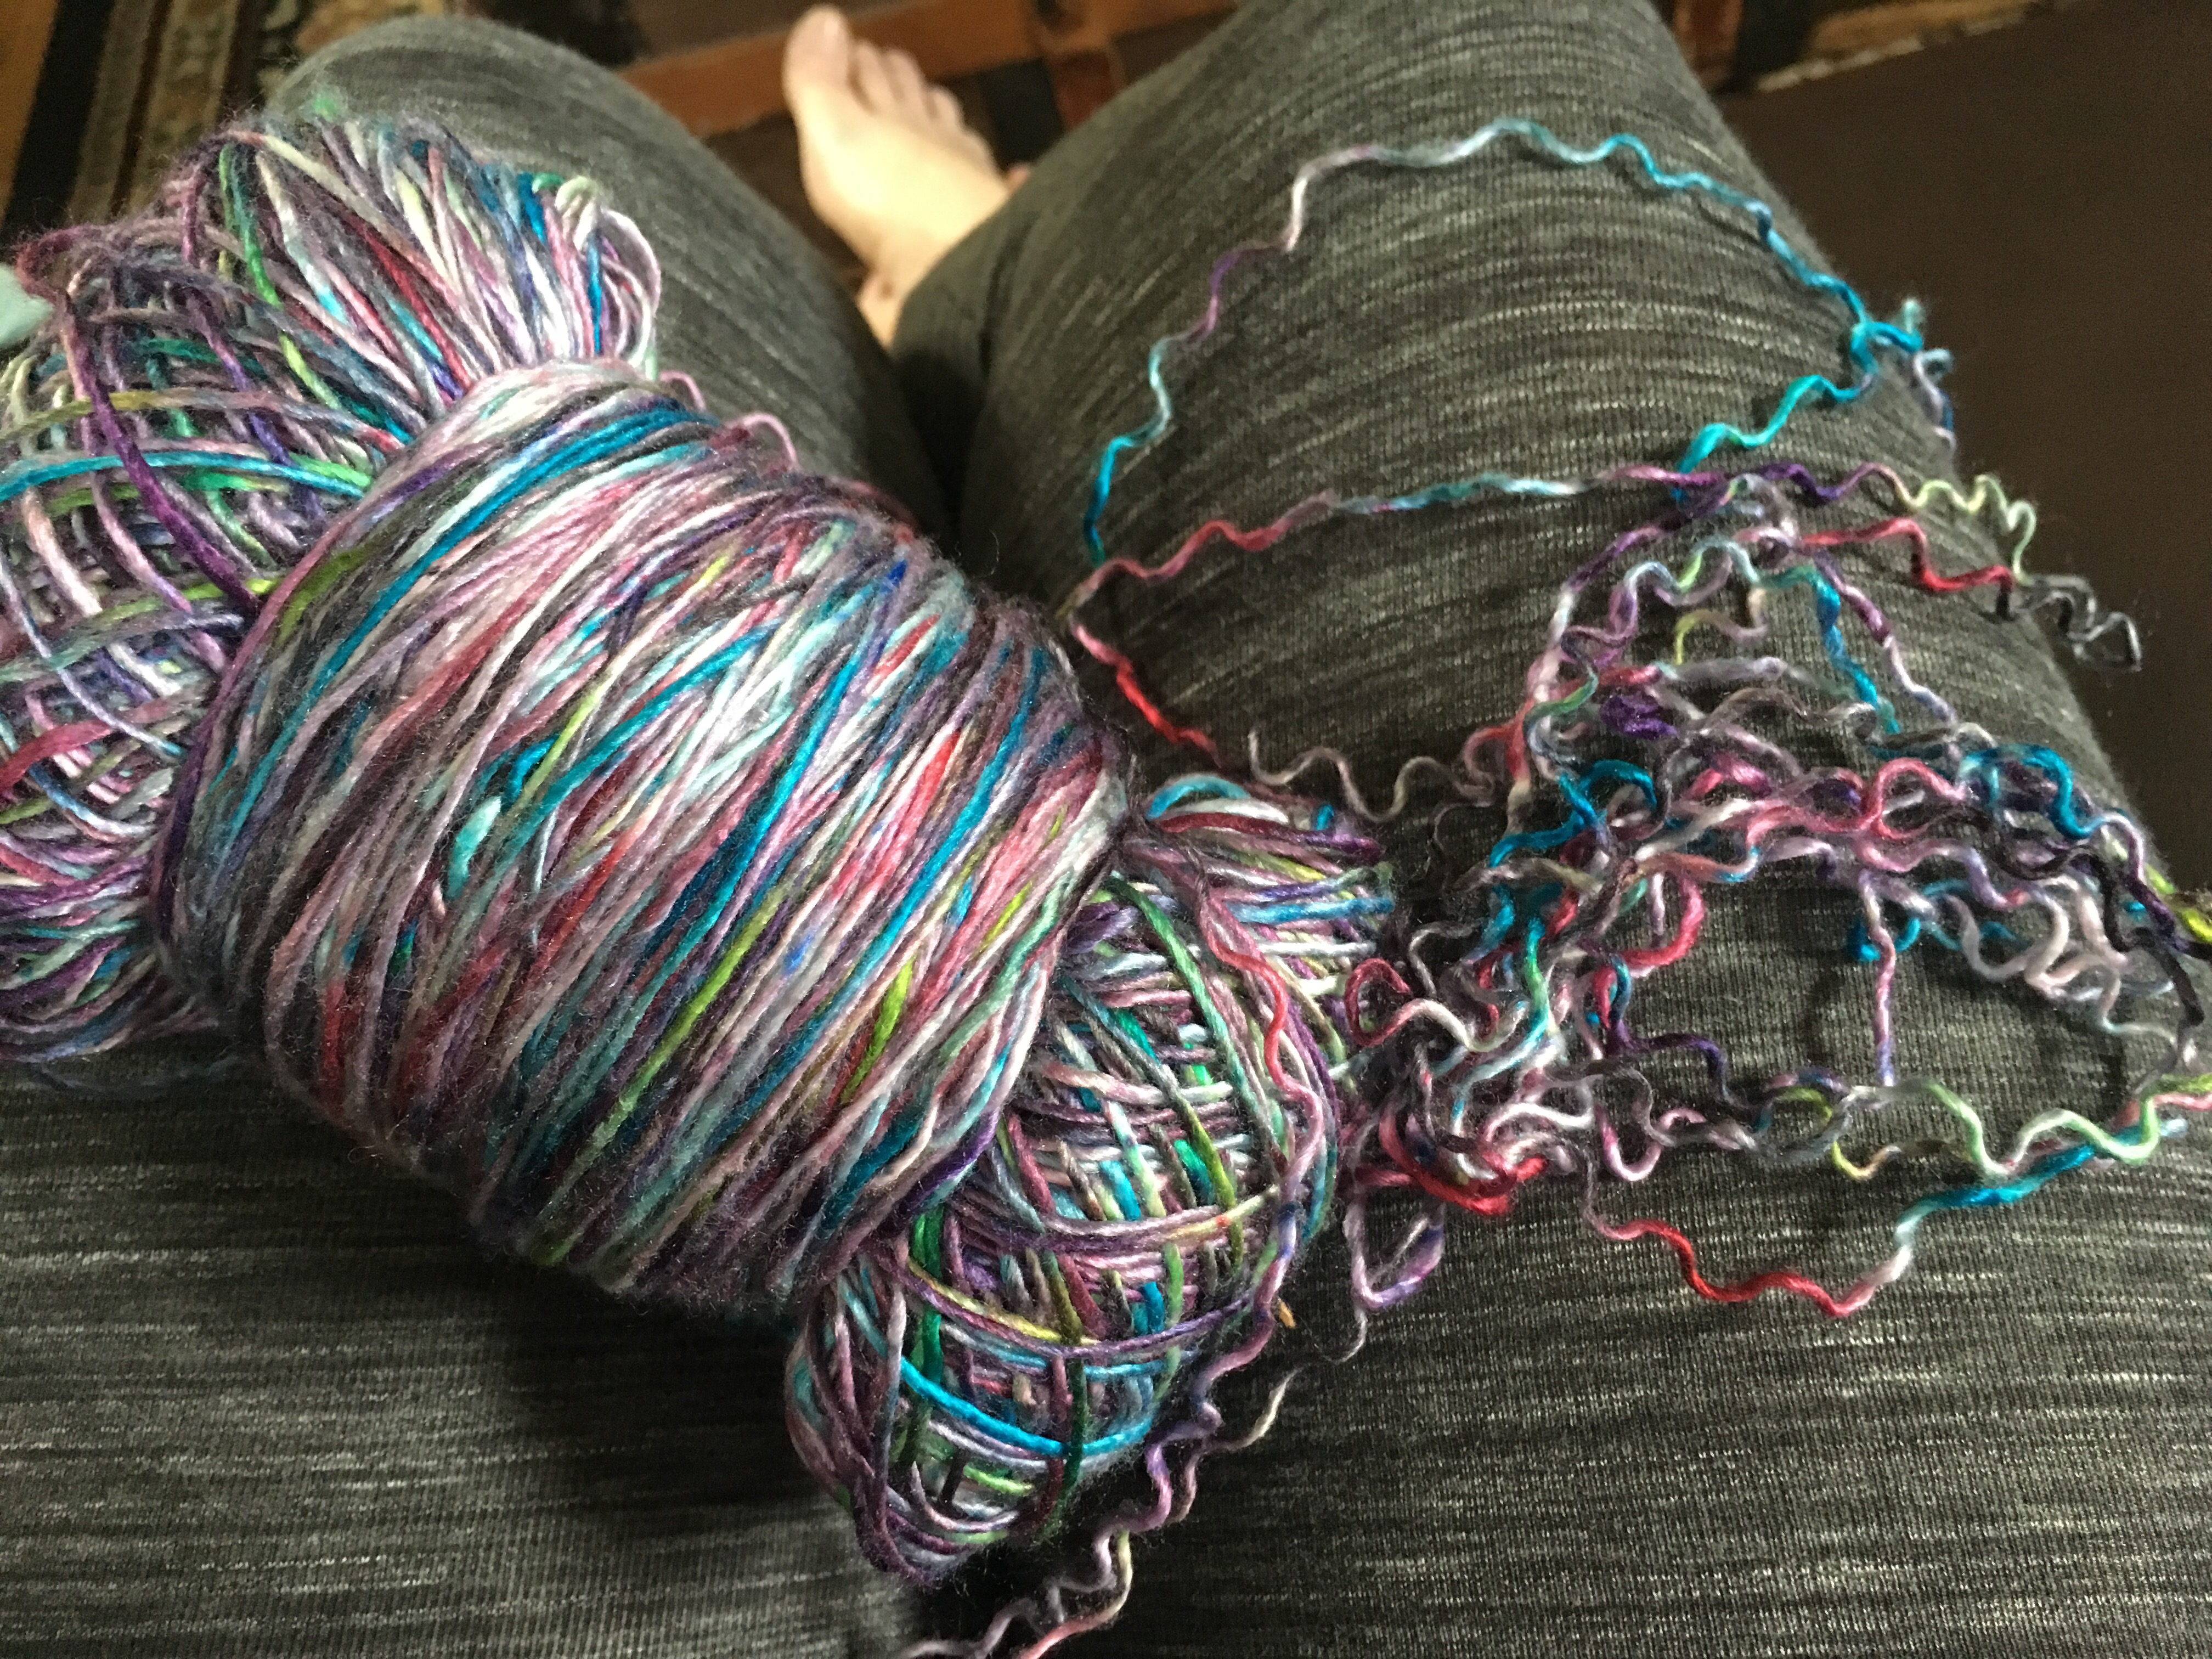
Time to rrrrriiiiiipppppp back.
All 7,524 stitches!
Compared to the time it took to get that far…
…ripping back took almost no time at all!
Best not to dwell….
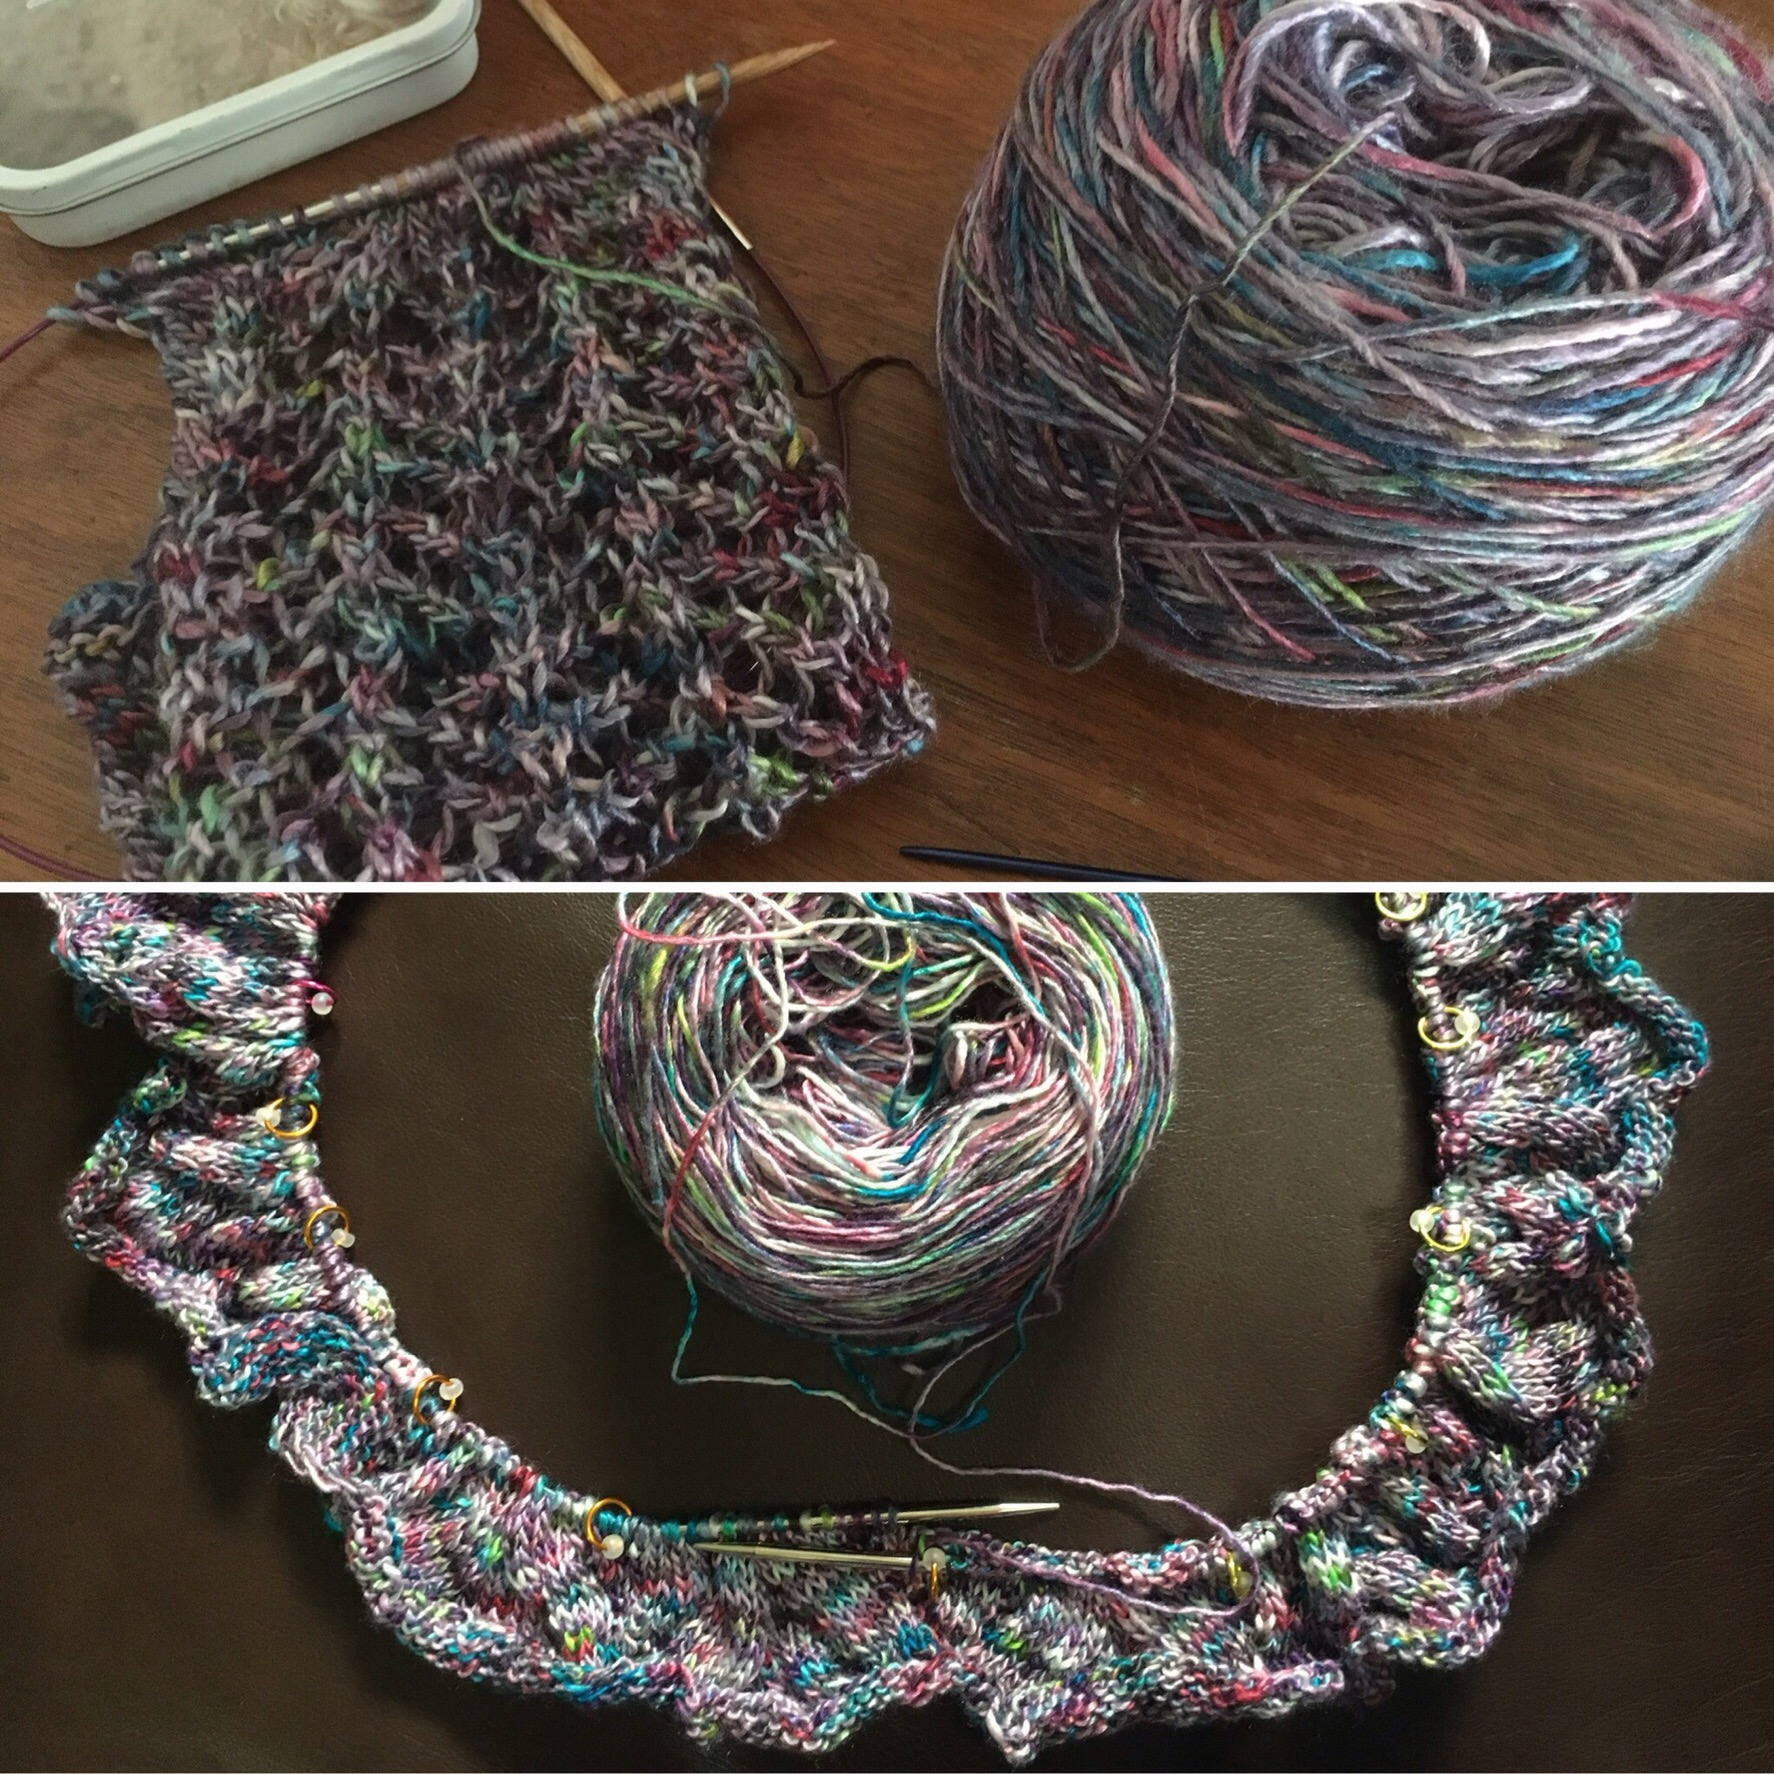
So, now I’m casting on 418 stitches AGAIN! 🙂
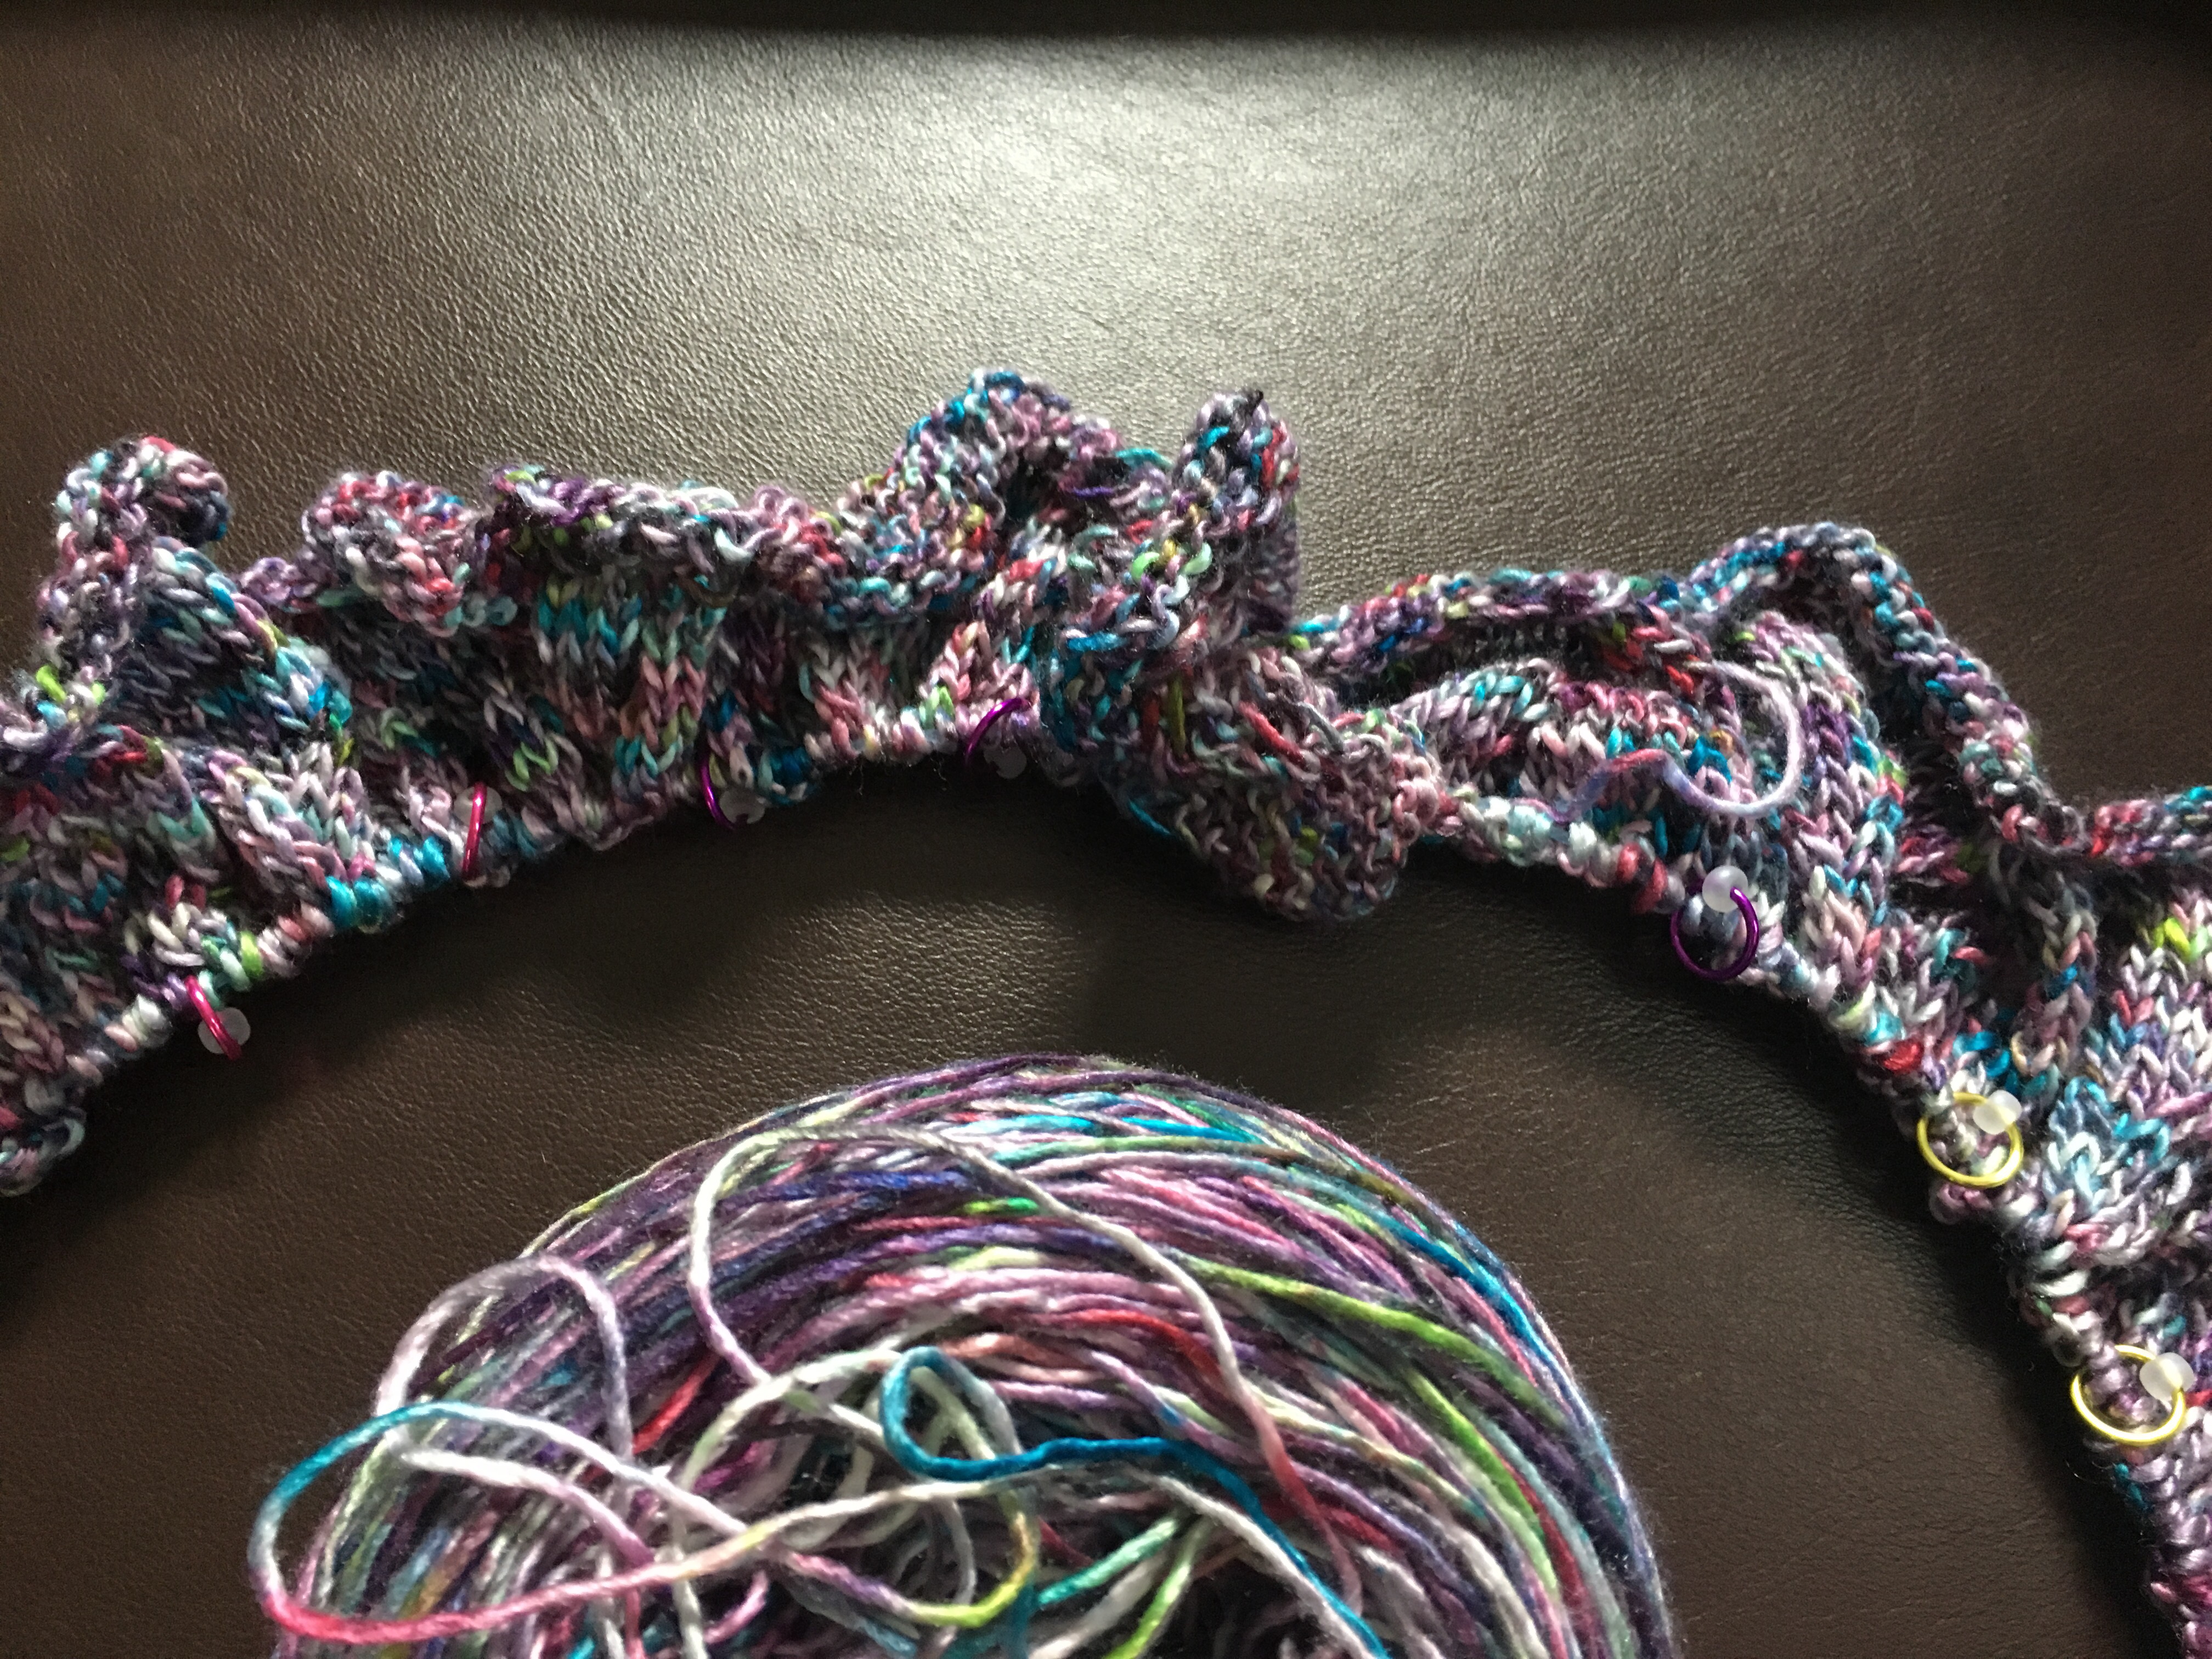
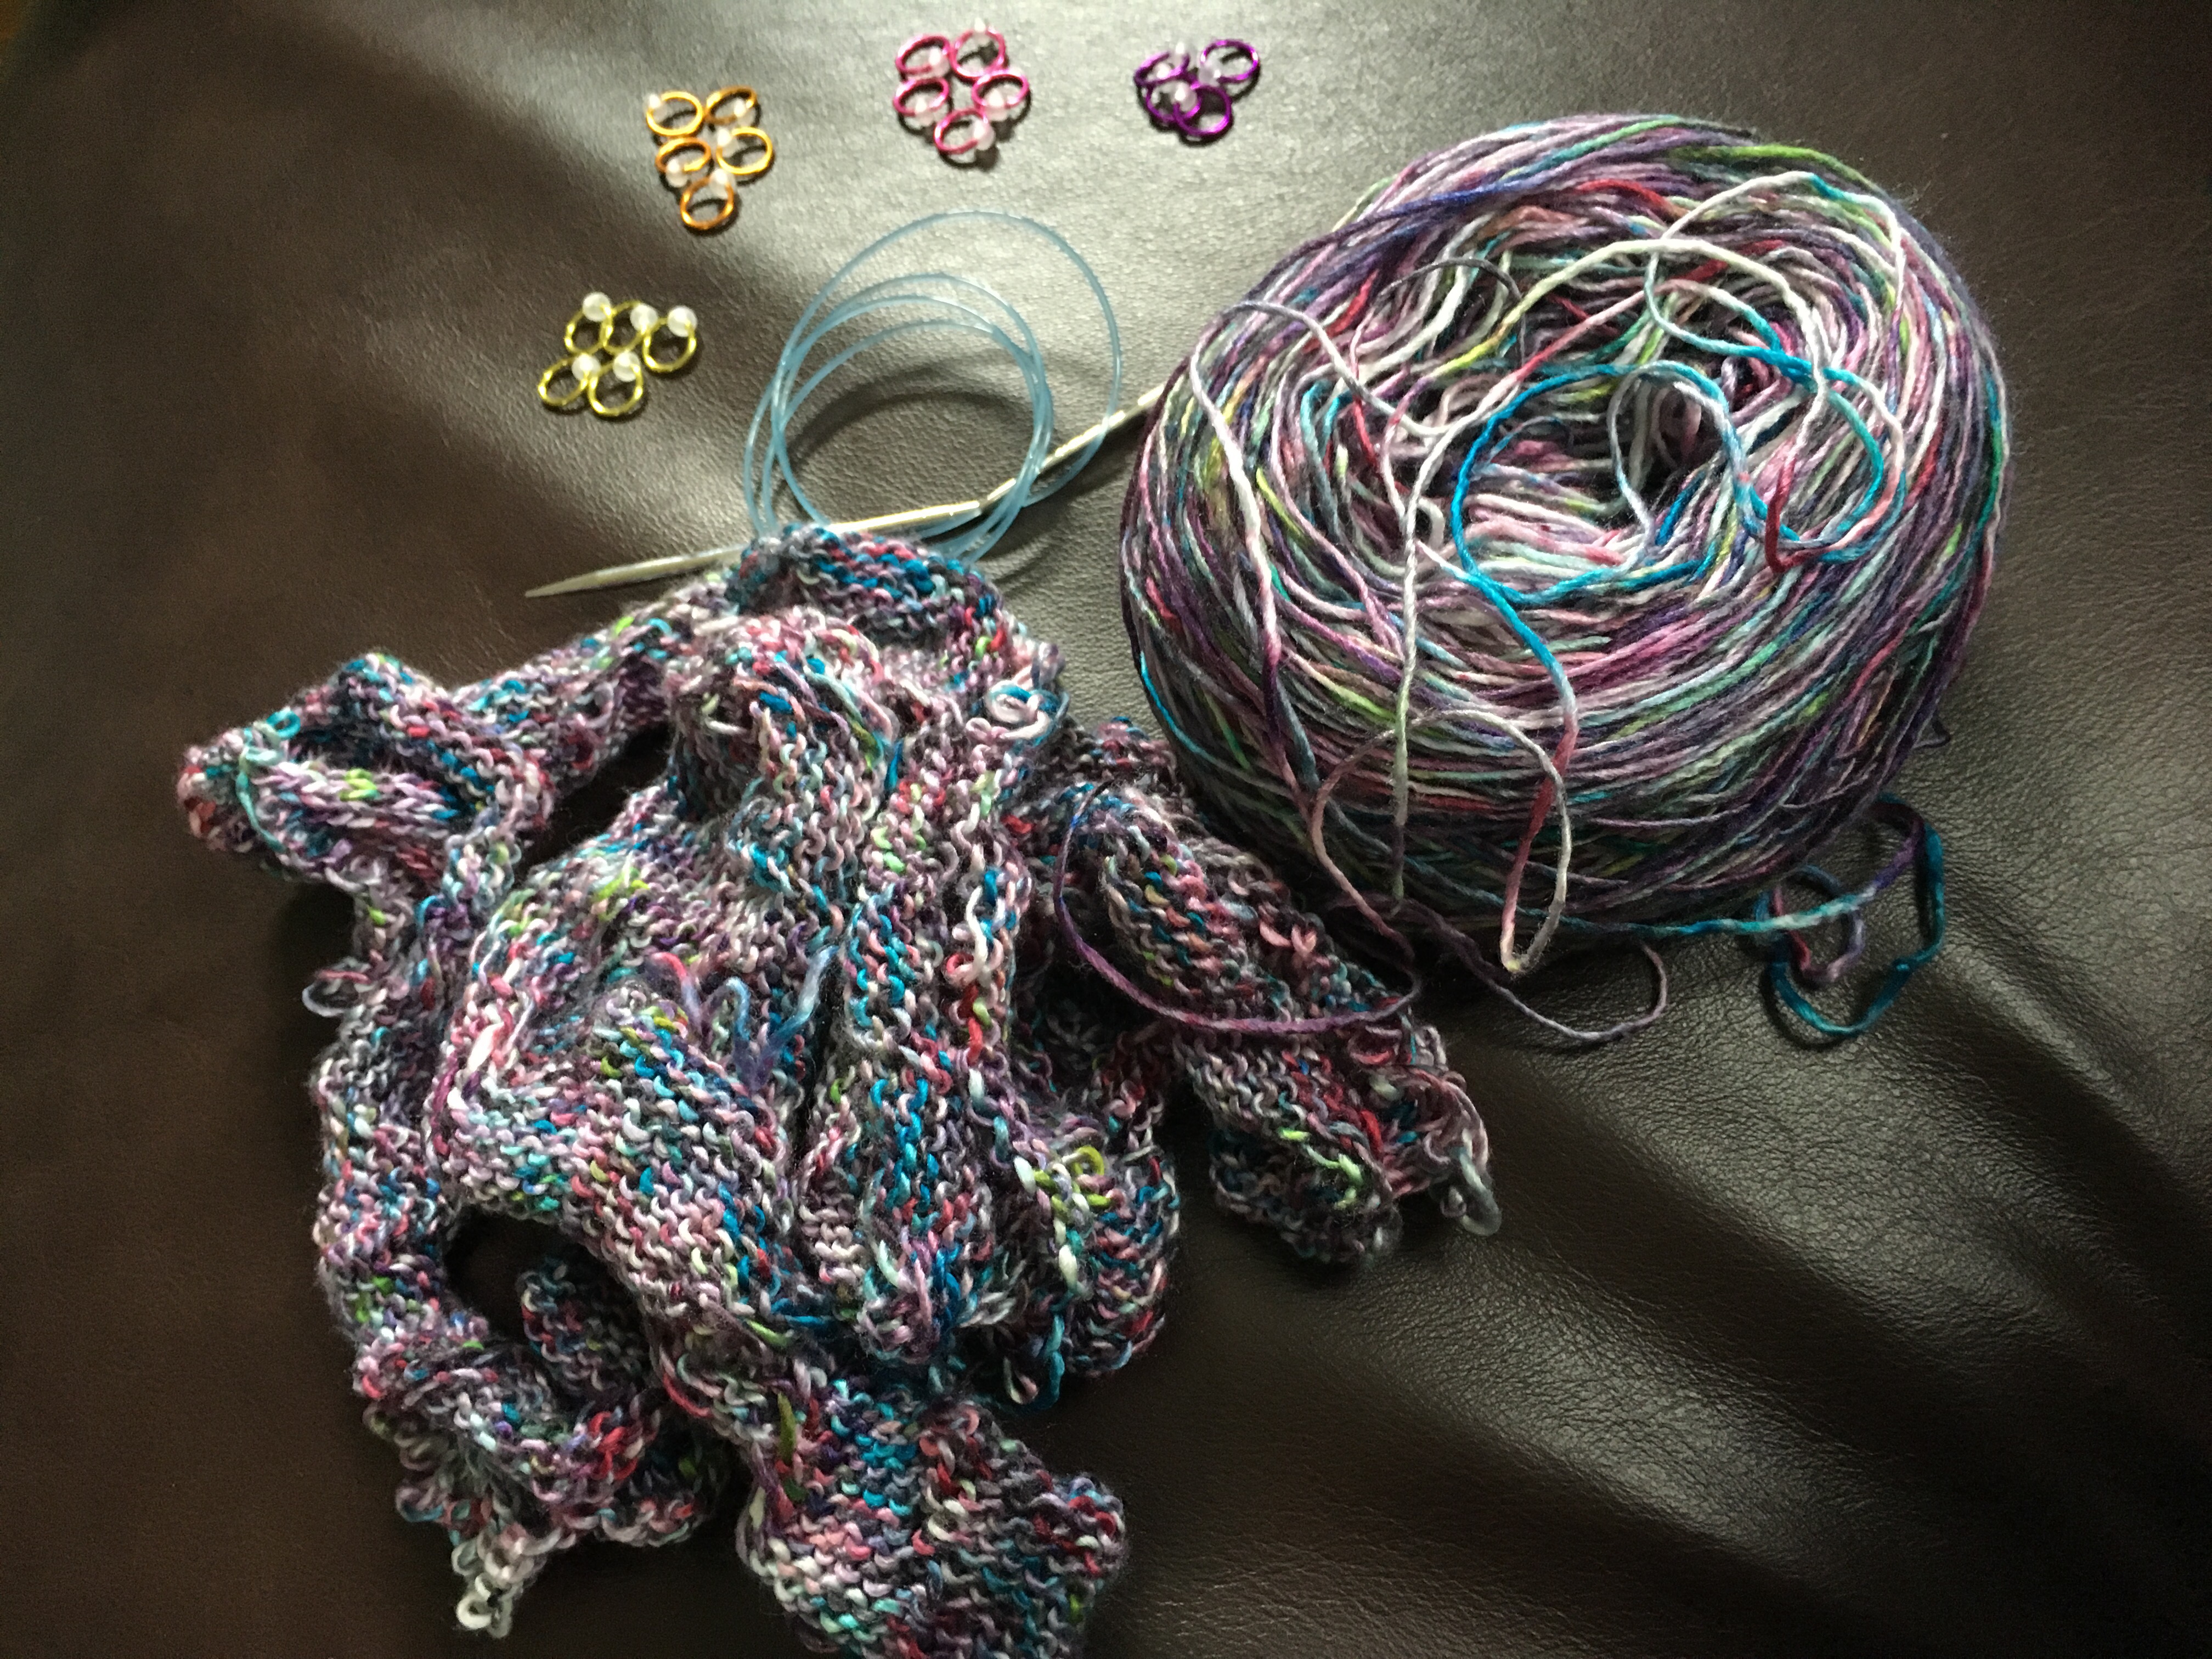
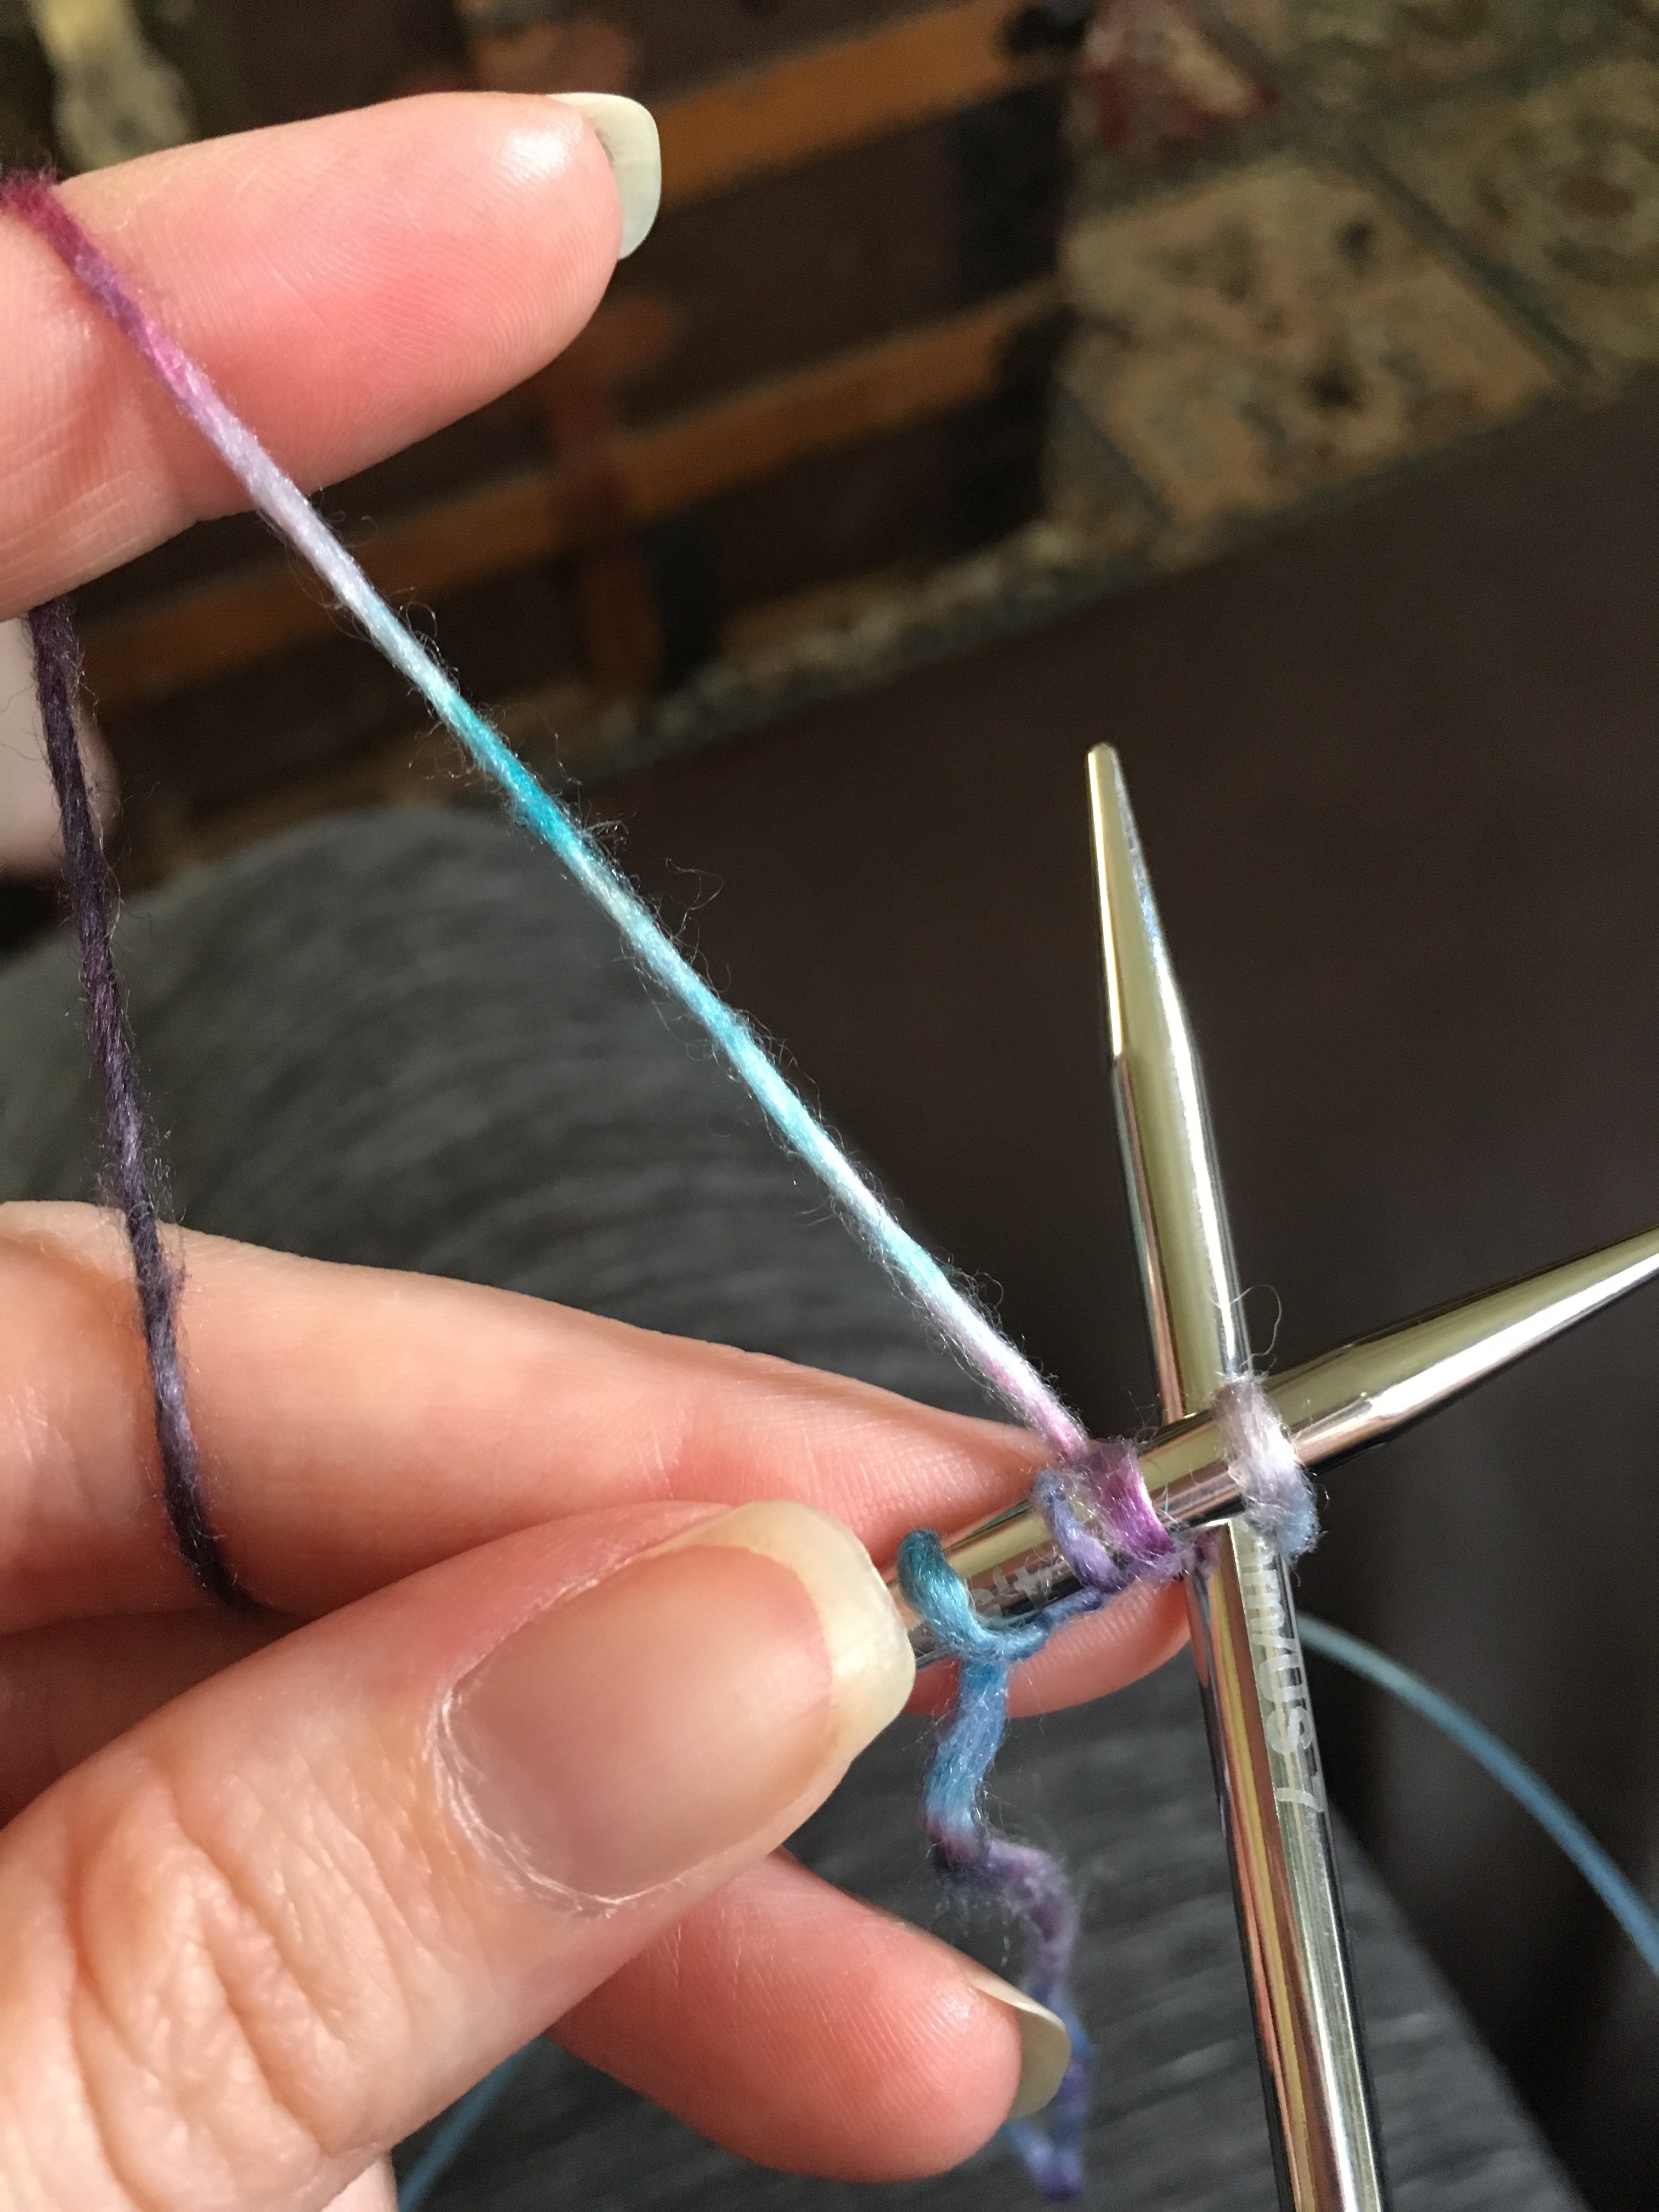
To help me keep track of my progress, I’m placing a marker every 22 stitches as I go…
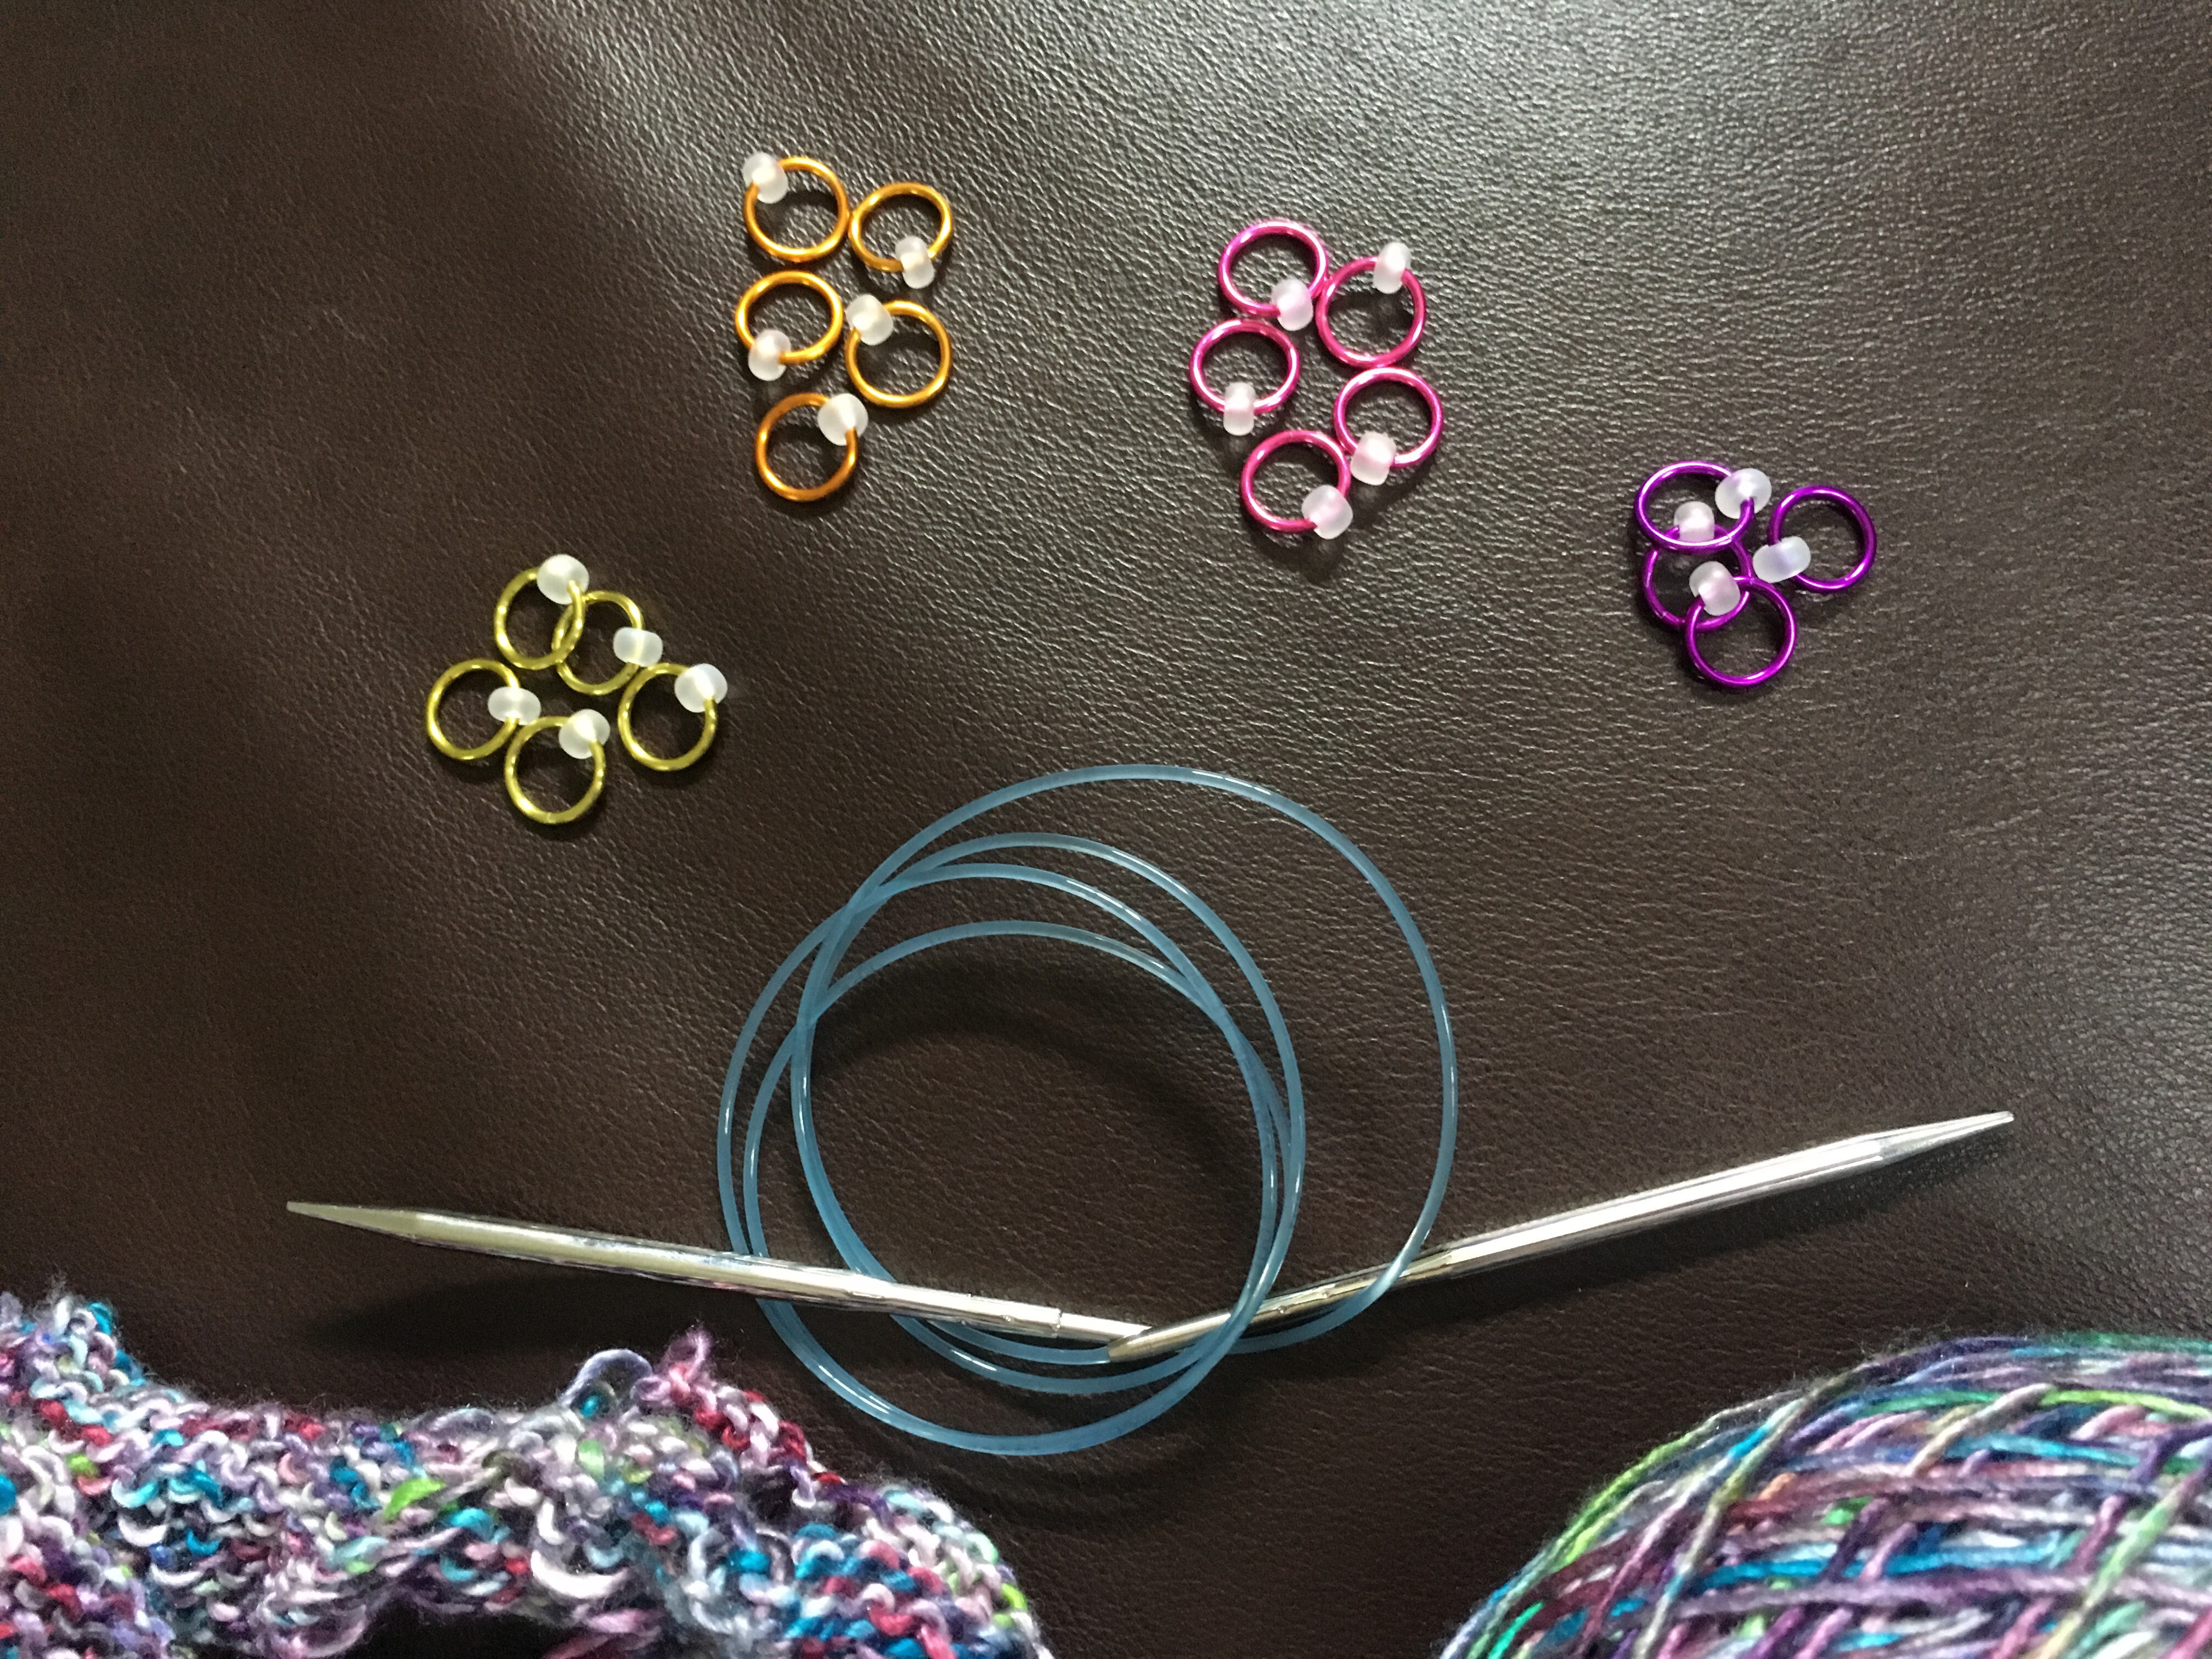
That’s a marker for every pattern repeat along the round. There are 19 pattern repeats per round, so I’ll need a total of 19 stitch markers.
I really like these from the Sheep and Wolf because of their simplicity, pretty colors, and size. (These are the large ones, they also come in medium and small (sock knitting size!); as well as different colors.
As frustrating as ripping back and starting over from scratch seems right now, I know I’ll be glad I did when I have a twist-free infinity scarf ready for my friend Kayla! 😉
And it’s not so bad!
See, I’m making progress already! 😀
Have you ever had to rip a project back? Do you have any handy tips for avoiding the dreaded twist when you join to work in the round? I’d love to hear about it! 🙂
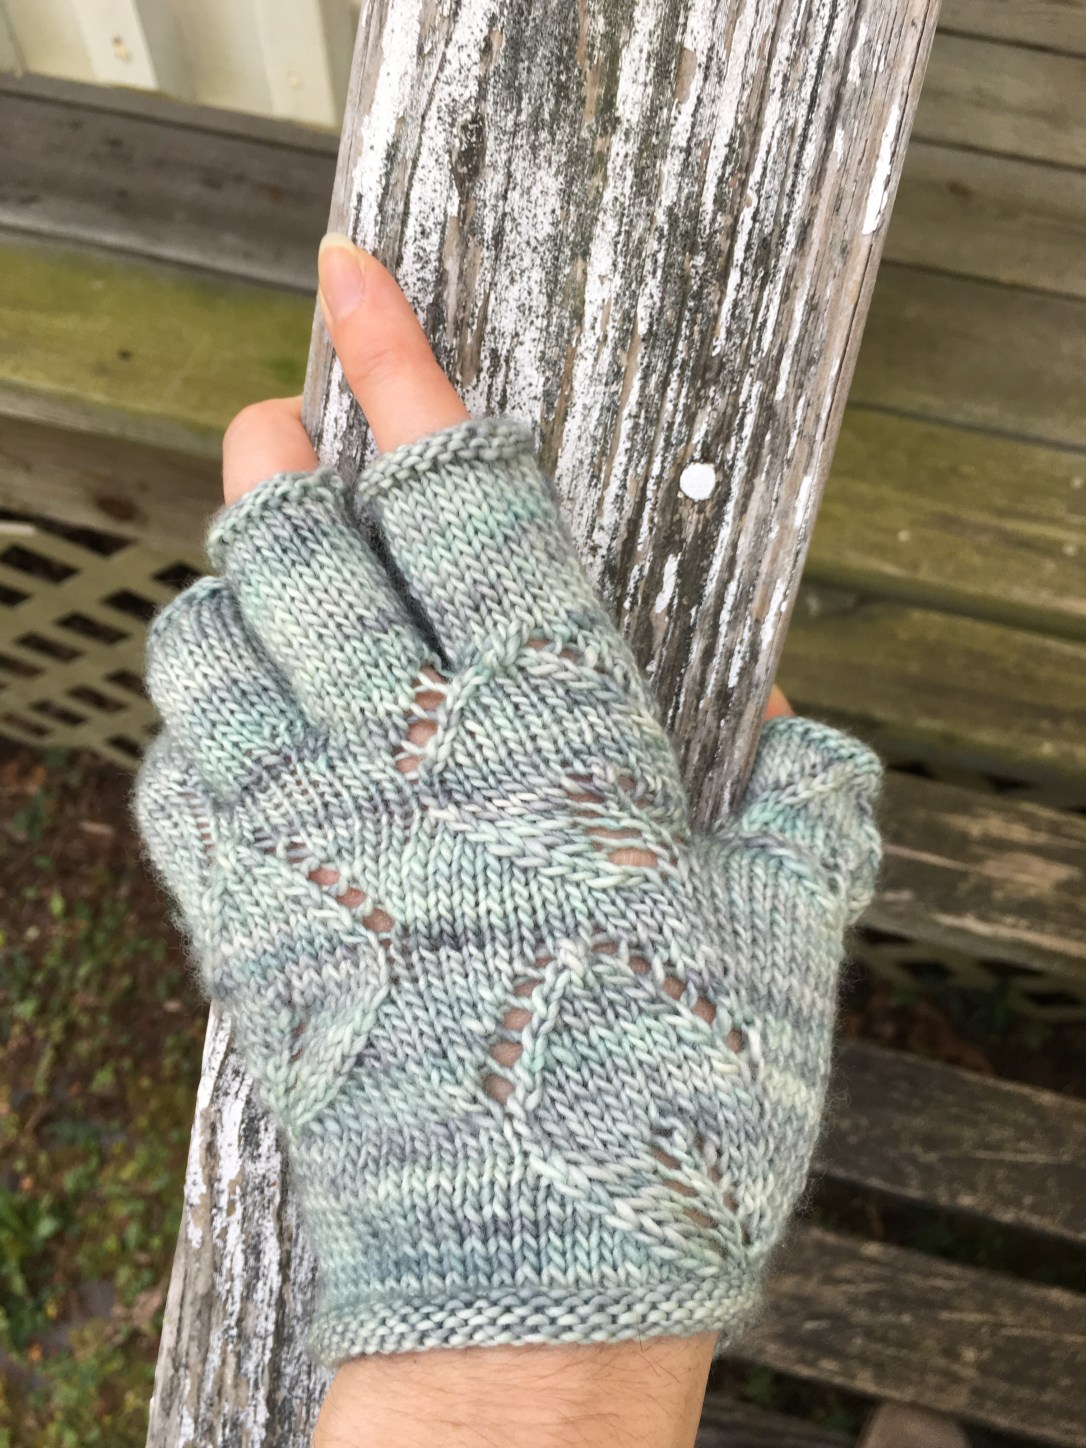
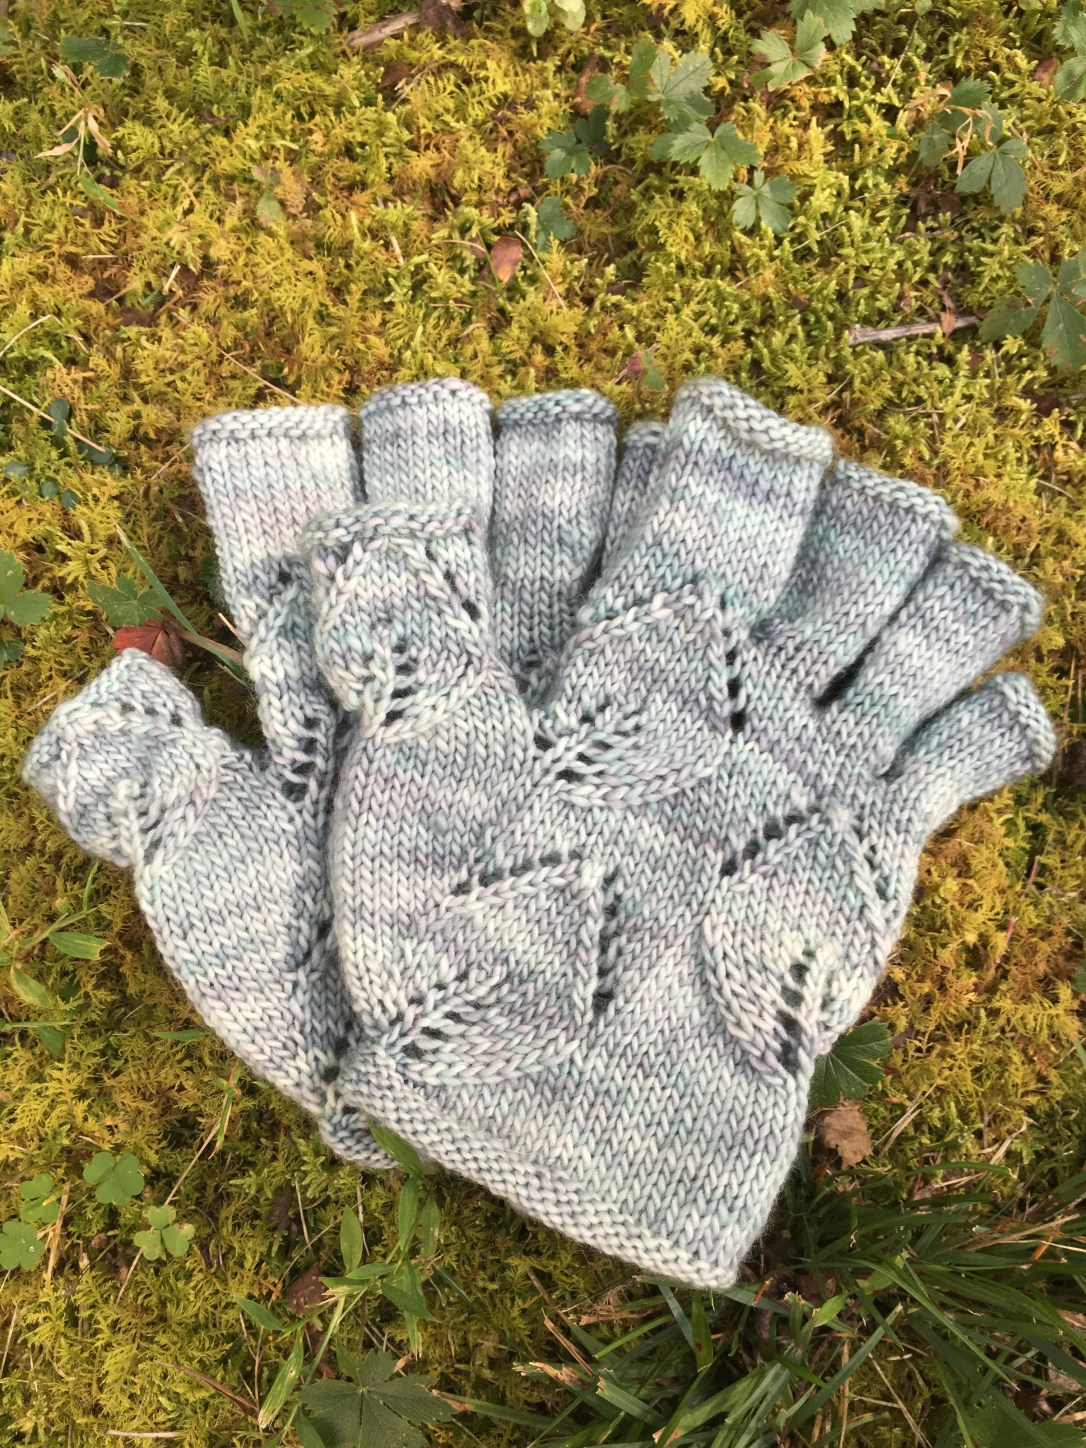
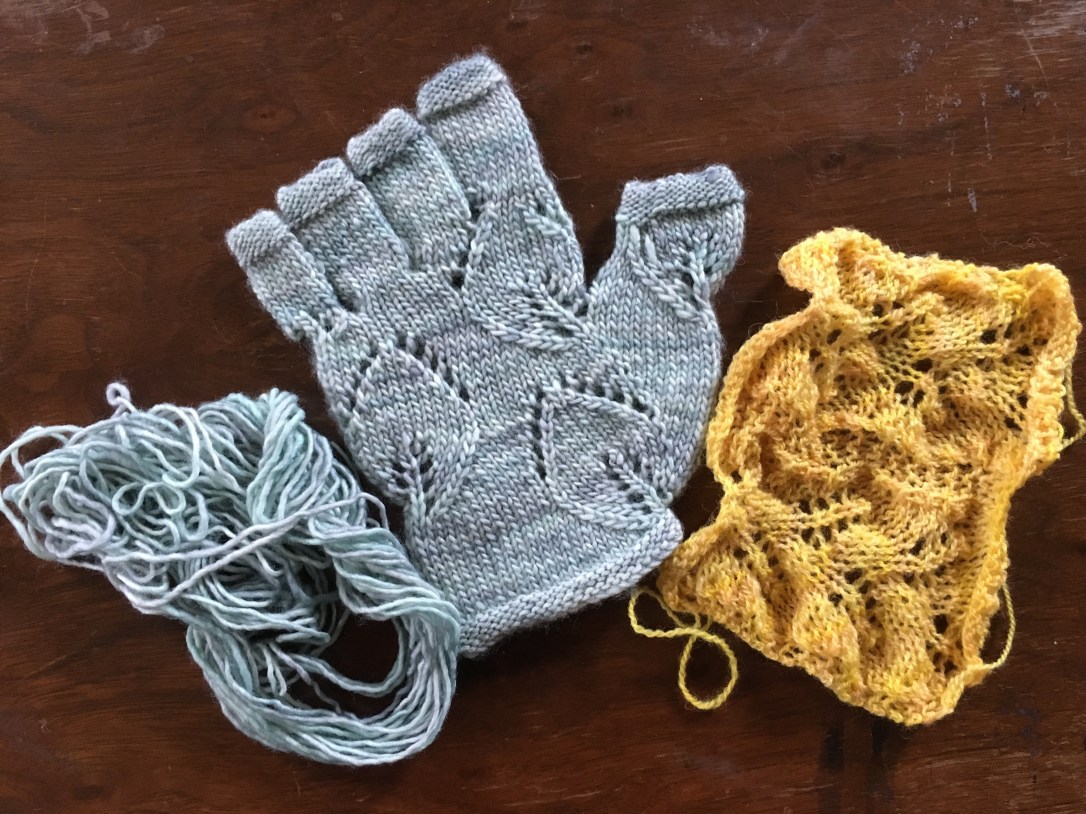
Today, I’m celebrating the release of my new pattern: Twin Leaf Gloves!
Delicate, yet warm, Twin Leaf Gloves are the perfect cozy accessory for all of those slightly chilly mornings/evenings in Spring & Fall when you just need a little wooly comfort to keep you toasty! Knit in the round on double pointed needles, they fly by quickly with just enough lace to keep you focused. Designed for a fitted look and sized for women’s hands in small, medium, and large, I bet you (like me!) won’t be able to knit just one pair! 😉
It’s been a dream of mine, for many years, to begin writing out my knitting patterns so I can share them with you. So today is a very exciting milestone for me! 🙂
This particular pattern, Twin Leaf Gloves, has been in the works for quite a while. The first inspiration for them came about nine months ago at the end of last Summer when I was obsessing over leaf-patterned stitches and fingerless gloves (one of my all-time favorite accessories!). Looking at leaf shapes, it occurred to me that they might go gracefully with hand and thumb gusset shaping for a pair of fitted gloves or hand warmers. As I played around with the idea, sketching and swatching, the Twin Leaf Gloves were born!
Along the way, I discovered that pattern writing can bring with it a rather steep learning curve… i.e.: Knitting what’s in my head, for myself or a loved one, takes some time, but is relatively uncomplicated compared to writing it down and/or charting it out in a way that makes sense for communicating it with others.
Most of the months between then and now were spent in developing and refining the pattern from my original scribbled notes to a detailed pattern with both written instructions and charts.
And of course, then there was the checking and re-checking of the pattern for accuracy; the first step of which (for me, anyway) involved knitting sample gloves in all three sizes = a lot of time and a lot of math! 🙂
Overall, I have to say that pattern writing has been a very exciting and rewarding experience for me, even with the rather larger-than-expected learning curve involved! 😉
My deepest thanks go out to Allison O’Mahoney of Kniterations for her patient advice, support, and superb technical editing; and to Beth Harnett (Hatknitter on Ravelry) for her heart warming enthusiasm and fabulous test knitting! Ladies, you are a joy to work with, and I am deeply grateful for your input and contributions. ❤
And now, to spread the joy and celebrate this pattern release, I’m offering two discount options on my Twin Leaf Gloves pattern:
1) and enter discount code: New20 to get 20% off your Twin Leaf Gloves pattern through April 25th, 2017!
Or…
2) Get 50% off your Twin Leaf Gloves pattern through June 30th, 2017 when you subscribe to my Newsletter!
Reduce, Reuse, Recycle; Organizing to Shop your own Stash!
One of my biggest goals this year is to organize my yarn stash and make it easier to know what I have and find what I need so that I can use the gorgeous yarn I’ve collected! I’m sure this is something many of us fiber people can relate to. 🙂 Now that my stash takes up more than two large plastic bins, I’ve decided to buckle down and put it in order! Here are five steps I’m using to approach this project: 1) Review & Sort, 2) Sub-Categorize, 3) Document Yarn Data, 4) Storage, and5) Shop Your Stash! I’ll also be sharing some helpful resources I’ve made, along with some that I’ve found along the way in my research!
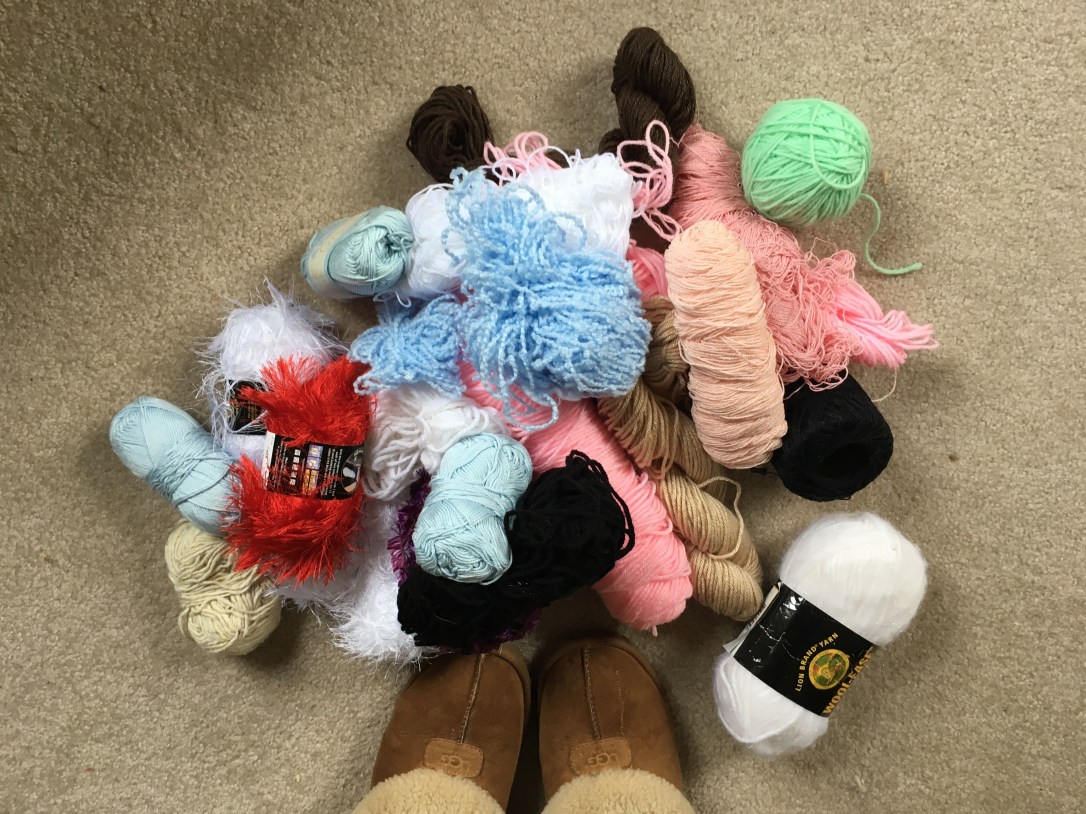
A couple of “Before” pics…
Though these pics don’t show my entire stash, they do show the previous state of chaos… 😉
Step 1: Review & Sort…
I started with preliminary sorting first, which happily for me, is one of my favorite things! (If sorting is NOT one of your favorite things, don’t worry, this part is relatively quick!) I pulled out all my yarn and sorted it into five piles similar to what Lion Brand recommends in their post “12 Tips on How to Organize Your Yarn Stash…”
The WIPs (Works in Progress) pile includes all of my currently in-progress but un-finished projects and the yarn to finish them.
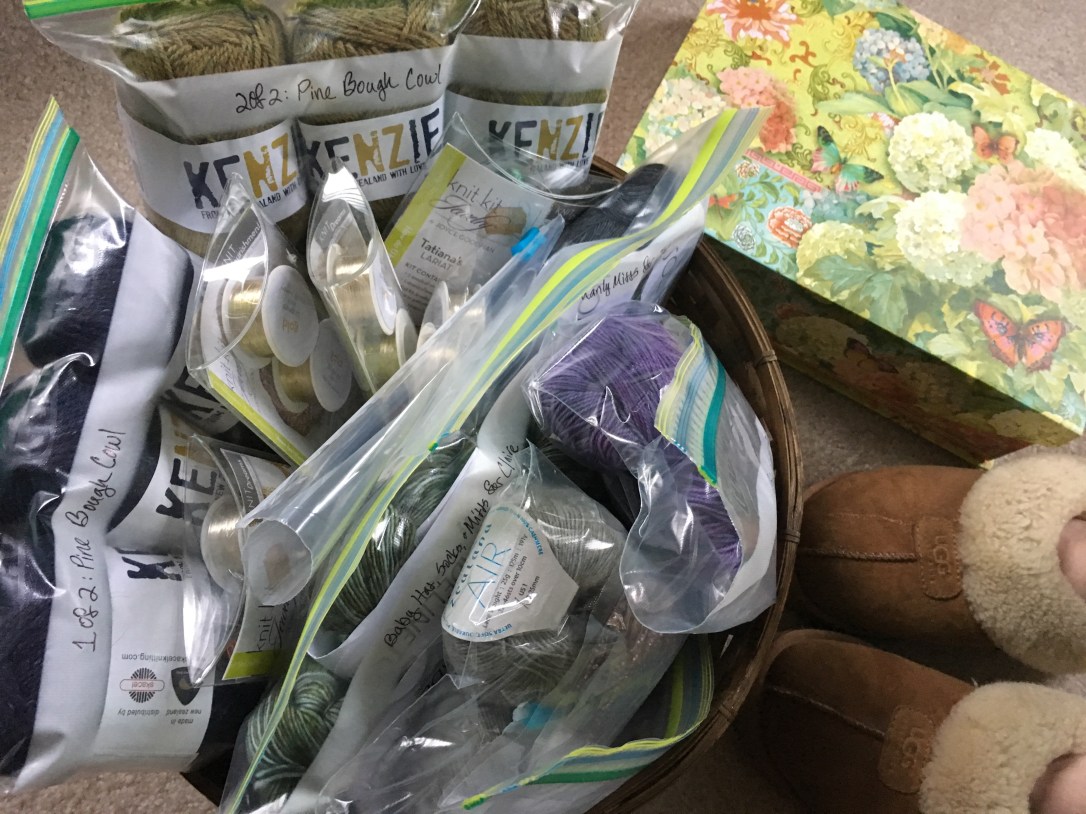
The Will Use Have Pattern pile is composed of yarn that I’m not only sure I will use, but know what pattern I’ll use it with, AND actually have the pattern. Its a sort of pre-WIPs pile! This pile turned out to be rather larger than I had expected. It must be because I plan faster than I knit… 🙂
Previous method of storing Will Use Have Pattern yarn…
Will Use Have Pattern yarn revealed!
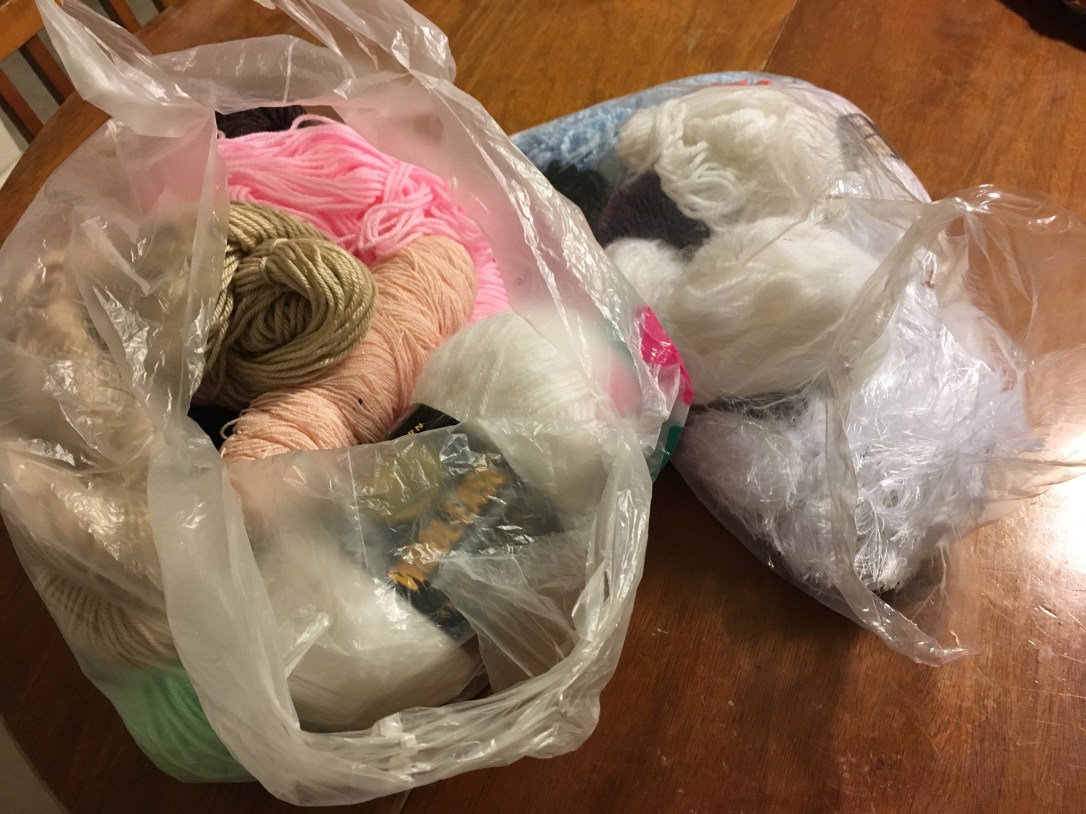
The Will Use No Pattern Yet pile holds all the yarn that I know I will use, but either don’t have the pattern I want to go with it, or don’t know yet what pattern I want to use. This is one of the most exciting portions of my yarn stash because it is all yarn that is free and available, which means the possibilities are practically endless!
A wholelot of Will Use No Pattern Yet yarn!
The Wandering Bits & Pieces pile is for all of those little bits and pieces of yarn leftover from completed projects, as well as their corresponding swatch(es).
Here are a couple of Wandering Bits & Pieces… I’m still sorting out the rest!
And last but certainly not least, is the Won’t Use pile for all yarn that I liked when I bought it, but have decided that I don’t really like anymore; or just don’t have room to store. It also includes yarn that I’ve had FOREVER, never done anything with, and feel that is unlikely to change. 🙂
The Won’t Use yarn pile is surprisingly larger than I had thought it would be… very proud of myself for resisting the urge to hoard yarn…!
The best part of this sorting phase of yarn stash organizing? I GET to decide which yarn goes where! The hardest part? I get to DECIDE! I was definitely glad to have some good knitting and a delicious latte on standby for a (few) breaks from decision-making-overload! 🙂
Step 2: Sub-Categorize…
Next, I’ll need to pick a way to sub-categorize my five piles of yarn. The yarn that will likely be most heavily involved in this stage (and the next) is the Will Use No Pattern Yet pile because that’s where the majority of my yarn is! (I’ve been working on Step 2 for awhile now…)
It took me a long time to decide how to sub-categorize the “Will Use No Pattern Yet” pile of yarn. Since this is all of my free and available yarn, there is a large volume involved. And there are SO many options to choose from… I could sub-categorize according to fiber content, or color, or yarn weight, to name just a few.
Having spent considerable time going through this pile of yarn, I have finally decided to sub-categorize it by fiber content because that is often where I start when planning a project. Now to actually divide out all of this yarn!
After much thought, I decided that it makes the most sense to sub-categorize my WIPs pile and my Will Use Have Pattern pile according to project.
WIPs, by project!Will Use Have Pattern yarns, by project!
I put each project & all the yarn that goes with it into it’s own gallon zip-lock bag, along with it’s pattern and needles. This keeps the project all together in one place, ready to pick up and get going whenever I’m ready! No hunting around for the pattern, or the rest of the yarn, or trying to remember which needles I was using/planning to use…! 🙂 This also provides of peace of mind by preventing me from accidentally using up yarn that was designated for one project to make something else.
The Wandering Bits & Pieces pile I believe I will sub-categorize by project as well. I think I’ll put the swatches and leftover yarn for each project in it’s own small plastic bag and label the bag with the name of the pattern, and perhaps of the yarn as well. 🙂 This will make it easy to find and identify the right yarn later on if/when a repair may be needed. Also, I’ll be able to tell at a glance whether I have enough yarn leftover for another small project, or whether I need to save it for potential repairs only.
Yarn in the Won’t Use pile will be categorized by destination. Yarn to give away at Guild Fiber Swaps, and yarn to give away to non-Guild friends/family.
Step 3: Document Yarn Data…
Now it’s time to decide how to document all of my neatly organized and sub-categorized yarn so that I can quickly and easily see what I have! When it comes to keeping track of yarn data, one could go several ways. There’s the digital way – I could document and track the yarn in my stash electronically on Ravelry. Here’s a link to a great blog post by Stacey of Fresh Stitches, about how to use Ravelry’s handy yarn stash feature! One of the things I find most exciting about using Ravelry to keep track of yarn stash is that once all of your yarn is listed in your Ravelry Stash, you can do a search for only patterns using yarn that you already have in your stash! SO helpful!
And then there’s the physical/tactile way – I could create and keep an actual, physical Yarn Stash Notebook.
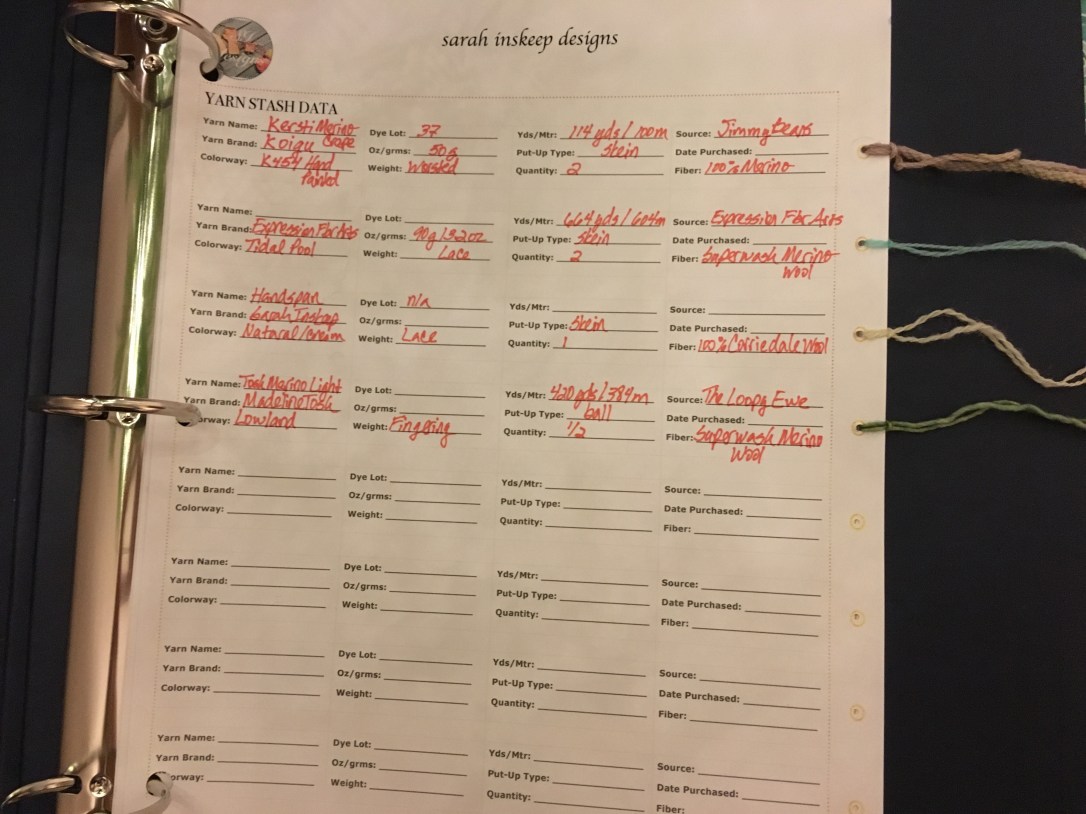
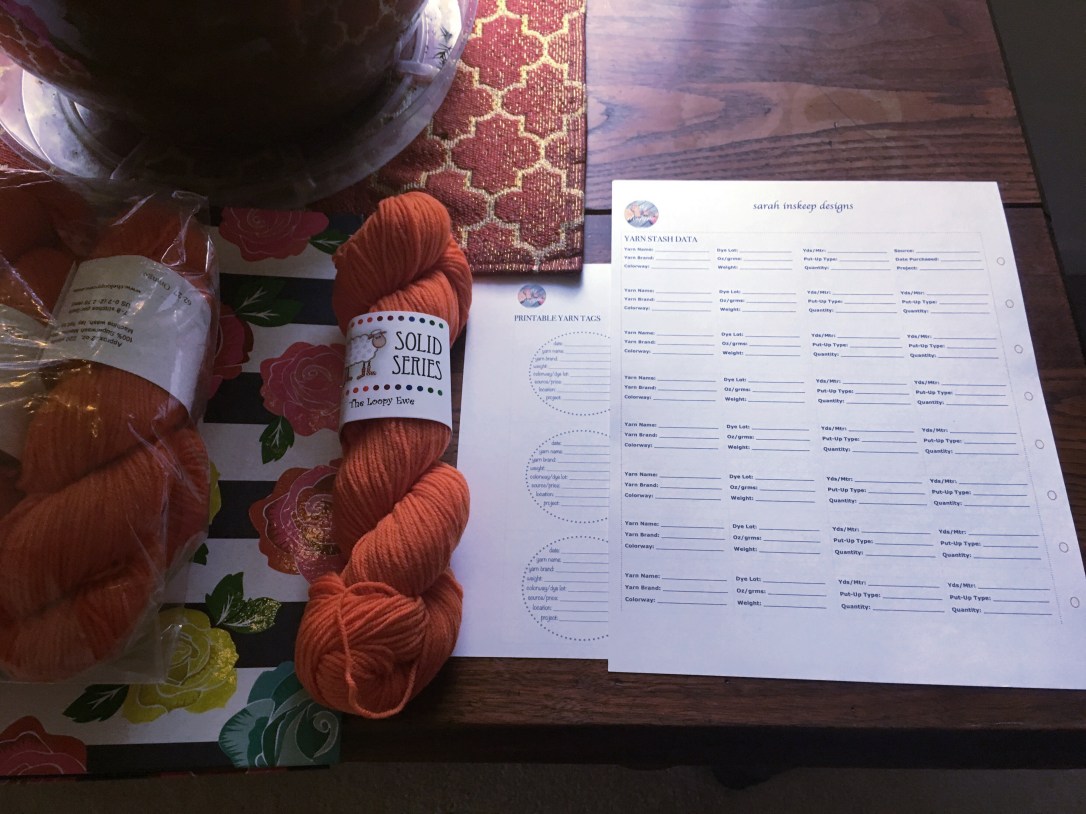
Notebook, hole punches, yarn data template & yarn tags, and pen – ready to create my Yarn Stash Notebook!
Yarn data can be handwritten and a small sample of each yarn attached to pages kept in a three-ring binder. The binder can be decorated as desired, and decorative penmanship can be used on the pages.
This option appeals deeply to the artist in me, and I REALLY love the idea of being able to see the true colors & touch/feel the texture of an actual sample of my yarn while planning a project – without having to go hunt down the skein(s) in the bins first!
Notebook, yarn, and templates ready to create my Yarn Stash Notebook!
In fact, I believe I will go ahead and make a Yarn Stash Notebook first. Later on someday, I may add my yarn stash on Ravelry also, but for now, making the notebook will be enough. Here’s a link to a very helpful post I found by Dedri of the Lookatwhatimade blog. She talks in detail about how to create a Yarn Stash Notebook.
I decided to create my own templates, both for the Yarn Stash Notebook pages, and for optional yarn tags. My Yarn Stash Data template (for notebook pages) is double-sided with places to record important yarn info on the front, and free space to make any notes you wish about that yarn on the back. I found Dedri’s advice to either print the template pages out on heavy paper such as card stock, or laminate them to be very important. It really helps to have nice stable pages to attach the yarn samples to.
I’m so excited to be able to offer free PDF downloads of both my templates to all of my Newsletter Subscribers (current & new)! If you are a current Subscriber, you can access your free template downloads in the Newsletter!
If you would like to become a Subscriber and be kept in the loop with knitting tips, discounts, & coupon codes, please click here to sign up to receive my Newsletter and you’ll receive an email with links to the free template downloads!
Step 4: Storage…
I don’t know about you, but for me, “out of sight” really does become “out of mind” quickly, and I want to finish my works in progress so I can use them or gift them! To keep my WIPs projects on my mind, I’ve decided that I’ll store them in a pretty basket and set it out by my favorite knitting spot in the living room! That way I’ll see them often, and it’ll be very satisfying to see the number of WIPs in the basket dwindling!
Basket of WIPs, ready & waiting!
For my Will Use Have Pattern yarns, I’ll make use of another nice basket. These “next up!” projects also need to be visible and easy to access so they don’t become forgotten in the middle of the business of life.
Basket of Will Use Have Pattern yarn!
My Will Use No Pattern Yet yarn will live in three large plastic tubs. (I still need to purchase one more…) I’ll label them Boxes A, B, & C so that I can specify in my Yarn Stash Notebook where each individual yarn is located. This will make finding the yarn I want for a particular project so much faster and easier!
Will Use No Pattern Yet yarns waiting to be documented in my Yarn Stash Notebook!
The Wandering Bits and Pieces yarn can go into one of several large cardboard boxes I have saved. Since this is a growing yarn pile (it gets bigger every time I finish another project), it’ll need to be a nice big box. And since it’s made of cardboard, it’ll be easy to label with a sharpie!
I’ll put my Won’t Use yarn in a couple of totes or plastic bags so it’s easily portable. The bags of yarn to be given away at the Guild Yarn Swap will go with other Guild stuff, and the yarn to be given away to other friends & family will go by the door so that I don’t forget it!
Step 5: Shop Your Stash!
With my yarn stash tidy and organized I’ll be able to easily see what yarns I have and how much of each. This will save me a lot of time and money! All that remains is to remember to use my Yarn Stash Notebook to shop my stash first when I’m considering a new project or design!
Since quite a lot of yarns living in stashes are leftovers from previous projects, I took a look around and came up with a whole list of cute, and interesting patterns that are great for using up odd bits and pieces of leftover yarn! I can’t WAIT to try them and whittle down some of my stash! I hope these are helpful for you and your yarn stash as well!
…I especially enjoyed the unusual construction and shaping methods used…
The hat is knit in the round…
…sometimes circular needles are used,…
and sometimes double-points.
The intarsia and shaping are accomplished using short rows…
…even for the ears!
After shaping the ears…
…you connect the top/back of the hat to the front/face of the fox hat…
…using a three needle bind off and keeping a number of live stitches in the center…
…to knit the nose! A very unique and very fun knit!
I had gotten some really cute animal eyes to use, but discovered that the stem of the eyes would poke through the hat too far and be uncomfortable when worn…
So I used buttons from my button stash instead!
A personalized label is the finishing touch…
I sewed the label on the outside of the hat so as to avoid any possibility of discomfort due to its presence.
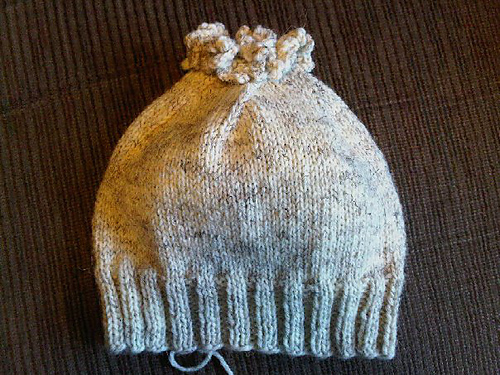
Vera’s parents (my brother, Joel, and sister-in-law, Annalies), loved it!
But due to a sudden and unanticipated (by me) growth spurt, this little Foxy Hat turned out too small for sweet little Vera! 😢 (Or maybe my gauge was off? It’s possible…)
So I’ll be giving this Foxy Hat to my one month old niece, Claire; and knitting a larger Foxy for Vera! (When your aunt is a knitter, sizing issues are generally fixable in one way or another!)
Note to self: Always size up more than you think you need to when knitting for children! 😊
What was your favorite knit of 2016? Have you knit a Foxy or a Wolfie hat? What did you think of the process? Do you knit for children? How do you handle the possibility of sudden growth spurts? Feel free to share with us in the Comments, we’d love to hear from you!!
I don’t know about you all, but I find that during the Christmas Season, knitting time comes at a high premium, making efficiency even more important.
All of my dear friends and family know that if I could, I would knit something fabulous, exciting, and huge for each and every one of them for Christmas!
But alas, in this imperfect world, reality sets in and I discover (and re-discover) that this is not likely to be possible for me…
So in the spirit of both efficient and reasonable Christmas knitting, I’d like to share with you all some lovely knitting & crochet patterns I’ve spotted recently that are quick, relatively easy, and make great gifts!
The Pony Tail Hat – a delightful and practical current trend …
The Messy Mom Bun Beanie, by Ashlea Konecny, is very popular, very cute, and super easy to crochet! All you need is a size H (5mm) hook, some worsted weight yarn, and few hours!
This Frilly Ponytail Hat, by Cheryl Mercer is a slightly different variation on the same theme. It’s knitted, and it has a cute little frill around the edges of the ponytail hole! It’s knit in Lion Brand’s Wool Ease; a worsted weight yarn, so it would knit up quickly.
The By My Side Ribbed Ponytail Hat, by Michelle Moore is an absolutely adorable crocheted cap version with a cute brim and the perfect spot for a gorgeous statement button or pin. SO chic! You can just see the ponytail hole near the bottom edge in the back view pic…
Here are a couple of really unique options! The Cardiff Bay Ponytail Hat, by Beth Ann Beck has a enchanting touch of simple lace and cable. Knit up in a bulky weight yarn, it would be a quick knit with lots of interest, and would make an exciting gift!
Child’s Ponytail Hat
Child’s Ponytail Hat
Child’s Ponytail Hat
The Child’s Ponytail Hat, by Gail Tanquary, is a riot of color and texture! It would knit up very quickly in aran weight yarn. Plus, the pattern is a free download on Ravelry! The bonnet type styling, the highly textured accent yarn, and the use of the yarn ends as fringe are all so creative!
The Headband/Ear Warmer – perfect for keeping ears warm while rocking fabulous hair! A few that caught my eye…
The Headband with Cable, by Elaine Phillips is a lovely and practical version of this handy accessory; AND it’s a free pattern on Ravelry. I especially love the way that it’s knit wider than normal so that it’s double-layered for extra warmth!
And the Nordic Viking Headband, by Randi Hjelm Debes, is knit in a bulky weight yarn. The pattern comes in several different sizes for both children and adults and incorporates a fascinating herringbone stitch pattern.
The Fingerless/Half Finger Mitt – a classic necessity…
These Fast & Easy Fingerless Mitts by Lisa M. Beamer make a perfect gift knit! Available as a free Ravelry download, you can choose between the knit flat version or the circular version. They’re perfect for using up odd bits of yarn leftover from other projects since they only need about 50 grams in worsted weight yarn.
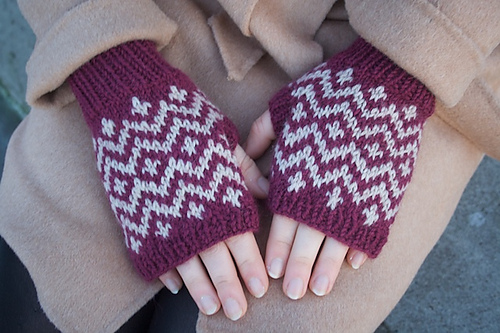
The Muckle Mitts, by Mary Jane Mucklestone are so charming! The perfect knit for one who loves color work and/or fair isle knitting, they’d make a wonderful gift for a loved one!
And for someone who wants a bit more of a challenge, the Urban Necessity Gloves, by Colleen Michele Meagher. Knit in worsted weight yarn, these sweet little mitts are half-finger gloves with a button down flip-top! I know many who would absolutely love to have a pair!
What about you? Are you knitting gifts for loved ones this Christmas? Do you have a favorite go-to item or pattern that you turn to for gift knitting? Feel free to share in the comments!
Wishing each and every one of you peace and joy and wellbeing in this Blessed Season, and throughout the New Year!
First of all, I want to wish each of you a very Happy I LOVE YARN DAY!!
I’m going to celebrate by spending the whole afternoon – the ENTIRE afternoon, folks! – knitting and organizing my yarn stash! Are you doing something fun today?
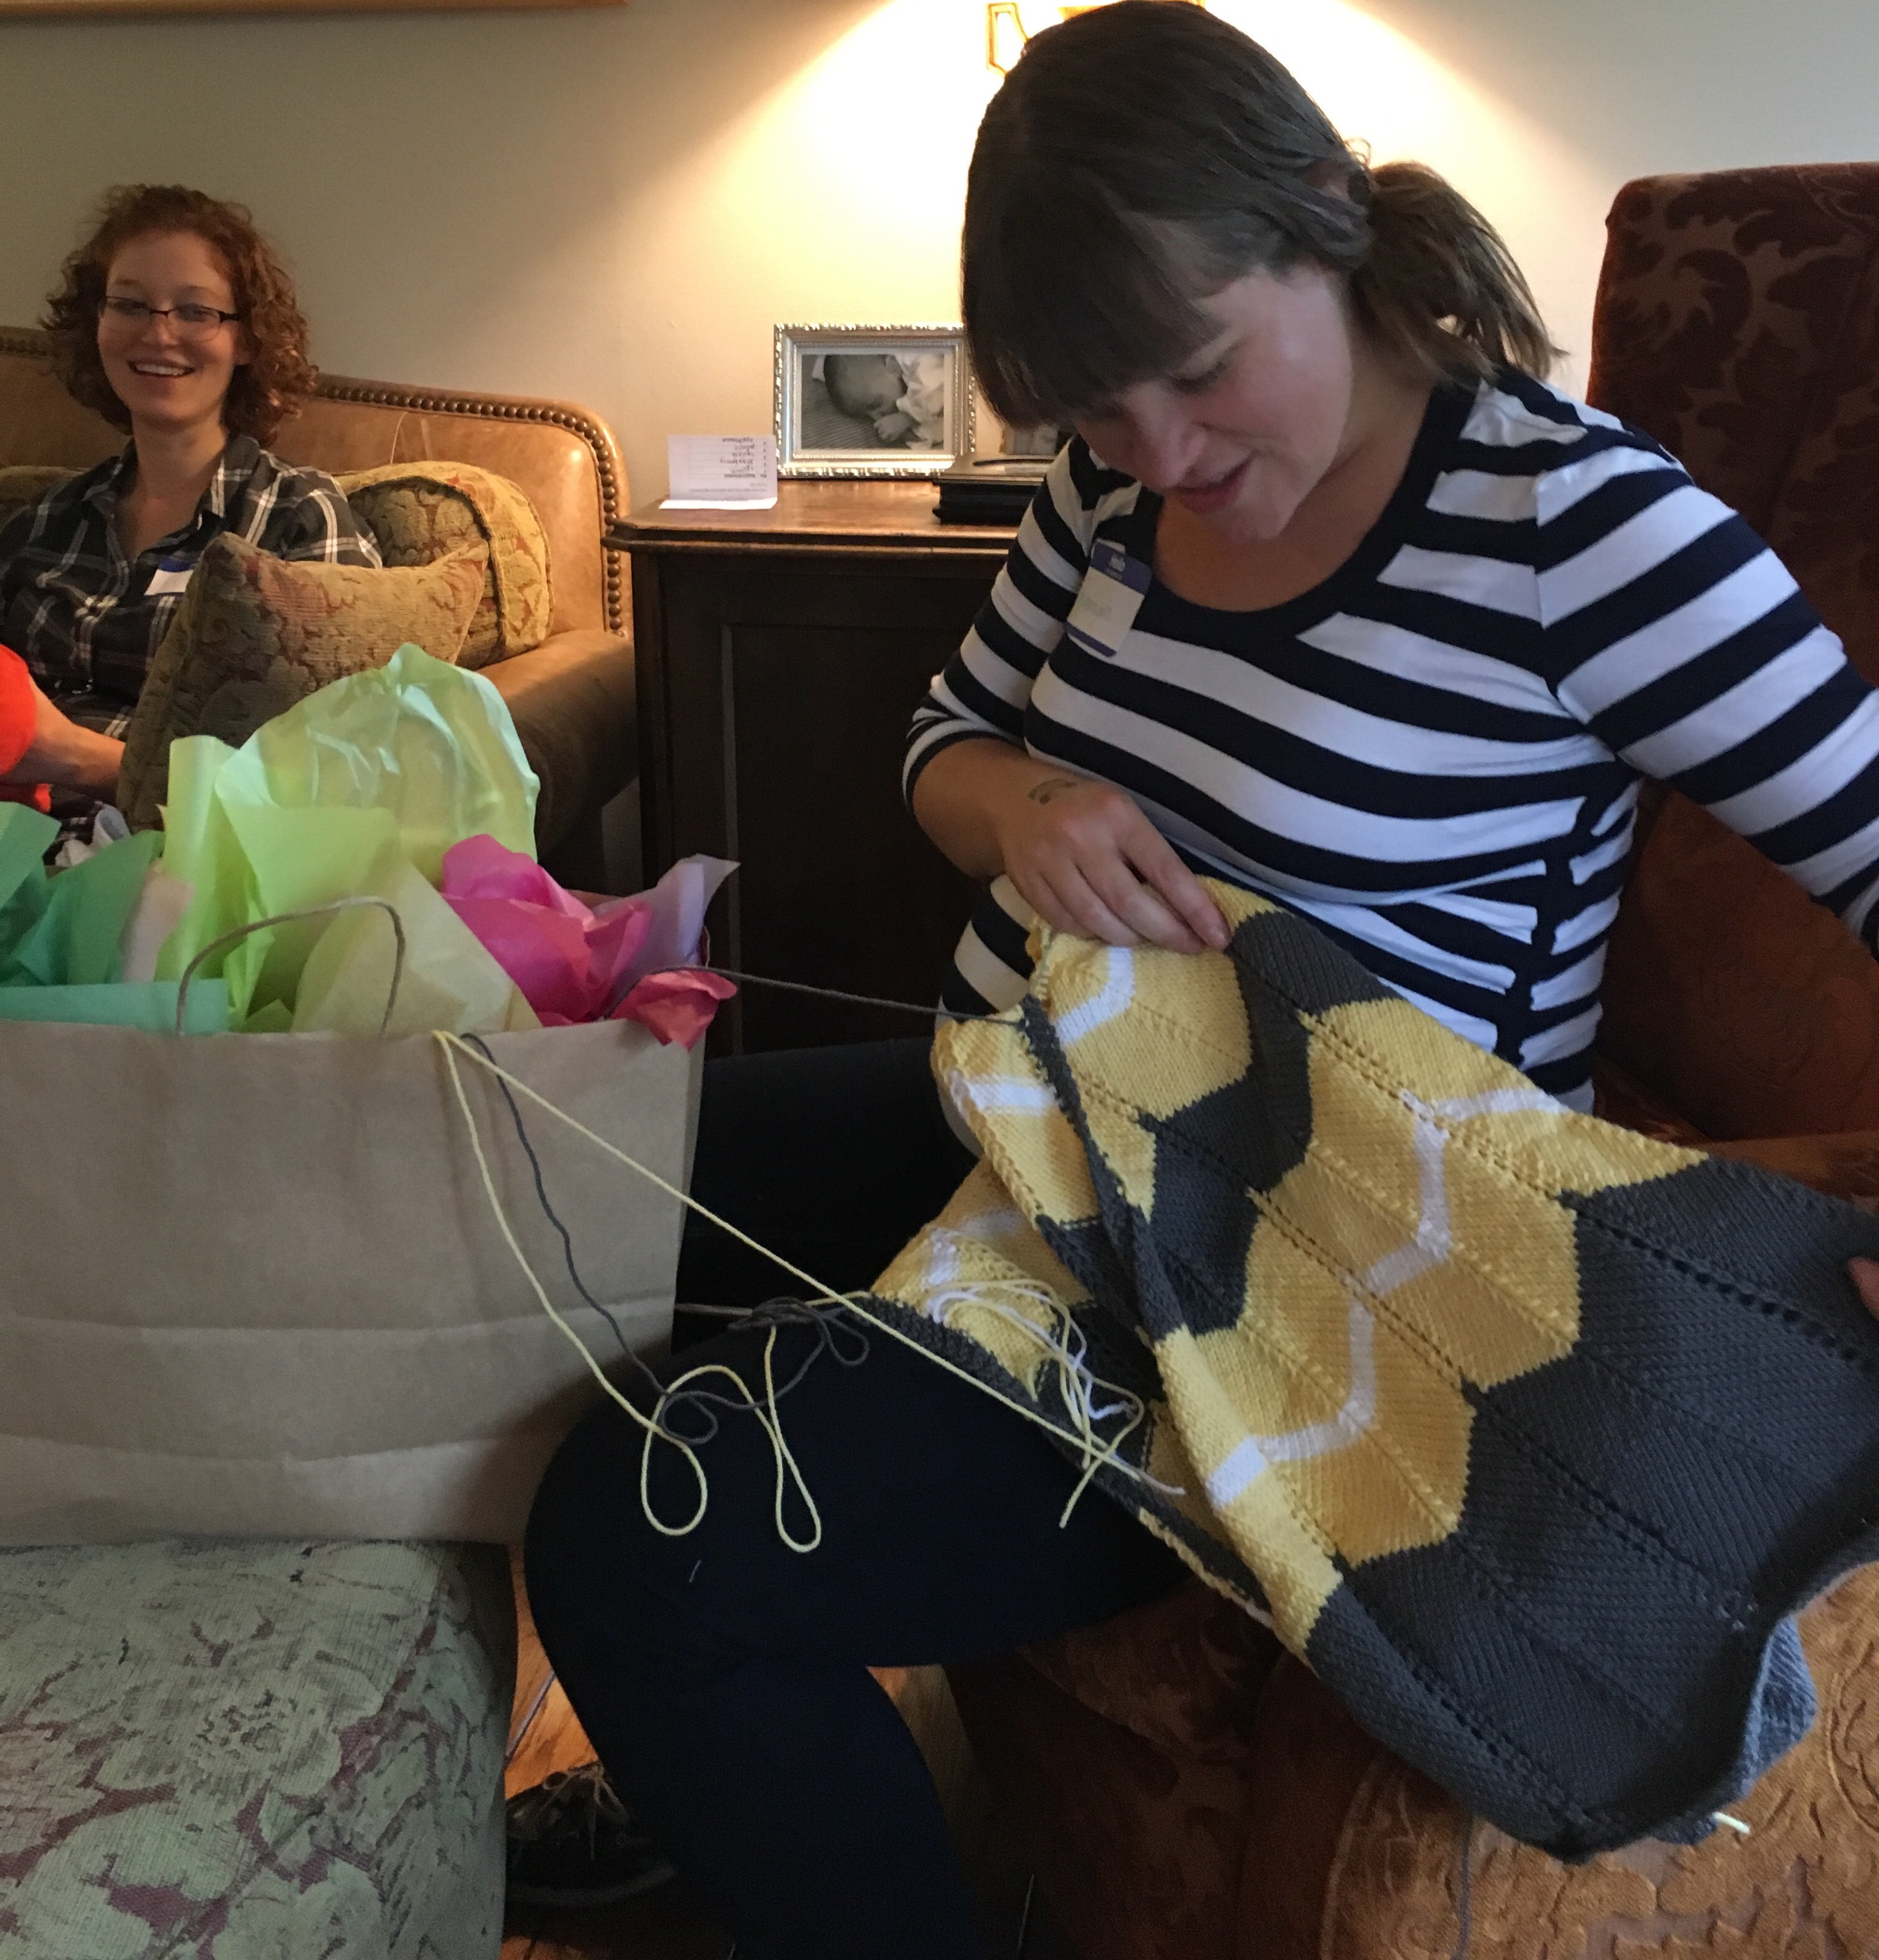
So, what am I knitting? I’m working on this Striped Chevron Baby Blanket (by Jess DoomCrafter) for my little niece-on-the-way…
It’s had to stay on the down-low for the last while because it was a surprise!
Though it’s definitely been growing steadily, it wasn’t quite finished in time for sister Hannah’s second baby shower last weekend…
I really wanted to have it all finished and ready in time, but life happened and it just didn’t work out that way.
So I wrapped it up, multiple balls of yarn, needles, and all, in a cute gift bag, and gave it to her “almost finished” as it was.
She loved it! And she didn’t mind at all that it wasn’t quite finished or that I had to take it back temporarily in order to finish it. (Sister Hannah is a fabulous human being who deserves lovely warm hand knits forever!)
I’m really close to finishing the blanket now – I just have a couple more rows of yellow before I can start the final long gray section; and then the garter stitch border! It’ll be finished in time to help keep Little Niece warm when she arrives! And that makes me really happy!
Have you ever had to give someone their hand knit gift before it was quite finished? How did it go? How did you feel about it?
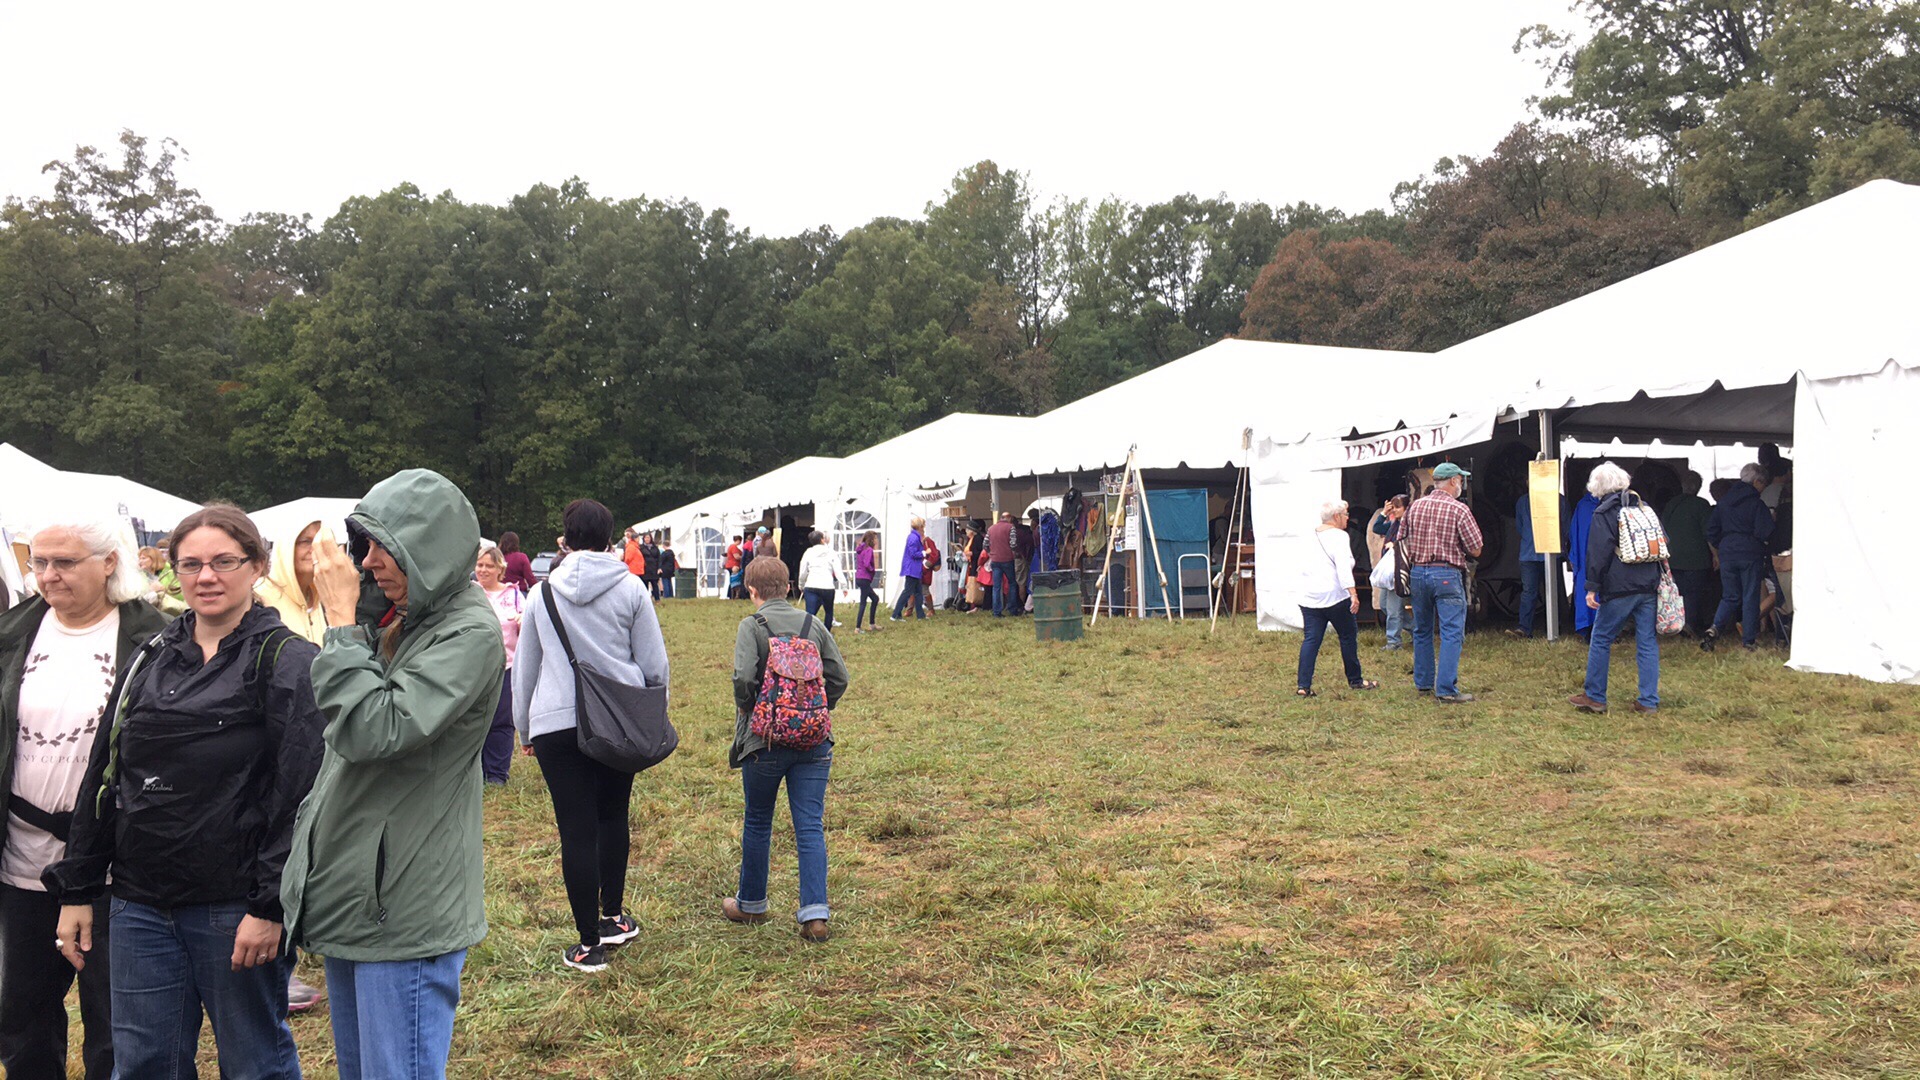
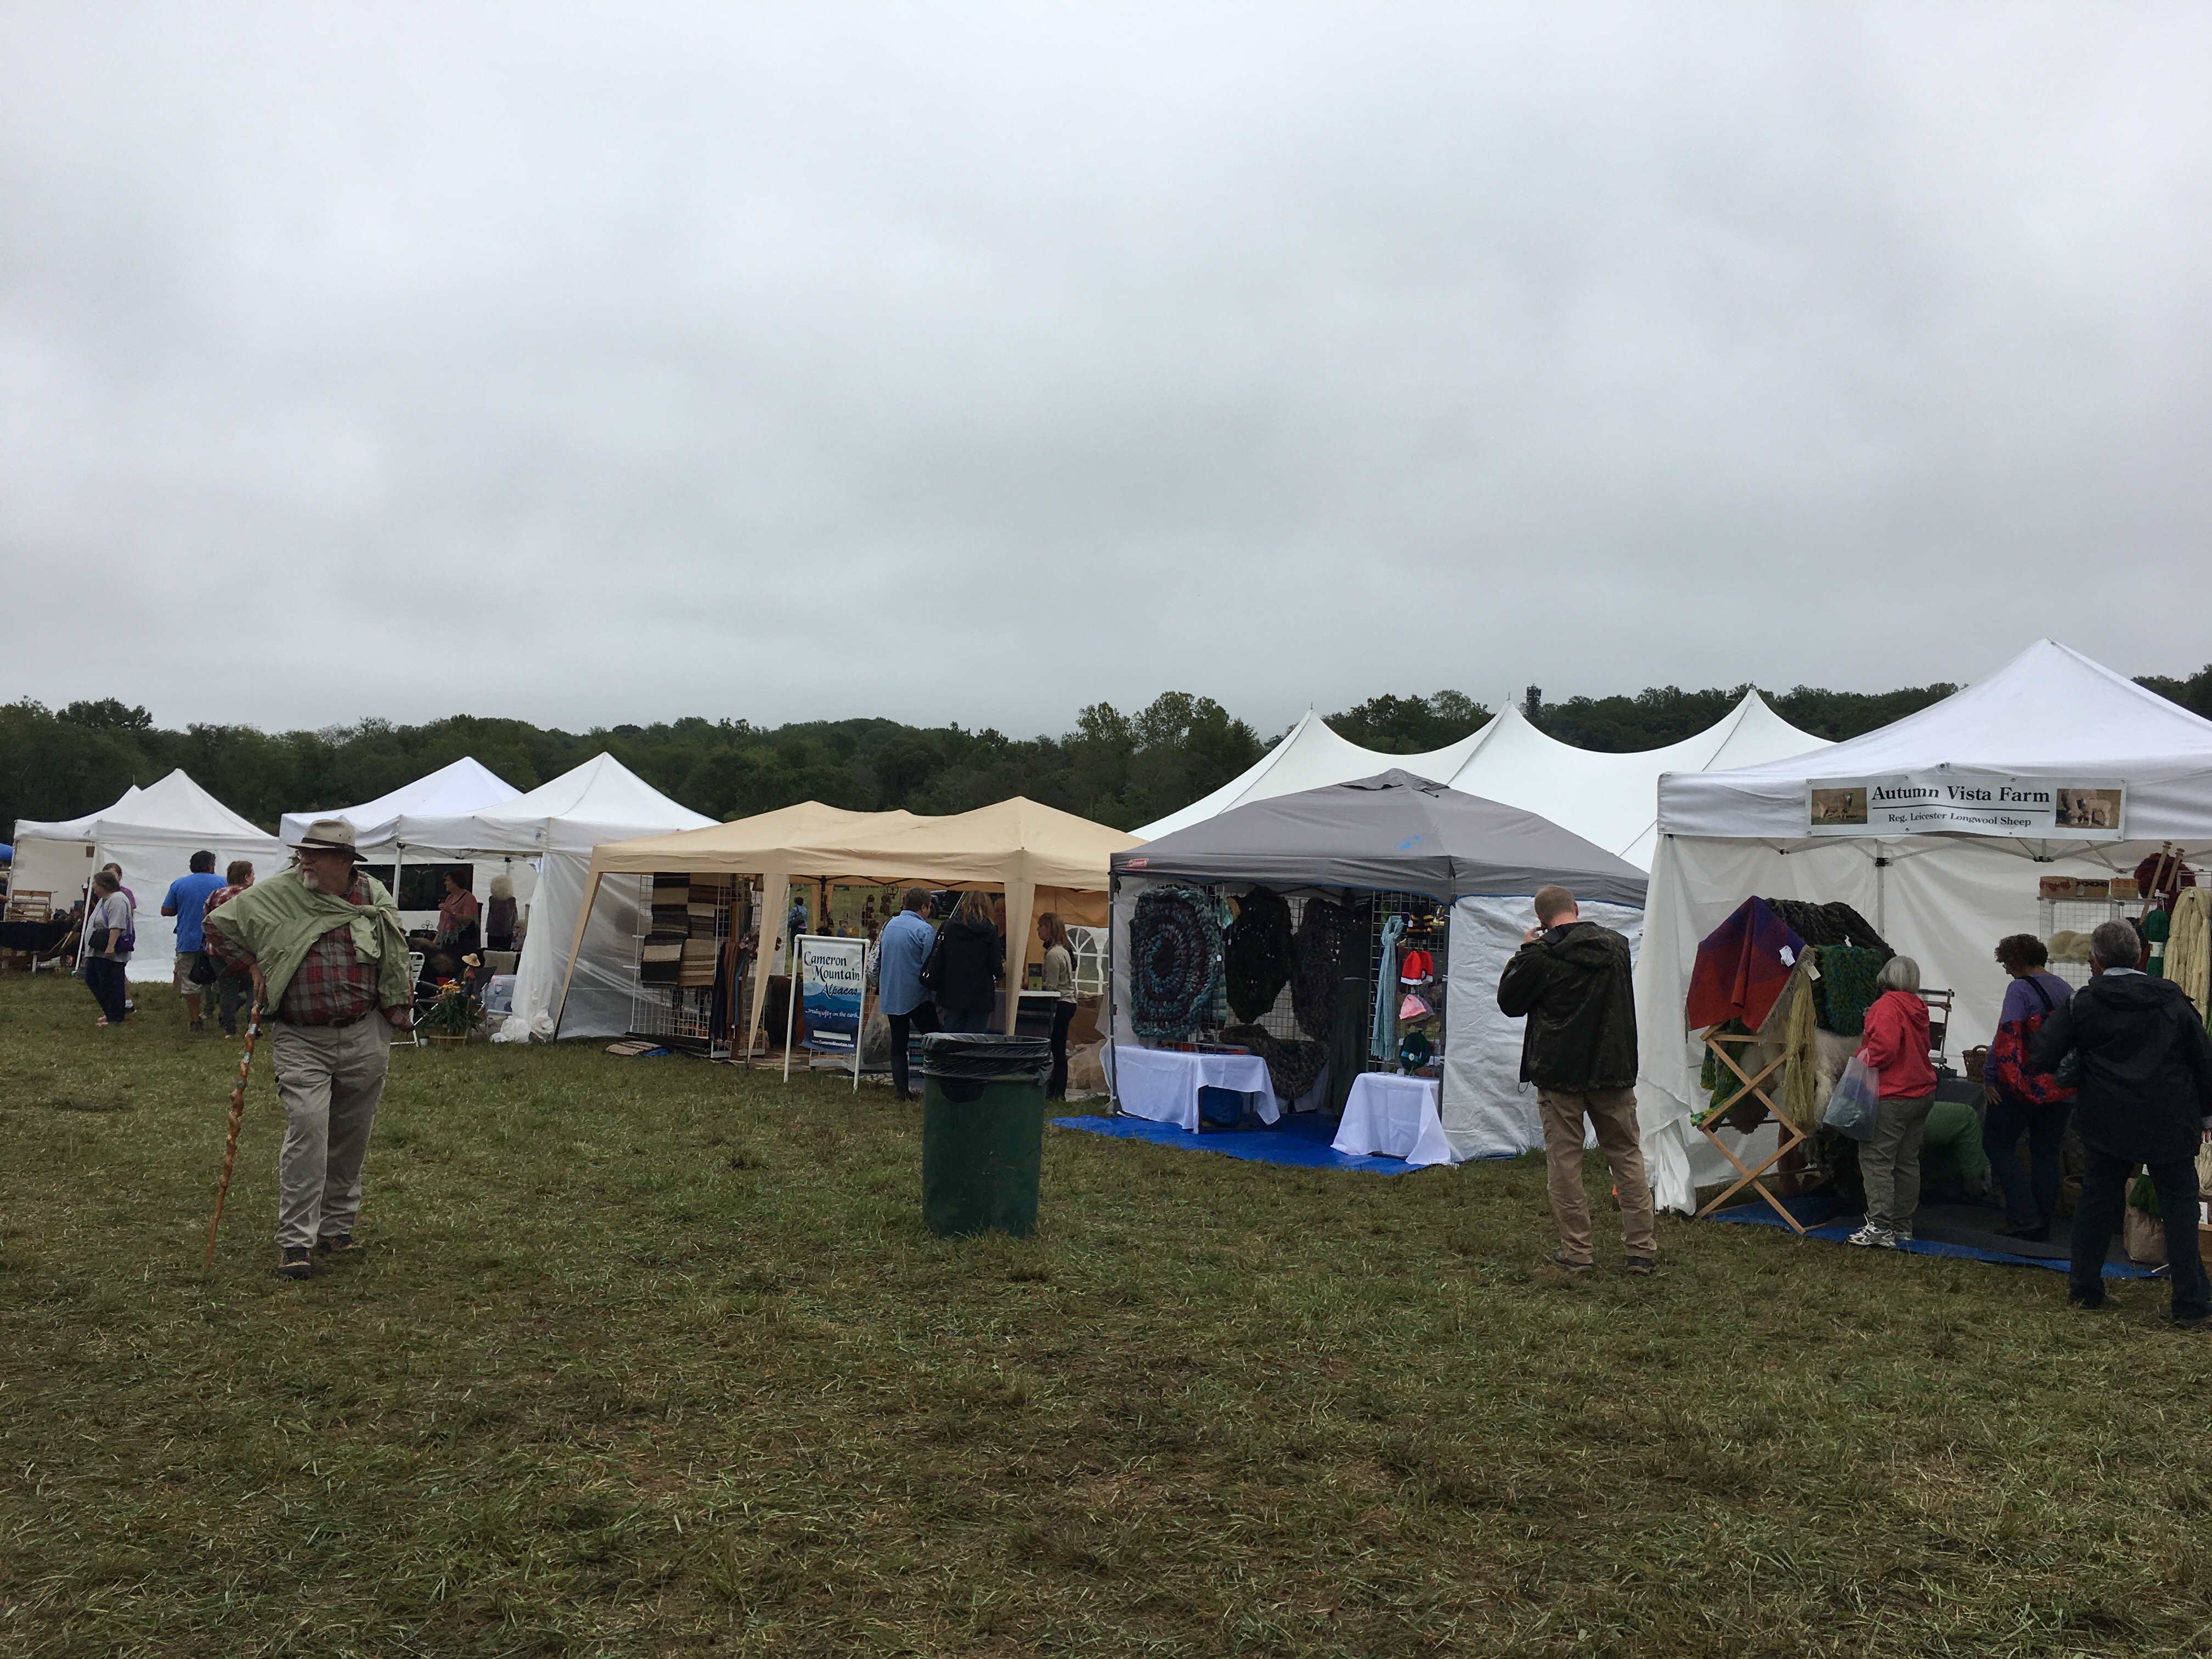
As you can probably tell, it was windy, cold, and damp…
… for most of the morning, the wind blew a chilly falling mist around and around. It was rather impossible to stay dry and we were so glad we’d brought our rain coats!
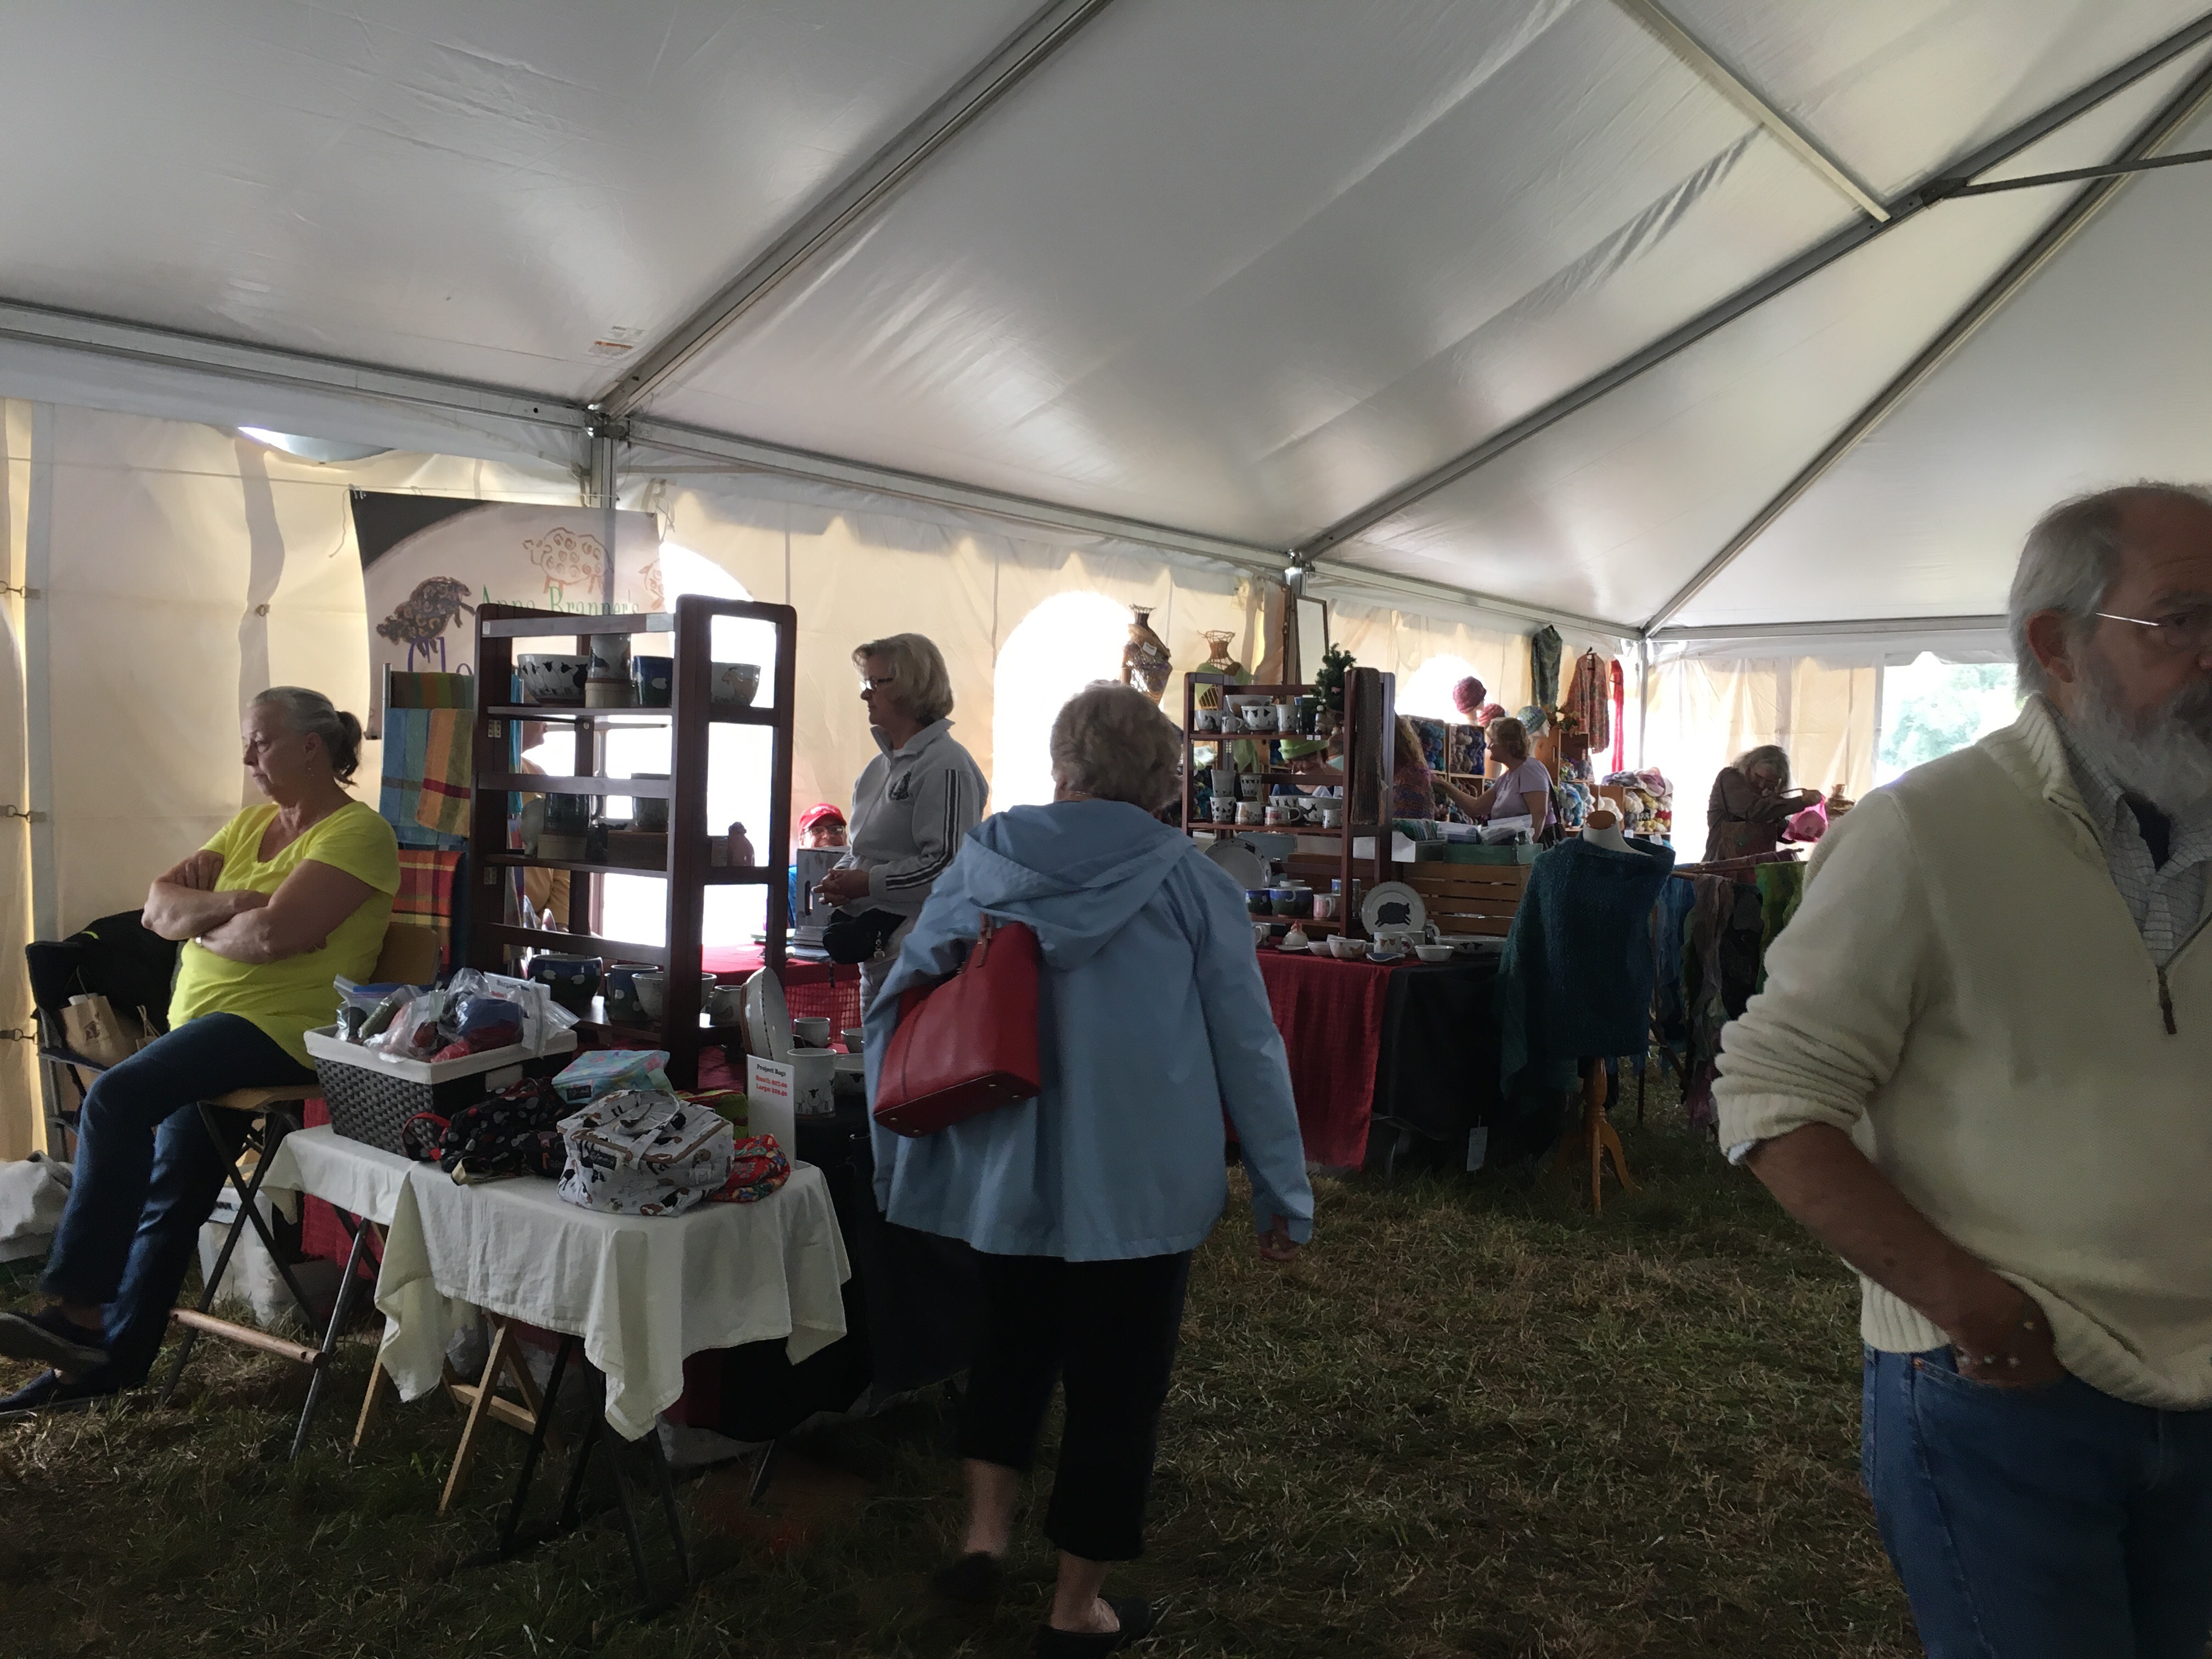
Even with the chill, wind, and wet, we had a marvelous time walking around,…
…chatting with friendly vendors,…
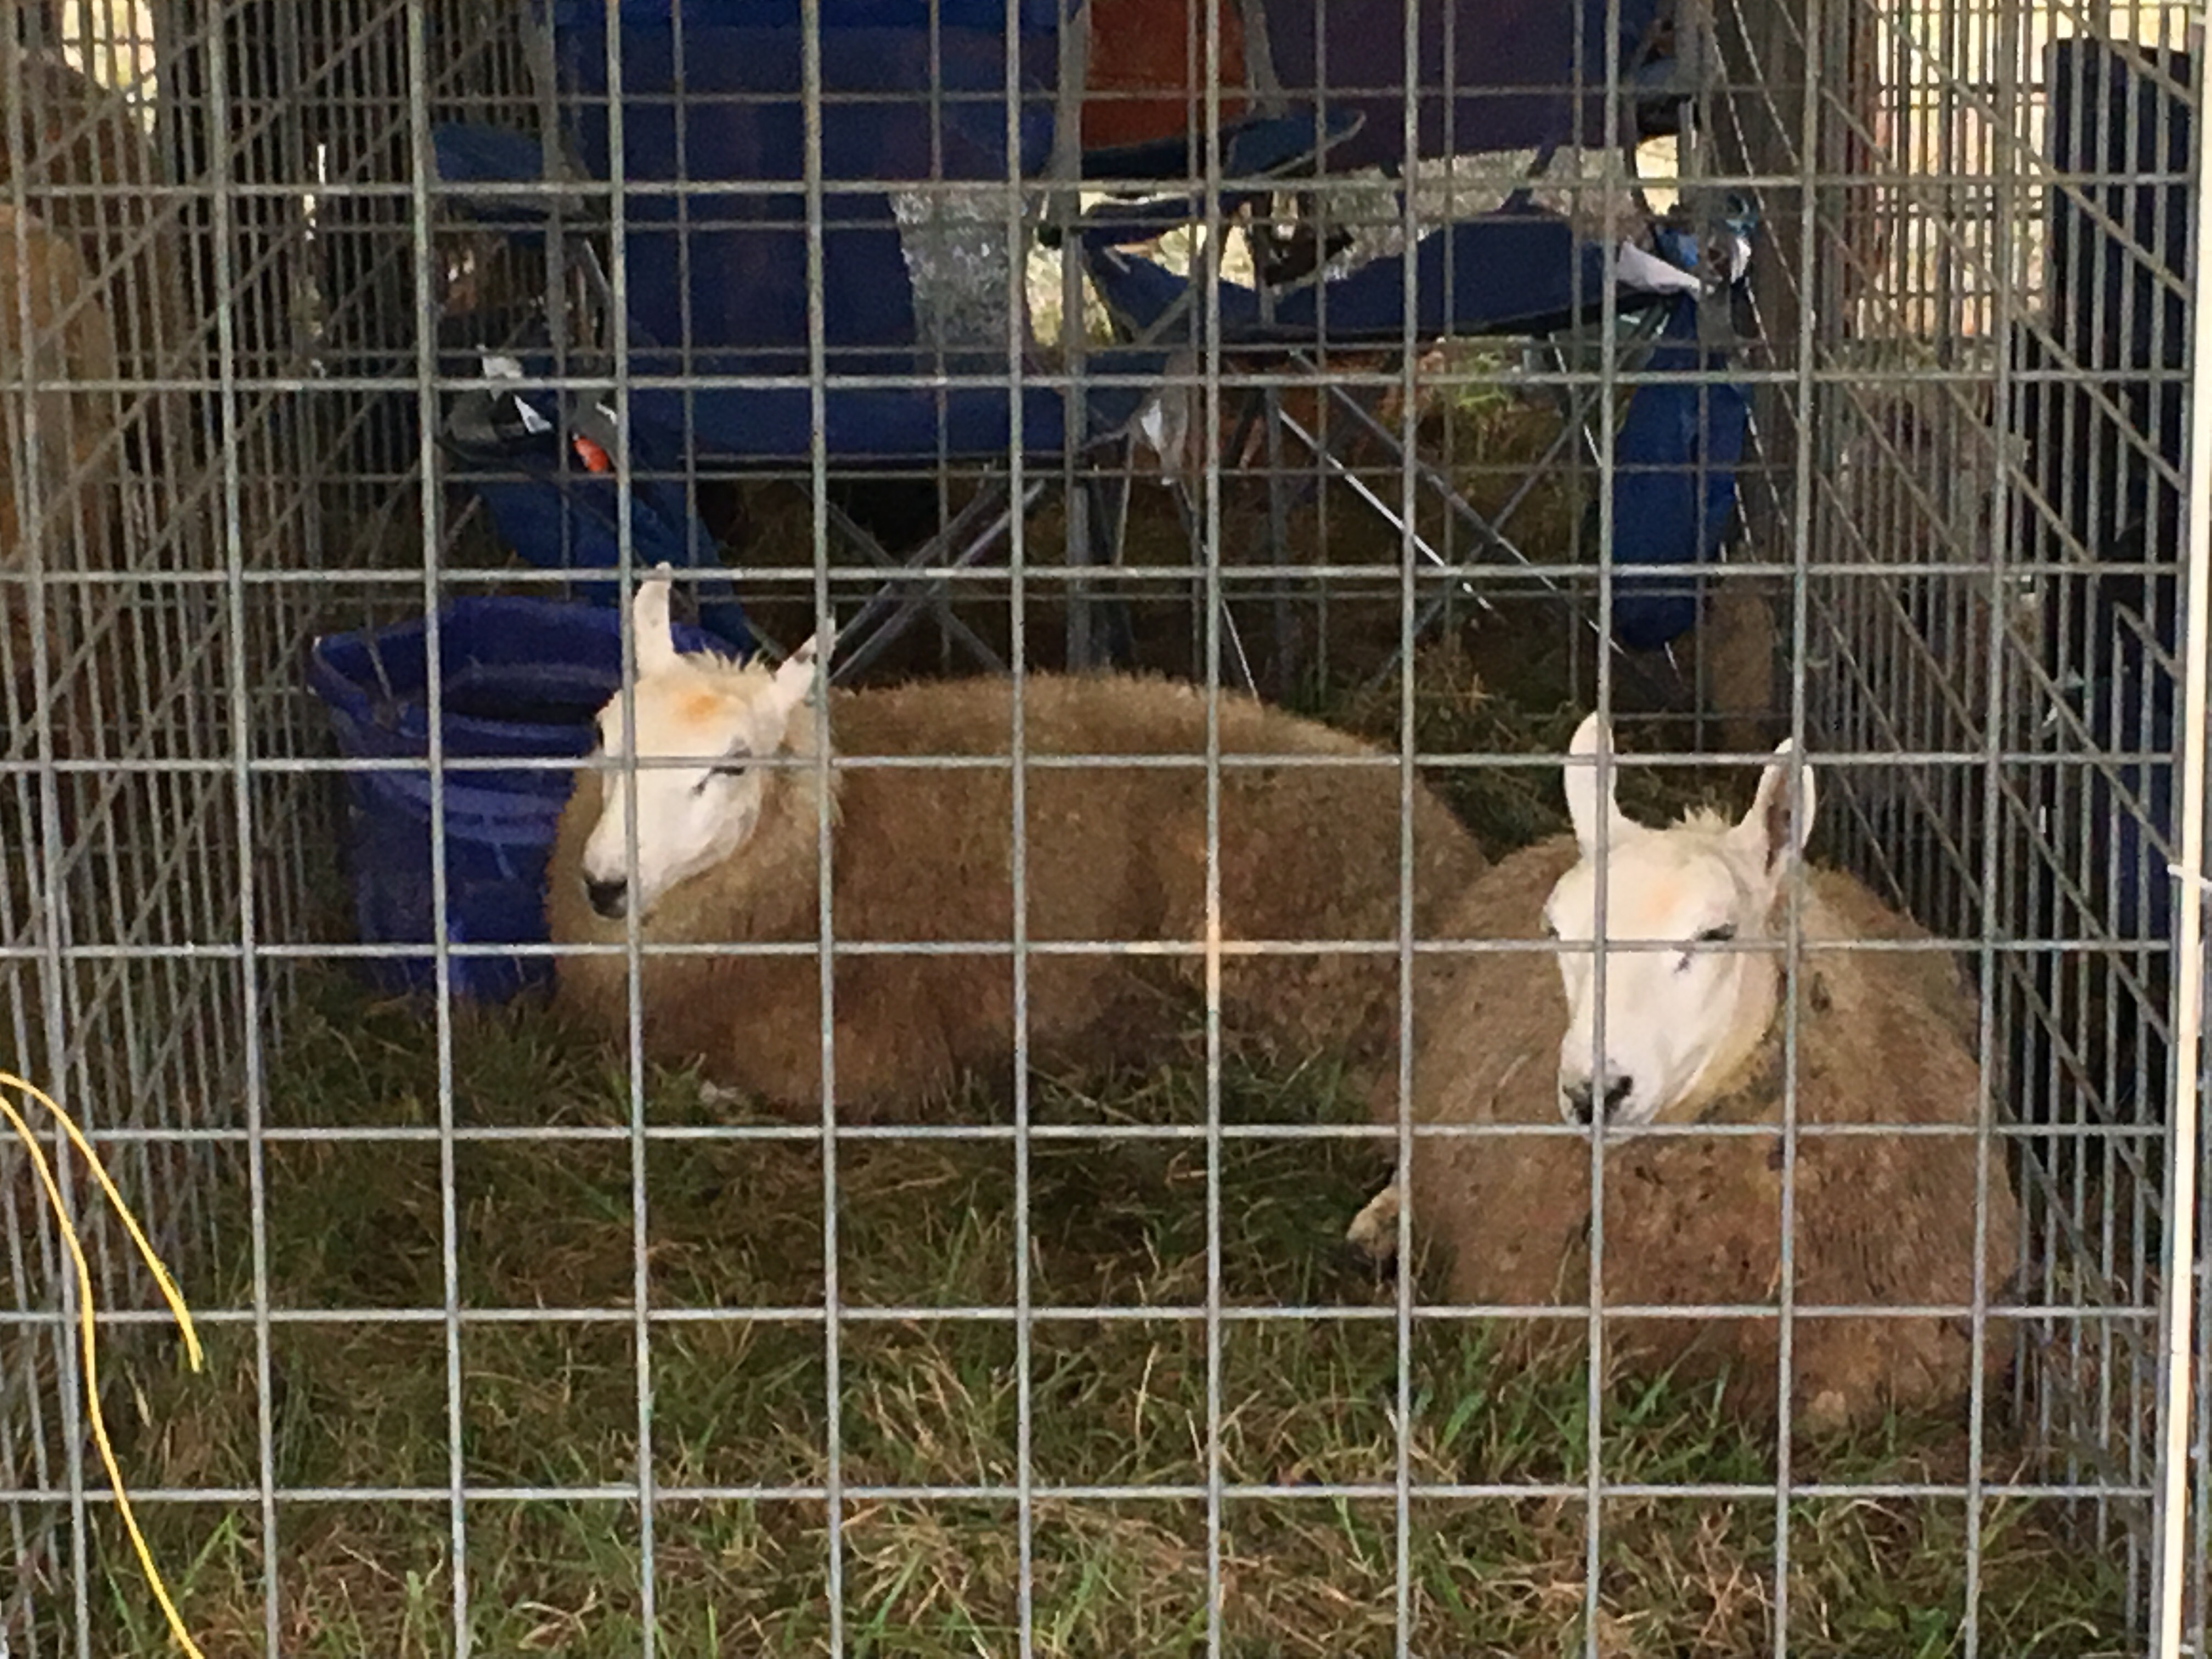
…admiring handsome animals, …
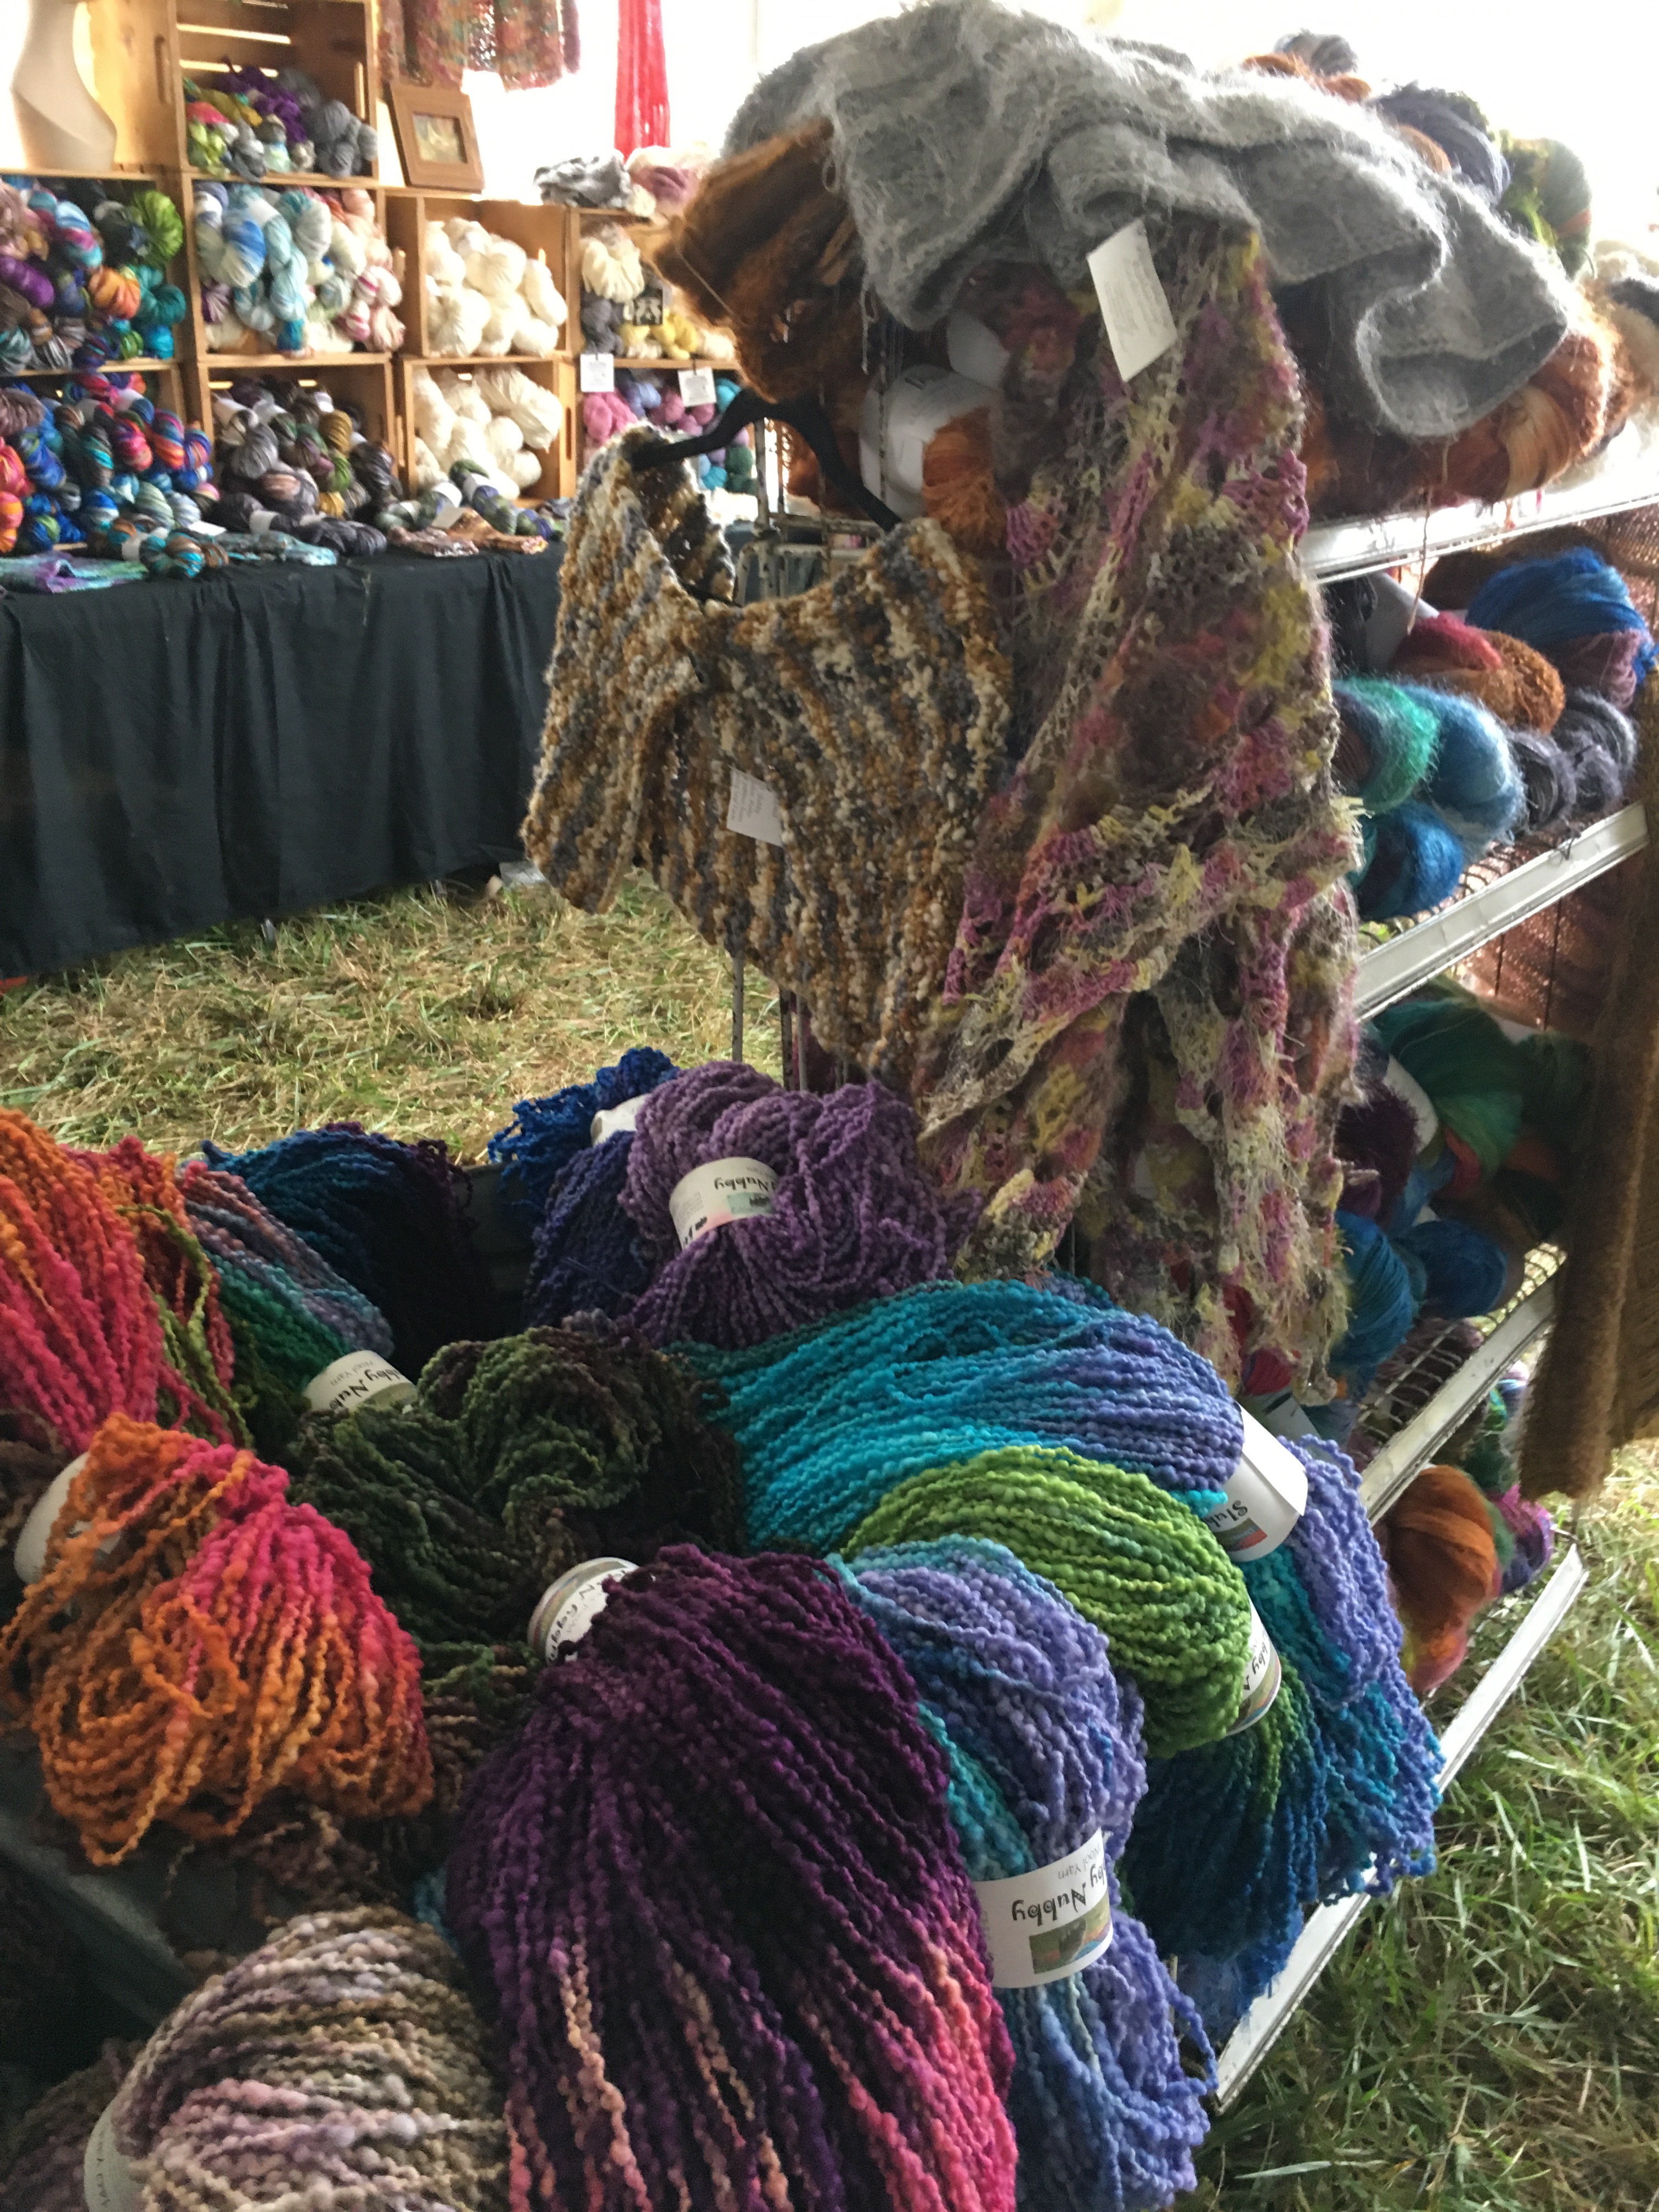
… gazing at gorgeous yarns…
…and samples,…
… and examining knitting, crocheting, spinning, weaving, rug hooking, and dying tools and equipment of every sort imaginable!
Phyllis was in need of a yarn swift and ball winder, so we kept an eye out and we found the most gorgeous yarn swifts at the Knitting Notions booth!
These swifts are made out of beautiful wood – you can choose between oak, cherry, and walnut. The craftsmanship is superb as they consist of four carefully shaped pieces that fit together with wooden pegs holding them in place.
The other neat thing about these yarn swifts is that instead of clamping onto the edge of a table, these sit serenely on the table top! (I ended up getting one too)!
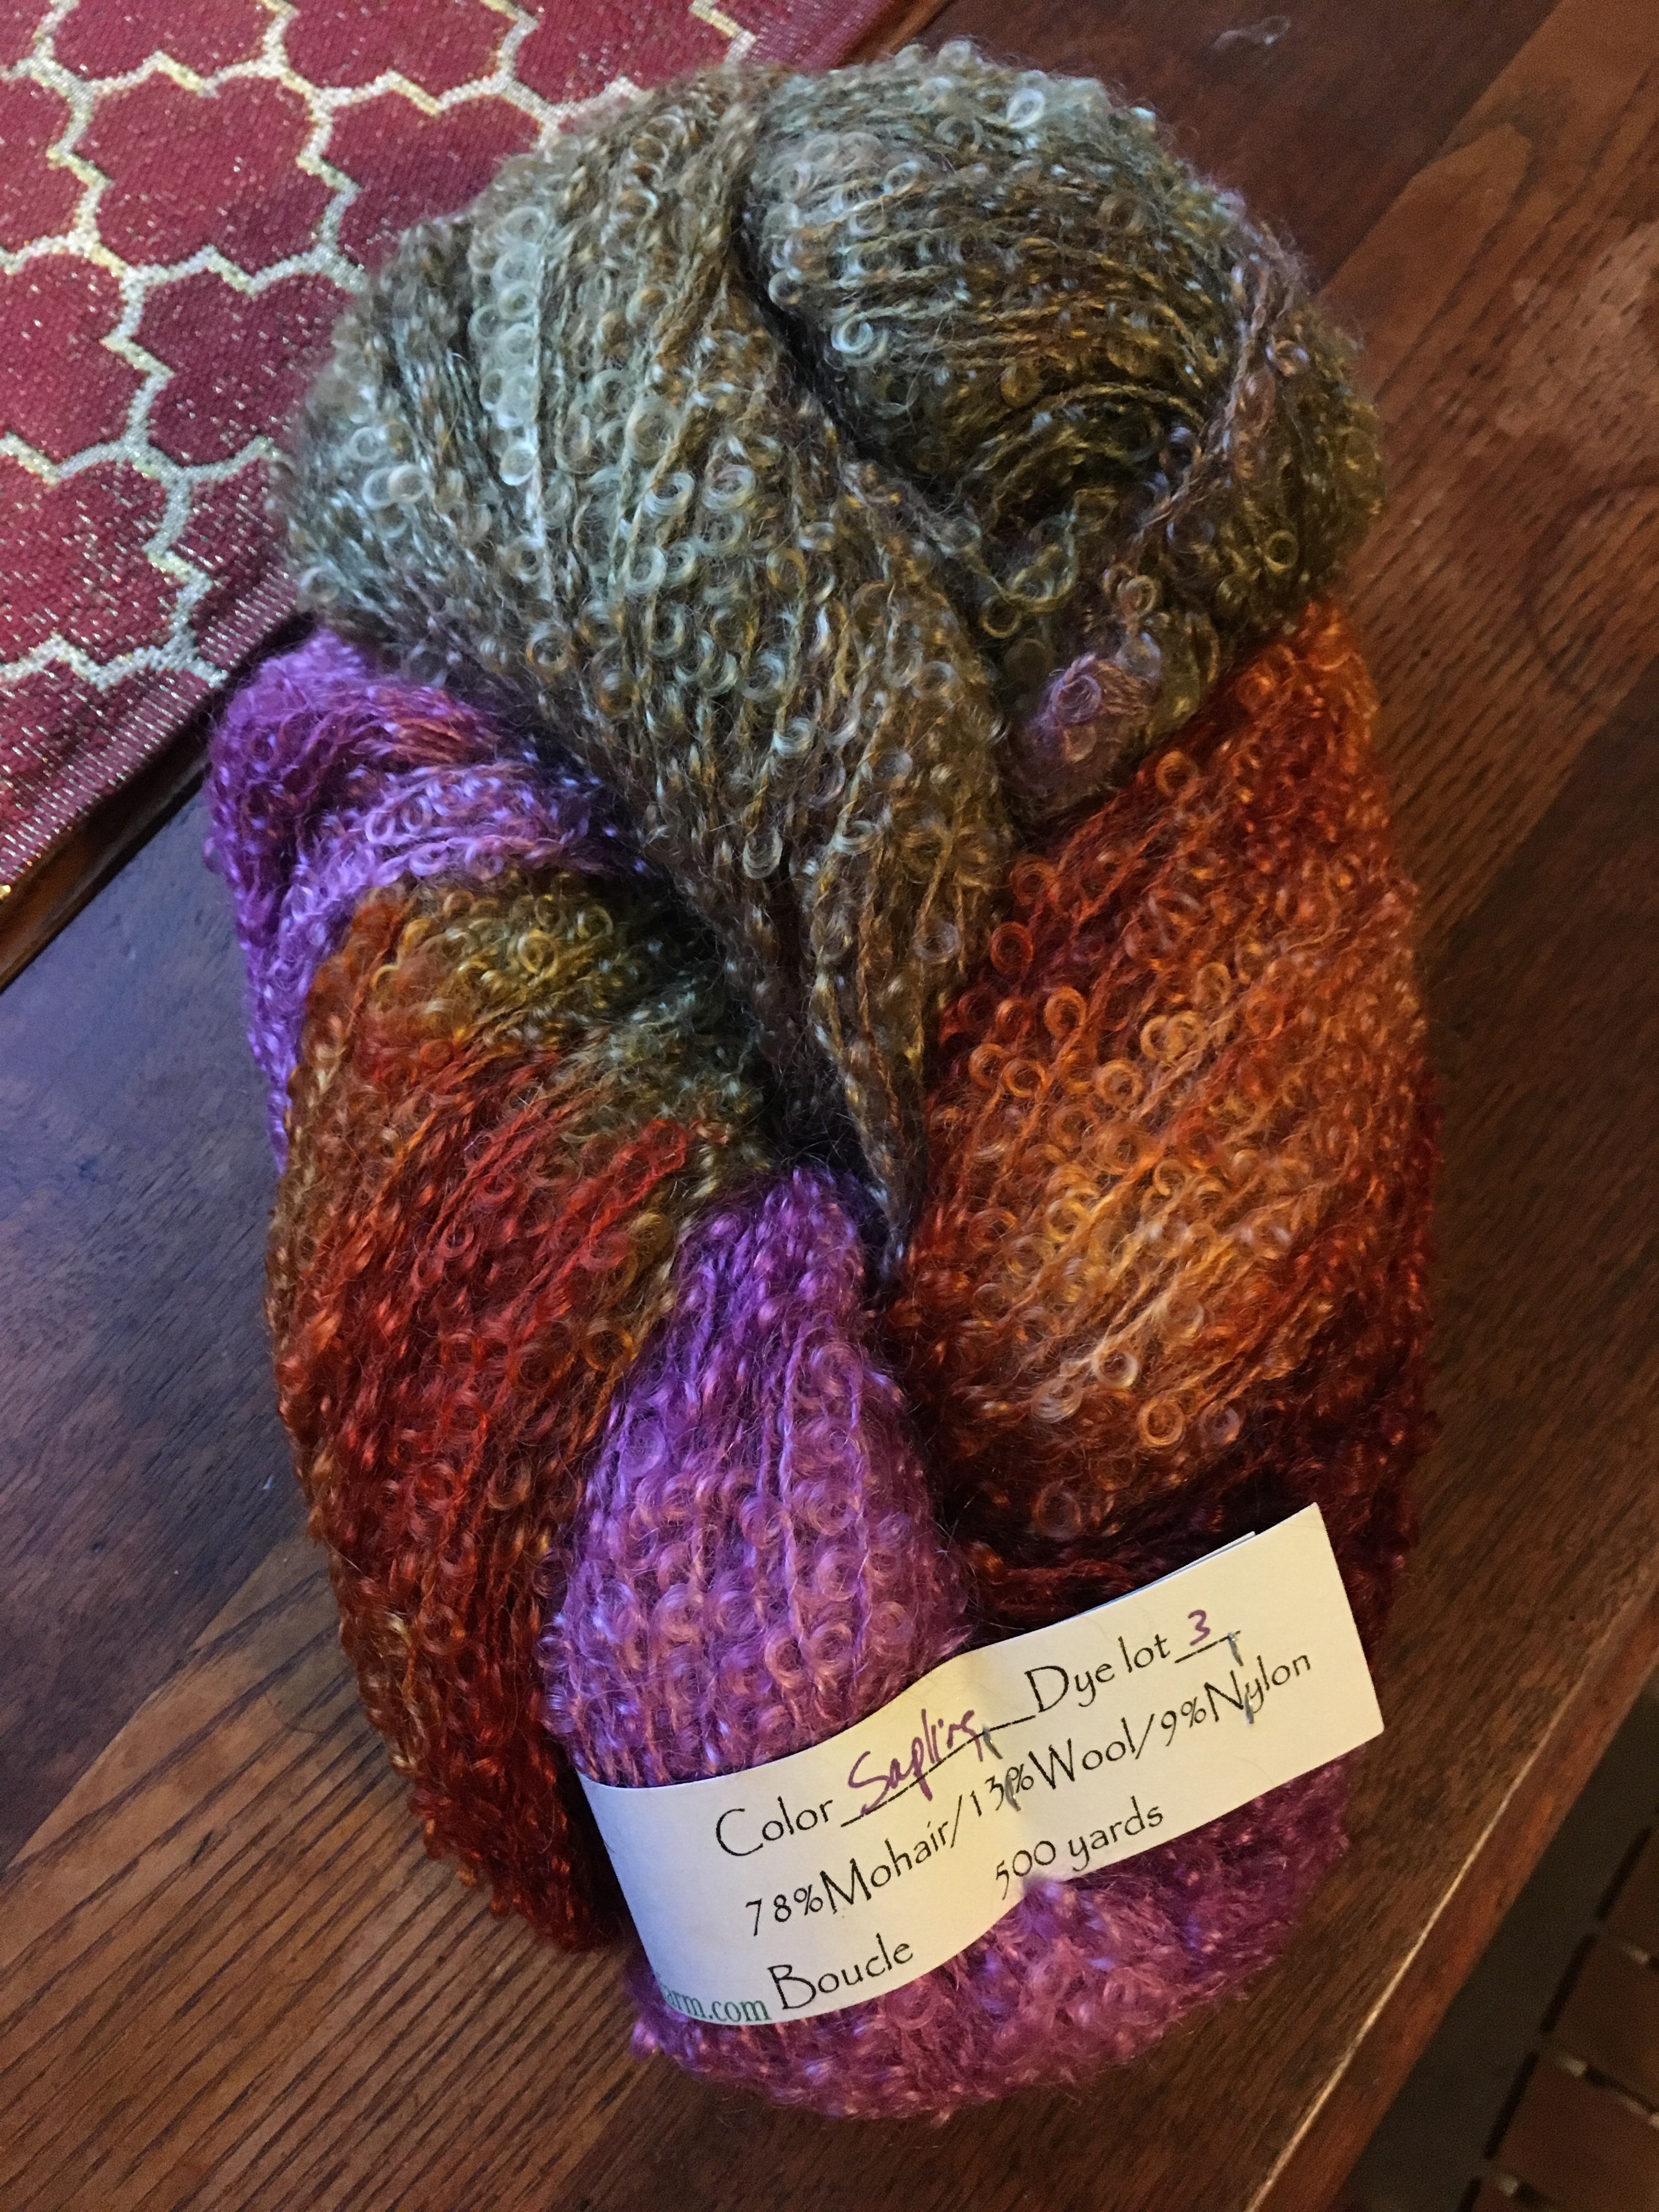
I couldn’t resist this lovely skein of mohair/wool/nylon boucle in the Dancing Leaf Farms booth… The texture and colors (the color way is called “Sapling”) just calls to me!
I also purchased this lovely skein of Beezigns B’Luxor, in alpaca, silk, and linen. It’s a wonderfully soft, yet hardy 3-ply hand painted in rich blues, purples, and greens.
Now I just need to find time alongside work, house chores, and all the baby and Christmas knitting (yes, I’m working away at a bunch of Christmas gifts that I hope to finish on time!) I’ve got going on, to work on two more knitting projects!! Piece of cake, right?! 🍁😉🍂
It’s become a favorite little tradition now between Phyllis and I that we shop for each other’s Christmas gifts together each year at the Fall Fiber Festival! It’s always worked out super good for us – we have lots of fun, we neither of us have to deal with any stress or pressure about finding the “perfect” gift, and last but not least, we get to enjoy giving a gift that we know the other really wants/needs! (And of course, let’s not forget that we get to enjoy a gift that we really wanted and can/will use!!
What about you? Been to any great Fiber Festivals recently? Got any clever little Holiday traditions you’d like to share? Do you gift handknits to your loved ones? If so, how’s your Christmas knitting coming along? Feel free to share in the comments, we’d love to hear all about it!
I have a fabulous resource and learning experience that I’m really excited to share with you today…!
Recently, I completed a great class on technical editing for knitting patterns. This course is designed and taught by Joeli, of Joeli Creates! Today, Joeli posted on her blog about her interview with me on what it’s like to take her Learn to Tech Edit course. If you are someone who is interested in tech editing and/or in becoming a tech editor, go ahead and get yourself a glimpse of what it was like taking the course by checking out the interview on Joeli’s blog!
If you are a designer in need of tech editing services, I am now accepting clients and welcoming new designers! I would love to work with you! Check out my Technical Editing Services page for details, and please contact me if you have a question or would like more information. You can reach me through my Contact Form, on Facebook, Twitter, or Instagram.


 Recently, I completed a great class on technical editing for knitting patterns. This course is designed and taught by Joeli, of